Attaching the WR‑R11a/WR‑R11b (Transceiver)
To use the WR‑R11a/WR‑R11b, attach it to a compatible camera.
-
Be sure the camera is off before proceeding.
-
For information on cameras that can be used with the WR‑R11a/WR‑R11b, see “Specifications” under “supported cameras” (Specifications).
Attaching the WR‑R11a
Connect the WR‑R11a to the camera’s 10‑pin remote terminal (q) as shown by the mounting marks on the WR‑R11a (d) and camera (b) and tighten the WR‑R11a locking screw (w).
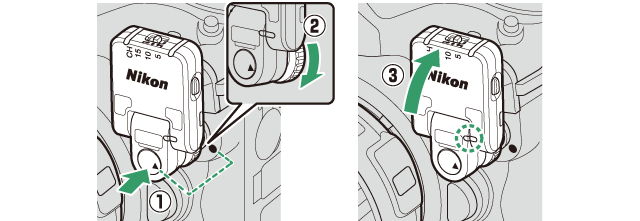
After attaching the controller, angle it so that the mounting marks align as shown (e). Failure to observe this precaution could cause damage or product malfunction.
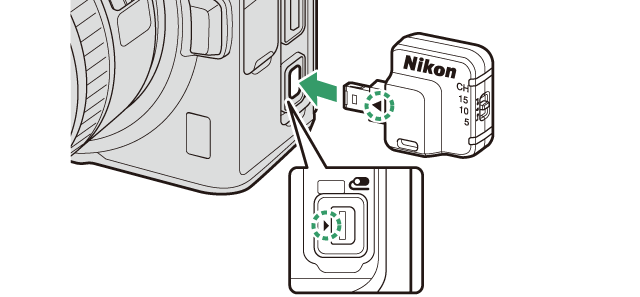
Attaching the WR‑R11b
Connect the WR‑R11b to the camera’s accessory terminal as shown by the mounting marks on the WR‑R11b (d) and camera (c).
-
When attaching the WR‑R11a/WR‑R11b, be sure the connectors match and are in the correct orientation; do not use force or insert the connectors at an angle. Inserting the connectors in the wrong orientation could damage the product.
-
To prevent unintended camera operation, be sure the WR‑R11a/WR‑R11b is properly connected.
-
The WR‑R11a/WR‑R11b cannot be used with certain accessories. Forcibly attempting to use the controller together with an incompatible accessory could result in damage to, or malfunction of, the accessory or camera.
-
With some film cameras, it may be necessary to rotate the WR‑R11a to align the mounting marks.
-
The WR‑R11a/WR‑R11b can be removed from the camera by performing the steps to attach it in reverse order.
-
Remove the WR‑R11a/WR‑R11b from the camera when it is not in use. Leaving it in place while transporting the camera either in a bag or suspended from a strap could result in damage to the camera or controller in the event that they are subject to excessive force or vibration.