Applications for the WR‑R11a/WR‑R11b and WR‑T10
The WR‑T10 can be used to simultaneously release the shutters on all cameras to which WR‑R11a/WR‑R11b controllers have been attached.
Simultaneous Release with the WR‑T10
A single WR‑T10 can be paired with multiple WR‑R11a/WR‑R11b controllers and used to
simultaneously release the shutters on multiple cameras with one press of the WR‑T10’s
shutter-release button.
-
Pair the WR‑T10 with each WR‑R11a/WR‑R11b controller.

-
Pair the WR‑T10 with each WR‑R11a/WR‑R11b controller. For more information, see “Using the WR‑R11a/WR‑R11b with the WR‑T10: The Basics” (Using the WR‑R11a/WR‑R11b with the WR‑T10: The Basics).
-
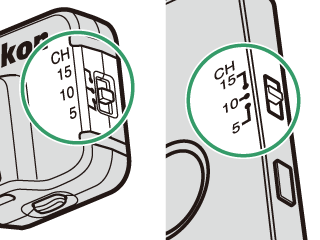
Set all WR‑R11a/WR‑R11b controllers to the same channel.
-
Here, all controllers are set to Channel 10.
-
Pairing is also available with WR‑R10 controllers. Simultaneous release with a mix of WR‑R11a/WR‑R11b and WR‑R10 controllers is also supported.
-
-
Take pictures.
Pressing the shutter-release button on the WR‑T10 releases the shutters on all cameras to which paired WR‑R11a/WR‑R11b controllers are attached.
Synchronized Release with the WR‑R11a/WR‑R11b
Wireless connections can be established between WR‑R11a/WR‑R11b controllers mounted
on multiple cameras. Releasing the shutter on any of the cameras to which the interconnected
WR‑R11a/WR‑R11b controllers is attached synchronously releases the shutters on the
remaining cameras. Wireless connections can be established between WR‑R11a/WR‑R11b
controllers via pairing or using a PIN.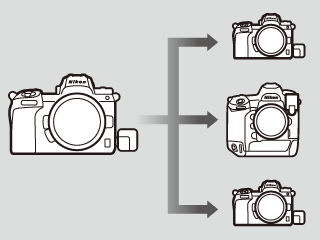
|
Method |
Description |
|---|---|
|
Pairing |
Simply press the pairing buttons on two controllers simultaneously to establish a connection (Pairing). No complicated settings are required. |
|
PIN |
Connections can be established between controllers with identical four-digit PINs (PIN). Connections will automatically be established between devices with the same PIN, making this a good choice for photography featuring a large number of remote devices. |
-
The camera that transmits a release signal when the shutter-release button is pressed is referred to as the “master” camera, while the cameras that release their shutters in response are referred to as “remote” cameras.
-
The cameras that can function in the role of master are the D780, mirrorless cameras, and cameras compatible with the WR‑R11a. Other cameras can serve as remote cameras.
Pairing
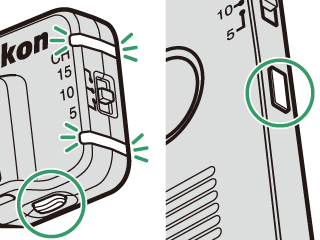
Press the pairing buttons on the WR‑R11a/WR‑R11b controllers simultaneously, just as you would when pairing the devices with a WR‑T10.
-
Turn on the cameras to which the WR‑R11a/WR‑R11b controllers are attached.
-
Set the WR‑R11a/WR‑R11b controllers to the same channel.

-
Set the channel selectors on the WR‑R11a/WR‑R11b controllers to the same channel (5, 10, or 15).
-
Here, all controllers are set to Channel 10.
-
-
Pair the devices.
-
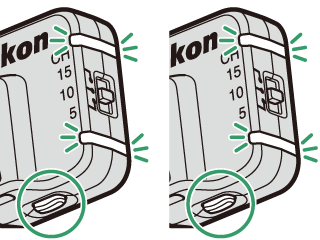
Press the pairing buttons on both WR‑R11a/WR‑R11b controllers simultaneously. Pairing is complete when the red and green LEDs on the controllers flash on and off in sequence.
-
When pairing devices, place them close together.
-
To synchronize release with further cameras, pair the master with the WR-R11a/WR-R11b for each of the remote cameras.
-
Pairing is also available with WR‑R10 controllers. Synchronized release with a mix of WR‑R11a/WR‑R11b and WR‑R10 controllers is also supported.
-
-
Take pictures.
Releasing the shutter on the master camera releases the shutters on all cameras to which paired WR‑R11a/WR‑R11b controllers are attached.
PIN
Connections can be established between controllers with identical four-digit PINs. Any four-digit PIN can be used.
-
PIN connections are available only with cameras that offer [] in the setup menu. Use pairing to connect to other cameras.
-
Pairing is not required for wireless PIN connections.
-
Turn on the cameras to which the WR‑R11a/WR‑R11b controllers are attached.
-
Set the WR‑R11a/WR‑R11b controllers to the same channel.
-
Set the channel selectors on the WR‑R11a/WR‑R11b controllers to the same channel (5, 10, or 15).
-
Here, all controllers are set to Channel 10.
-
-
On the master camera, select [] > [] in the setup menu, then highlight [] and press J.
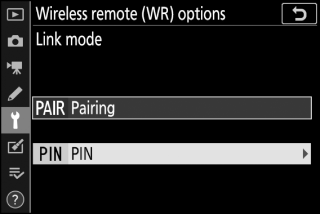
A PIN-entry dialog will be displayed.
-
Enter a PIN.
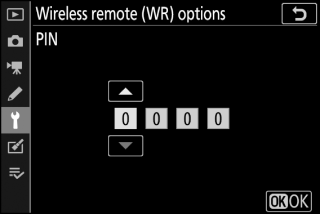
Using the 4 and 2 buttons on the multi selector to highlight digits and 1 and 3 to change, edit the PIN and then press J.
-
Enter the PINs for the WR‑R11a/WR‑R11b controllers on the remote cameras.
-
In the setup menu, select [] > [] > [] and enter the PIN code selected in Step 4.
-
A connection will be established automatically when you press J.
-
To synchronize release with further cameras, enter the PIN code on each device to which a WR‑R11a/WR‑R11b is attached.
-
-
Take pictures.
Releasing the shutter on the master camera releases the shutters on all cameras with WR‑R11a/WR‑R11b controllers connected via PIN.