Using the WR‑R11a/WR‑R11b with Other Devices
WR‑R11a/WR‑R11b controllers can be used with WR‑1 wireless remote controllers and SB‑5000 flash units.
- Using the WR‑R11a/WR‑R11b with WR‑1 Wireless Remote Controllers
- Using the WR‑R11a/WR‑R11b with SB‑5000 Flash Units
Using the WR‑R11a/WR‑R11b with WR‑1 Wireless Remote Controllers
In combination with a WR‑1 wireless remote controller, the WR‑R11a/WR‑R11b can be used for interval-timer photography—in which the camera automatically takes pictures automatically at preset intervals—and long time-exposures, as well as for simultaneous and synchronized release.
-
For more information, see the documentation for the WR‑1.
-
When reading the documentation for the WR‑1, replace all references to the WR‑R10 with the WR‑R11a/WR‑R11b.
-
When used as a transmitter, the WR‑1 should be placed in Group A.
-
The WR‑R11a/WR‑R11b must be paired with the WR‑1 (Pairing WR‑R11a/WR‑R11b Controllers with the WR‑1).
Features Available with the WR‑1
A single WR‑1 can be paired with multiple WR‑R11a/WR‑R11b controllers and used to simultaneously release the shutters on multiple cameras with one press of the WR‑1’s shutter-release button (Simultaneous Release with the WR‑T10).
When attached to multiple cameras, WR‑1 or WR‑R11a/WR‑R11b controllers can be used for synchronized release between a master camera and one or more remote cameras (Synchronized Release with the WR‑R11a/WR‑R11b).
The Fn button on a transmitting WR‑1 performs the function assigned by cameras to which the WR‑R11a/WR‑R11b controllers are attached.
-
The Fn button functions in the same way as the button on the WR‑T10 (The WR‑T10 Fn Button).
-
This feature is available only when the WR‑1 functions independently as a transmitter. It is not available when the WR‑1 is mounted on a camera.
The WR‑1 can be used for interval-timer photography, in which the camera automatically takes a selected number of shots automatically at preset intervals.
-
This feature is available only when the WR‑1 functions independently as a transmitter.
Choose the time the shutter-release button remains in the fully-pressed state for long time-exposures or to take single shots in burst release modes.
-
This feature is available only when the WR‑1 functions independently as a transmitter. It is not available when the WR‑1 is mounted on a camera.
Delay release of the shutter on cameras to which receiving WR‑1 controllers are attached.
Pairing WR‑R11a/WR‑R11b Controllers with the WR‑1
WR‑R11a/WR‑R11b controllers must be paired with the WR‑1. ID mode connections are not supported. For more information, see the documentation for the WR‑1.
-
Use the WR‑1 as a transmitter or receiver.
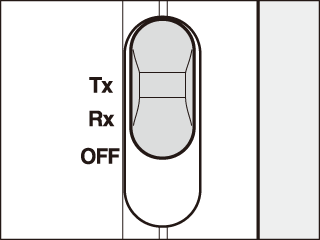
Slide the Tx/Rx/OFF switch on the WR‑1 to [] to use the WR‑1 as a transmitter or to [] to use it as a receiver.
-
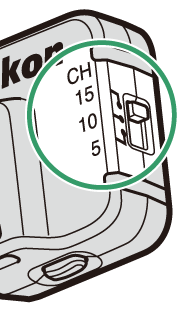
Set the WR‑R11a/WR‑R11b and WR‑1 to the same channel.
-
The channel for the WR‑R11a/WR‑R11b can be chosen using the channel selector.
-
To choose a channel for the WR‑1, press E or G. When using the WR‑1 with the WR‑R11a/WR‑R11b, choose channel 5, 10, or 15.
-
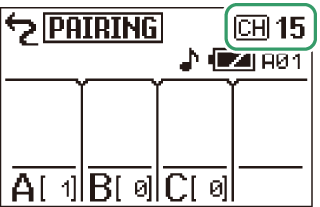
Here, all controllers are set to Channel 15.
-
-
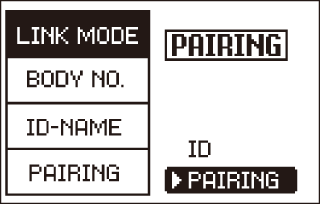
Select [] for [] in the WR‑1 menus.
-
Highlight [] in the WR‑1 menus and press 2.

-
Turn on the camera to which the WR‑R11a/WR‑R11b is attached.
-
Highlight [] in the WR‑1 menus and press z while simultaneously pressing the pairing button on the WR‑R11a/WR‑R11b.
-
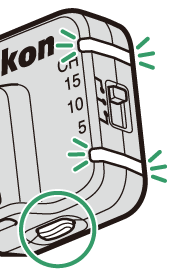
When pairing devices, place them close together.
-
The red and green LEDs on the WR‑R11a/WR‑R11b will flash on and off in sequence when pairing is complete.
-
The WR‑1 will display a message and the red and green LEDs will flash on and off in sequence. Press MENU to exit when the menus are displayed.

-
Using the WR‑R11a/WR‑R11b with SB‑5000 Flash Units
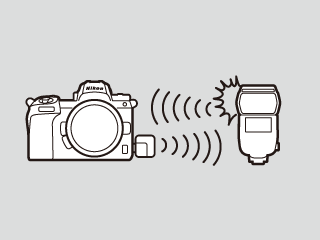
A WR‑R11a/WR‑R11b mounted on a camera can be used as a transmitter to control remote flash units via radio AWL.
-
This feature is available only with cameras that support radio AWL.
-
For more information on available features and on adjusting settings, see the documentation for the camera and SB‑5000.
-
When reading the documentation for the SB‑5000, replace all references to the WR‑R10 with the WR‑R11a/WR‑R11b.
-
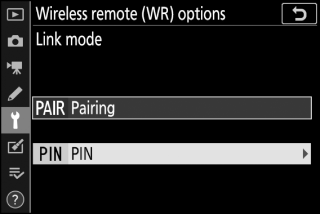
For use with radio remote control, the SB‑5000 must either be paired with the WR‑R11a/WR‑R11b or connected in PIN mode.
-
Pairing: Press the pairing button on the WR‑R11a/WR‑R11b to pair it with the SB‑5000 (Connecting in Pairing Mode).
-
PIN: Enter the PIN for the camera on the SB‑5000 (Connecting in PIN Mode).
-
Features Available with the SB‑5000
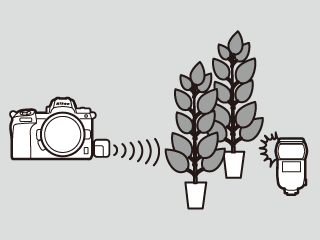
Radio AWL can be used to control flash units not visible from the camera or placed at distances of up to about 30 m (98 ft). It offers more flexibility in lighting choices and frees you from fretting over flash placement.
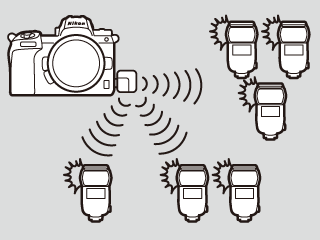
Radio AWL allows simultaneous control of up to 18 flash units arranged freely in up to 6 groups.
The camera provides real-time updates on the status and settings of remote flash units. Flash settings can also be adjusted from the camera.
Connecting in Pairing Mode
-
Turn on the camera to which the WR‑R11a/WR‑R11b is attached.
-
Set the WR‑R11a/WR‑R11b to the desired channel.
Here we select Channel 15.
-
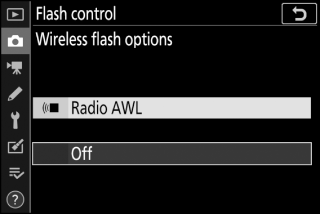
Select [] for [] > [] in the camera photo shooting menu.
-
Select [] for [] > [] in the camera setup menu.
-
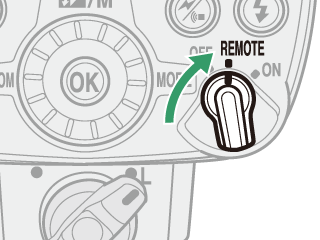
Rotate the flash unit power switch to REMOTE.
-
Press the wireless setting button to cycle through remote modes until radio control remote mode is displayed.
Keep cycling until the a icon is displayed.
-
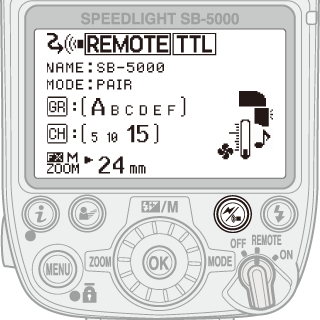
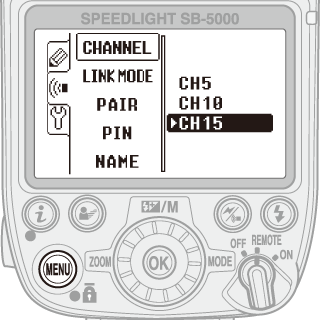
Set the flash unit to the same channel as the WR‑R11a/WR‑R11b.
-
Press the MENU button, highlight [] in the “wireless item” tab, and press OK.
-
Highlight the channel selected in Step 2 and press OK.
-
Here we select Channel 15.
-
-
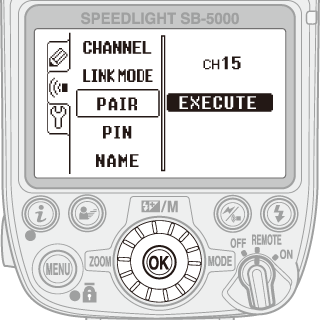
Choose [] mode.
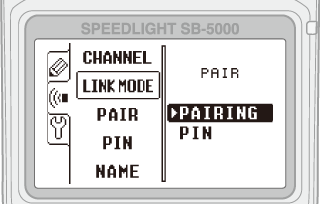
Select [] in the “wireless items” tab, then highlight [] and press OK.
-
Highlight [] and press OK.
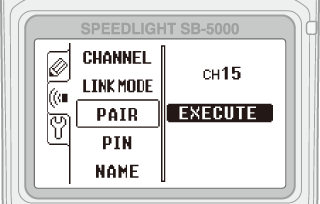
[] will be highlighted.
-
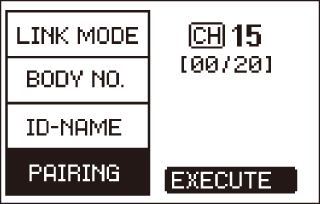
Press the OK button on the flash unit and the pairing button on the WR‑R11a/WR‑R11b.
-
Wait no longer than about a second between pressing the OK button on the flash unit and the pairing button on the WR‑R11a/WR‑R11b.
-
If desired, the pairing button on the WR‑R11a/WR‑R11b can be pressed before the OK on the flash unit.
-
-
Confirm that pairing is complete.
-
If pairing succeeds, the LINK indicator on the flash unit will blink green and orange. The LEDs on the WR‑R11a/WR‑R11b will blink alternately red and green.
-
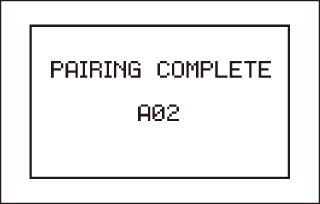
Pairing is complete when the green LED on the WR‑R11a/WR‑R11b lights, the flash unit LINK indicator turns green, and the flash unit displays the message “PAIRING COMPLETE”.

-
You will not need to perform pairing again when connecting the devices in future.
-
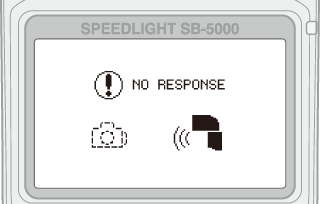
If pairing fails, for example because you waited too long between pressing the buttons on the flash unit and WR-R11a/WR-R11b, the flash unit will display the message “NO RESPONSE”. Repeat the pairing process from Step 9.
-
Connecting in PIN Mode
-
Turn on the camera to which the WR‑R11a/WR‑R11b is attached.
-
Set the WR‑R11a/WR‑R11b to the desired channel.
Here we select Channel 15.
-
Select [] for [] > [] in the camera photo shooting menu.
-
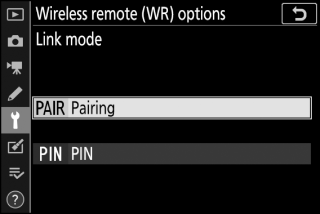
Go to the camera setup menu, select [] > [], then highlight [] and press 2.
A PIN-entry dialog will be displayed.
-
Enter a four-digit PIN and press J.

Enter a four-digit number of your choice. There is no need to re-enter the PIN in future.
-
Rotate the flash unit power switch to REMOTE.
-
Press the wireless setting button to cycle through remote modes until radio-control mode is displayed.
Keep cycling until the a icon is displayed.
-
Set the flash unit to the same channel as the WR‑R11a/WR‑R11b.
-
Press the MENU button, highlight [] in the “wireless item” tab, and press OK.
-
Highlight the channel selected in Step 2 and press OK.
-
Here we select Channel 15.
-
-
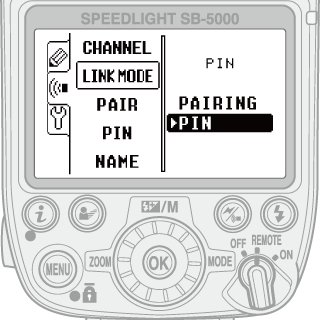
Choose [] mode.
-
Highlight [] in the “wireless item” tab, and press OK.
-
Highlight [] and press OK.
-
-
Enter the PIN.

-
Highlight [] in the “wireless item” tab, and press OK.
-
Use the rotary multi selector to enter the PIN, pressing H or F to highlight digits and E or G to change.
-
Enter the four-digit PIN selected in Step 5.
-
Press OK when entry is complete; the connection to the camera will be initiated automatically.
-
When the connection is established, the green LED on the WR‑R11a/WR‑R11b will light and the LINK indicator on the flash unit will turn green.
-