Video Recording with the ME-D10
The steps for recording videos with the ME-D10 are as follows.
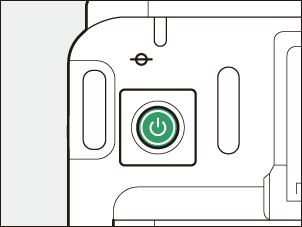
Turn the camera on.
The ME-D10 is powered by the camera. The power supply ends when the camera turns off or the standby timer expires.
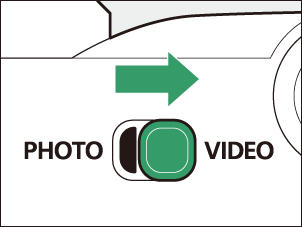
Slide the camera photo/video selector to VIDEO to select video mode.
Select the microphone mode and pickup direction.
Adjust the settings of the microphone-mode and pickup pattern switches to suit your recording.
Microphone-mode switch
- PURE: Use this mode for recording the sound of the scene "as-is" including low frequencies, such as musical instrument performances or field recordings. This mode allows you to further refine the sound to the quality you desire in post-production with its resistance to editing degradation. We recommend recording the audio in 32-bit float format.
- FOCUS: Use this mode to capture human voices in interviews, product presentations, and similar situations. It is directional, allowing recording with reduced environmental noise such as air conditioning.
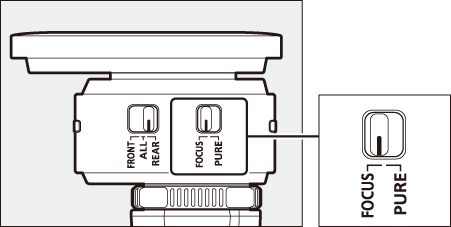
Pickup pattern switch
- FRONT: Use when the sound source is in front of the camera.
- ALL: Use when sound sources are all around the camera.
- REAR: Use when you narrate or provide commentary while recording video.

Combining Microphone Mode and Pickup Direction
You can set the pickup direction with both PURE and FOCUS microphone modes. Selecting FOCUS with FRONT or REAR pickup direction strengthens the directionality. For details on the characteristics of each combination, refer to "Audio Characteristics" (0 Audio Characteristics).
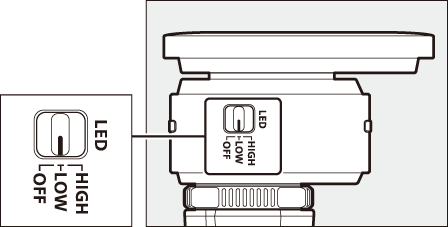
Set the brightness of the status lamps.
Use the LED brightness switch to adjust the brightness of the front and rear status lamps.
Configure microphone settings on your camera.
Adjust the microphone settings in the video recording menu on your camera as needed. See the camera Reference Guide for details. The menu items about external microphone settings include:
- [32-bit float audio recording]
- [Audio input sensitivity]
- [Attenuator]
- [Frequency response]
Press the camera shutter-release/REC button or the REC button on the front of the camera to start video recording.
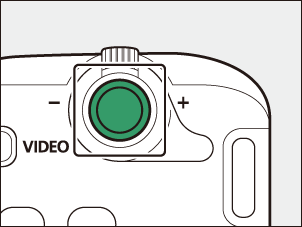
Shutter-release/REC button
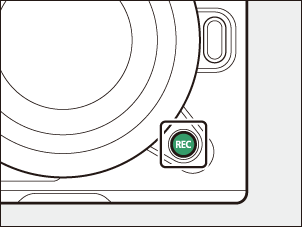
REC button
- If audio clipping is detected during video recording, both the front and rear status lamps will blink rapidly in sync with the sound being captured.
- Using 24-bit recording causes audio clipping when the detected sound exceeds the capability of the camera. Adjust the audio input sensitivity until the rapid blinking of the status lamps stops.
Using 32-bit float recording allows audio recording with minimal clipping and distortion. Move the microphone away from the sound source until the rapid blinking of the status lamps stops if audio clipping continues under the following conditions.
- When recording extremely loud sounds beyond the microphone's capabilities,
- When the sound source is too close to the microphone, or
- In strong wind conditions.
- Audio may sound distorted if the speaker volume or gain is set too high during video playback.