Connecting to Computers
To upload pictures to a computer, connect the camera via a wireless network or using the supplied USB cable.
Connecting via USB
If the supplied USB cable is used to connect the camera to a computer running ViewNX-i, you can copy pictures to the computer, where they can be viewed, edited, and organized.
Installing ViewNX-i
Download the ViewNX-i installer from the following website and follow the on-screen instructions to complete installation (existing users should be sure to download the latest version, as earlier versions may not support the camera). An Internet connection is required. For system requirements and other information, see the Nikon website for your region.
http://downloadcenter.nikonimglib.com/
Capture NX-D
Use Nikon’s Capture NX-D software to fine-tune photos or to change settings for NEF (RAW) pictures and save them in other formats. Capture NX-D is available for download from:
Copying Pictures to the Computer
For detailed instructions, see the online help for ViewNX-i.
-
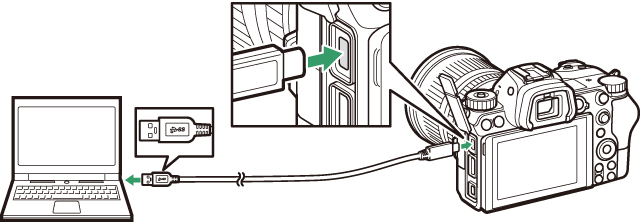
Connect the USB cable.
After turning the camera off and ensuring that a memory card is inserted, connect the supplied USB cable as shown.
USB Hubs
Connect the camera directly to the computer; do not connect the cable via a USB hub or keyboard.
Use a Reliable Power Source
To ensure that data transfer is not interrupted, be sure the camera battery is fully charged.
Connecting Cables
Be sure the camera is off when connecting or disconnecting interface cables. Do not use force or attempt to insert the connectors at an angle.
-
Turn the camera on.
The Nikon Transfer 2 component of ViewNX-i will start (if a message is displayed prompting you to choose a program, select Nikon Transfer 2).
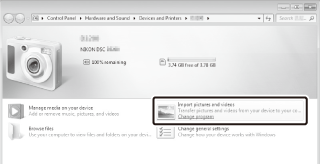
Windows 7
If the following dialog is displayed, select Nikon Transfer 2 as described below.
-
Under Import pictures and videos, click Change program. A program selection dialog will be displayed; select Nikon Transfer 2 and click OK.
- Double-click
 .
.
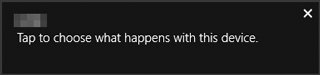
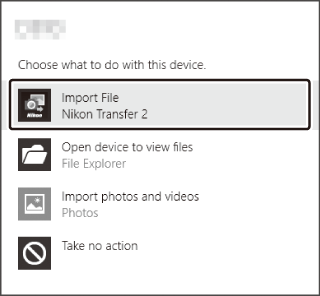
Windows 10 and Windows 8.1
Windows 10 and Windows 8.1 may display an AutoPlay prompt when the camera is connected. Tap or click the dialog and then tap or click Nikon Transfer 2 to select Nikon Transfer 2.
macOS/OS X
If Nikon Transfer 2 does not start automatically, confirm that the camera is connected and then launch Image Capture (an application that comes with macOS or OS X) and select Nikon Transfer 2 as the application that opens when the camera is detected.
-
-
Click Start Transfer.
Pictures on the memory card will be copied to the computer.
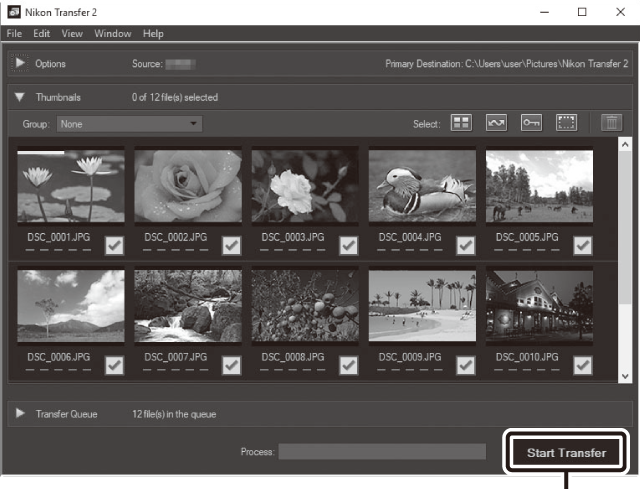
Click Start Transfer
Transferring Movies
Do not attempt to transfer movies from the memory card while it is inserted in another camera. Doing so could result in the movies being deleted without being transferred.
During Transfer
Do not turn the camera off or disconnect the USB cable while transfer is in progress.
-
Turn the camera off.
Turn the camera off and disconnect the USB cable when transfer is complete.
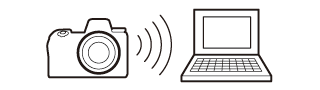
Wireless Networks (Wi-Fi)
The following methods can be used to connect to a computer via Wi-Fi. For more information, see the Network Guide.
Built-in Wi-Fi
Use the Connect to PC option in the camera setup menu to connect to computers either directly or via a wireless router.

Connection via a wireless router
Direct wireless connection
The WT-7 Wireless Transmitter
When the camera is connected to an optional WT-7 wireless transmitter, the Wireless transmitter (WT-7) option in the setup menu can be used for connection to computers or ftp servers.
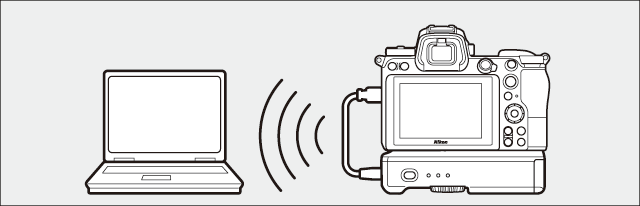
Use the WT-7 for connection to Ethernet networks and for more reliable connections to wireless networks. With Camera Control Pro 2 (available separately), the camera can be controlled remotely and pictures saved directly to the computer as they are taken.