Other Compatible Accessories
A variety of accessories are available for your Nikon camera.
- Availability may vary with country or region.
- See our website or brochures for the latest information.
- Power Sources
EN‑EL15c Rechargeable Li-ion Battery: EN‑EL15c batteries can be used with Nikon Z5II digital cameras.
- EN‑EL15b and EN‑EL15a batteries can also be used. Note, however, that fewer pictures can be taken on a single charge than with the EN‑EL15c (0 Battery Endurance).
EH‑8P AC Adapter: When connected to the camera via USB, the EH-8P can be used to charge batteries inserted in the camera.
- The battery will not charge while the camera is on.
- The EH-8P cannot be used to charge EN‑EL15a batteries.
- The EH-8P can be used to power the camera; to do so, select [ON] for [USB power delivery] in the setup menu. For more information, see “USB power delivery” (0 USB power delivery).
- Connections for power supply or battery charging using the EH-8P must be made via the supplied USB cable (featuring Type-C connectors at both ends).
- MH‑25a Battery Charger: The MH‑25a can be used to recharge EN‑EL15c batteries.
MH‑34 Battery Charger: The MH‑34 can be used to recharge EN‑EL15c batteries. Charge batteries by connecting an EH‑8P AC Adapter.
- Connecting to the EH‑8P requires the supplied USB cable (featuring Type-C connectors at both ends).
EP‑5B Power Connector and EH‑5d AC Adapter: Use EH‑5d AC adapters to power the camera for extended periods.
- The EP‑5B is needed to connect the EH‑5d to the camera. See “Attaching an EP‑5B Power Connector and EH‑5d, EH‑5c, or EH‑5b AC Adapter” (0 Attaching an EP‑5B Power Connector and EH‑5d, EH‑5c, or EH‑5b AC Adapter) for details.
- EH‑5c and EH‑5b AC adapters can be used in place of the EH‑5d.
MB-N14/MB-N11 Power Battery Pack: A battery pack for the Nikon Z5II digital camera. When attached, it allows the use of up to two EN‑EL15c rechargeable Li-ion batteries as a power source.
- The MB-N14/MB-N11 is equipped with buttons, dials, and a multi selector for use when the camera is rotated to take pictures in portrait (“tall”) orientation.
- EN‑EL15b and EN‑EL15a batteries can be used in place of the EN‑EL15c. Note, however, that fewer pictures can be taken on a single charge than with the EN‑EL15c (0 Battery Endurance).
- You can charge batteries in the battery pack or power the camera while the battery pack is connected. An EH‑8P AC adapter is required when using the MB-N14 and an EH-7P charging AC adapter for the MB-N11.
- Information on connecting and removing the battery pack and instructions on its use and care are available in the battery pack User's Manual and Reference Guide.
- Filters
- Neutral Color (NC) filters can be used to protect the lens.
- Filters may cause ghosting when the subject is framed against a bright light, or when a bright light source is in the frame. Filters can be removed if ghosting occurs.
- Matrix metering may not produce the desired results with filters with exposure factors (filter factors) over 1× (Y44, Y48, Y52, O56, R60, X0, X1, C‑PL, ND2S, ND4, ND4S, ND8, ND8S, ND400, A2, A12, B2, B8, B12). We suggest that [Center-weighted metering] be selected instead. See the documentation provided with the filter for details.
- Filters intended for special-effects photography may interfere with autofocus or the in-focus indicator (I).
- Remote Cords
- MC-DC3 Remote Cord (length approximately 1 m/3.3 ft): When connected to the headphone/remote cord (Z) connector, the MC-DC3 can be used to release the shutter remotely.
- USB Cables
- UC-E24 USB Cable: A USB cable with a Type-C connector for connection to the camera and a Type A connector for connection to the USB device.
- UC-E25 USB Cable: A USB cable with Type-C connectors at both ends.
- Sync Terminal Adapters
- AS‑15 Sync Terminal Adapter: An adapter for the accessory shoe that allows studio flash equipment and the like to be connected via a sync terminal.
- Accessory Shoe Covers
- BS-1 Accessory Shoe Cover: A cover protecting the accessory shoe when no flash unit is attached.
- Body Caps
- BF-N1 Body Cap: The body cap prevents dust entering the camera when no lens is in place.
- Viewfinder Eyepiece Accessories
DK-29 Rubber Eyecup: A rubber eyecup that comes attached to the camera at shipment. It can be fitted to the camera viewfinder. The DK-29 makes the image in the viewfinder easier to see, preventing eye fatigue.
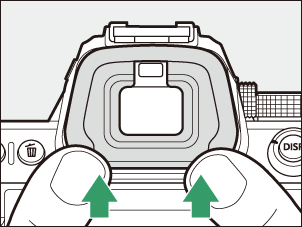
Remove

Replace
- Flash Units
SB-5000, SB-910, SB-900, SB-800, SB-700, SB-600, SB-500, SB-400, and SB-300 Speedlights: These units can be mounted on the camera for flash photography. Some also support wireless remote control for off-camera flash photography with multiple flash units.
- See the documentation supplied with each Speedlight for information on mounting the unit on the camera.
- For more information on flash photography, see “Using an On-Camera Flash” (0 Using an On-Camera Flash), “What Is Remote Flash Photography?” (0 What Is Remote Flash Photography?), and “Compatible Flash Units” (0 Compatible Flash Units).
- SB‑R200 Wireless Remote Speedlight: A flash unit for wireless remote flash photography.
- SU-800 Wireless Speedlight Commander: A wireless commander for use with SB-5000, SB-910, SB-900, SB-800, SB-700, SB-600, SB-500, and SB-R200 flash units. Flash units can be divided into up to three groups for remote flash control. The SU‑800 itself is not equipped with a flash.
- Mount Adapters
FTZ II/FTZ Mount Adapter: An adapter that allows NIKKOR F mount lenses to be used with digital cameras that support interchangeable Z mount lenses.
For information on attaching, removing, maintaining, and using mount adapters, refer to the product documentation.
Update to the latest version of the mount adapter firmware if so prompted after attaching the adapter. Information on performing firmware updates is available via the Nikon website for your country or region.
- Microphones
- ME-1 Stereo Microphone: Connect the ME-1 to the external microphone connector to record stereo sound. Using an external microphone also reduces the chance of picking up equipment noise, such as the sounds produced during video recording when focus is achieved using autofocus.
- ME-W1 Wireless Microphone: A wireless Bluetooth microphone. Use the ME‑W1 for off-camera recording.
- Remote Controls
- ML‑L7 Remote Control: Pair the ML‑L7 with the camera for remote photography and video recording.
- Remote Grips
- MC-N10 Remote Grip: When connected to the camera, the MC-N10 can be used for such tasks as video recording, photography, and adjusting camera settings. It comes equipped with a rosette for attachment to third-party camera equipment. With the MC-N10 mounted on third-party camera equipment via an ARRI-compatible rosette adapter, you can keep moving subjects in focus while panning the camera to track their motion, or use its conveniently-placed controls to adjust settings such as exposure and white balance without touching the camera.
Compatible batteries can be charged using the devices below.
| Battery | MH‑25a battery charger | EH‑8P AC adapter |
|---|---|---|
| EN‑EL15c | 4 | 4 |
| EN‑EL15b | 4 | 4 |
| EN‑EL15a | 4 | — |
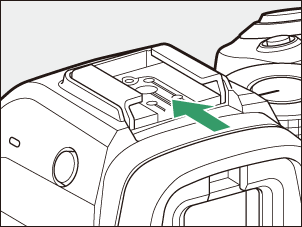
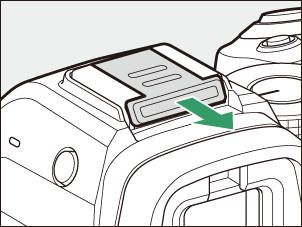
Attaching and Removing the Accessory Shoe Cover
The BS-1 accessory shoe cover slides into the shoe as shown. To remove the cover, hold the camera firmly, press the cover down with a thumb and slide it in the direction shown.
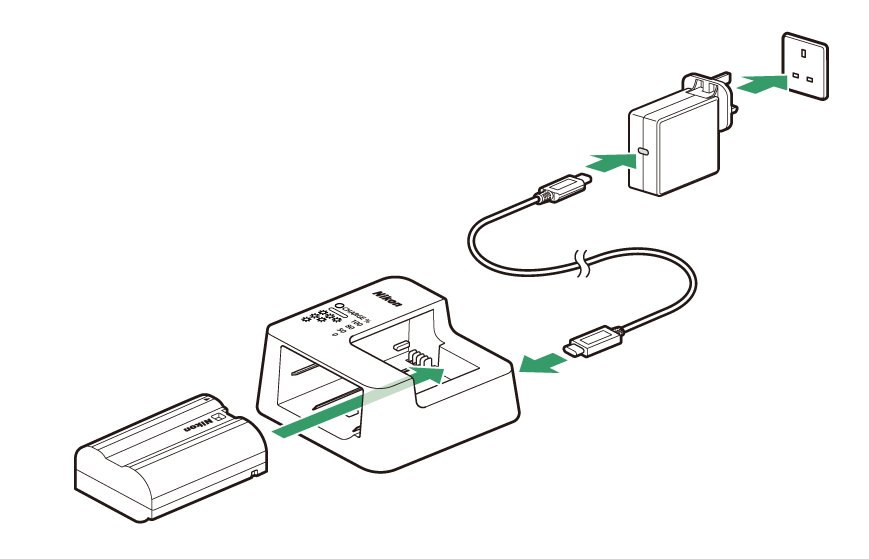
Charging the Battery with an Optional MH-34 Battery Charger
Connect the optional EH-8P AC adapter to the MH-34 battery charger with the supplied USB cable featuring Type-C connectors at both ends and plug the AC adapter into a household power outlet. You can then insert the battery into the charger to begin charging.
- Choose a location where the charger will remain stable and free from vibration during use.
- An exhausted EN-EL15c battery will fully charge in about 2 hours and 30 minutes, and an EN-EL15b battery will charge in about 2 hours and 50 minutes.
- The “CHARGE %” lamp flashes while charging and turns on after charging is complete.
- There may be a delay of about five seconds before the lamp starts flashing.
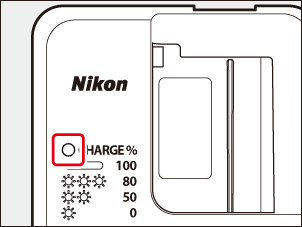
Battery status is shown by the “CHARGE %” lamp:
“CHARGE %” lamp Status Flashes once and turns off, in repetition Charging (less than 50% charged) Flashes twice and turns off, in repetition Charging (50% charged) Flashes three times and turns off, in repetition Charging (80% charged) Turns on Charging complete
Caution: Charging EN-EL15a/EN-EL15 Batteries
EN-EL15a and EN-EL15 rechargeable Li-ion batteries are not compatible with MH-34 battery chargers. Be sure to use an MH‑25a battery charger when charging these batteries via a charger.
If the “CHARGE %” Lamp Flashes Rapidly
If the “CHARGE %” lamp on the charger flashes rapidly (8 times a second):
- The battery is not inserted correctly: Unplug the charger and remove and reinsert the battery.
- The ambient temperature is too hot or too cold: Use the battery charger at temperatures within the designated temperature range (0–40 °C/+32–104 °F).
If the problem persists, unplug the charger and end charging. Bring the battery and charger to a Nikon-authorized service representative.
MC-DC3 Remote Cords
The MC-DC3 can be used to release the shutter remotely when connected to the headphone/remote cord (Z) connector.
- Select [Auto switch] for [Z connector function] in the setup menu before using the MC-DC3 remote cord.
Connecting an MC-DC3 Remote Cord
Turn the camera off.
Open camera's microphone and headphone/remote cord connector cover (q).
Insert the remote cord plug (e) all the way into the headphone/remote cord connector (w).
Do not use force or attempt to insert the connector at an angle.
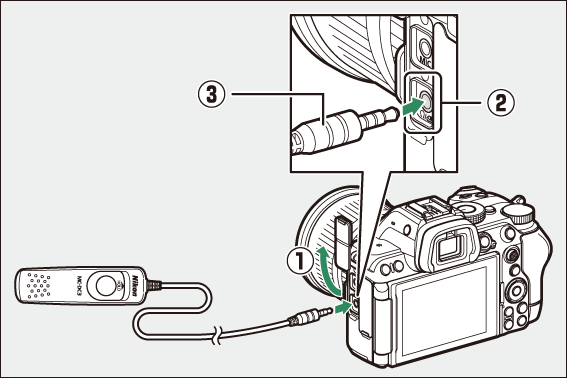
- Connect the MC-DC3 remote cord to the headphone/remote cord connector. It will not function if connected to the external microphone connector of the same shape.
Turn the camera on.
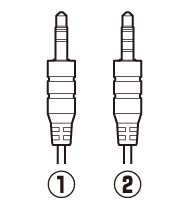
Caution: Headphone/Remote Cord Connector
Use headphones with a 3-pole plug (q) while [Auto switch] is selected for [Z connector function].
- Headphones or a headset with a 4-pole plug (w) may not be recognized or may cause the camera to malfunction.
- Select [Headphone] when using headphones or a headset with a 4-pole plug.
ML‑L7 Remote Controls
When paired with the camera via Bluetooth, optional ML‑L7 remote controls can be used to control the camera remotely during still photography, video recording, and the like.
- The ML‑L7 remote control must be paired with the camera before use.
- The camera can be paired with only one ML‑L7 remote control at a time. If paired successively with more than one ML‑L7, the camera will respond only to the ML‑L7 with which it was last paired.
- In addition to the present document, you will also need to consult the documentation for the ML‑L7 remote control.
Cautions: Using ML‑L7 Remote Controls
- ML‑L7 remote controls cannot be used when:
- [ON] is selected for [Airplane mode] in the network menu,
- [iPhone] is selected for [USB] in the network menu, or
- while the camera is connected to and exchanging data with another device via USB.
- The camera cannot connect to an ML‑L7 remote control while connected to another device via Bluetooth or Wi-Fi or vice versa.
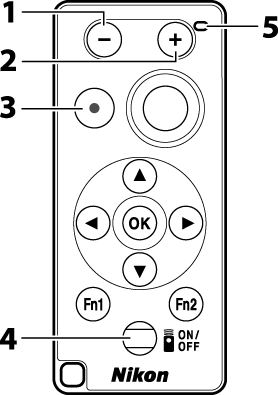
Parts of the ML‑L7 Remote Control: Names and Functions
| Control | Function | |
|---|---|---|
| 1 | “−” button | Performs the same function as the camera W (Q) button. |
| 2 | “+” button | Performs the same function as the camera X button. |
| 3 | Movie record button | Press once to start video recording and again to stop. |
| 4 | Power button |
|
| 5 | Status lamp | The color and behavior of the status lamp indicates remote control and shooting status (0 The Remote Control Status Lamp (Z5II)). |

| Control | Function | |
|---|---|---|
| 6 | Shutter-release button | Press the button to release the shutter.
|
| 7 | Multi selector | Performs the same function as the multi selector on the camera. |
| 8 | J (select) button | Performs the same function as the J button on the camera. |
| 9 | Fn1 (Function 1)/Fn2 (Function 2) buttons | Perform the roles assigned via the network menu using [Wireless remote (ML-L7) options] > [Assign Fn1 button] and [Assign Fn2 button].
|
The Remote Control Status Lamp (Z5II)
| Color | Behavior | Status |
|---|---|---|
| Green | Flashes approximately once a second | Searching for paired camera. |
| Green | Flashes quickly (approximately twice a second) | Pairing. |
| Green | Flashes approximately once every three seconds | Connected to camera. |
| Orange | Flashes once | Photography started. |
| Orange | Flashes twice | “Bulb” or “Time” photography ended. |
| Red | Flashes once | Video recording started. |
| Red | Flashes twice | Video recording ended. |
Adjusting Focus from the Camera
To shoot using the focus position adjusted with the camera, press the camera shutter-release button halfway to lock focus, then select the manual focus mode.
To reactivate the camera after the standby timer has expired and the monitor and viewfinder have turned off, turn the remote control on and press and hold its shutter-release or movie record button.
Connecting for the First Time (Pairing)
The remote control must be paired with the camera before use.
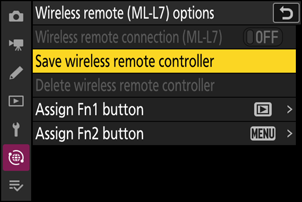
Go to [Wireless remote (ML-L7) options] in the camera network menu, highlight [Save wireless remote controller], and press J.
The camera will enter pairing mode.
Keep the power button on the remote control pressed for over three seconds.
- The camera and remote control will begin pairing. During pairing, the status lamp on the remote control will flash about twice a second.
- A connection will be established between the camera and remote control when pairing is complete.
W and Z will appear in the shooting display.

- If a message is displayed stating that pairing has failed, repeat the pairing process from Step 1.
Connecting to a Paired Remote
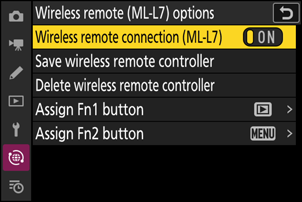
Go to [Wireless remote (ML-L7) options] in the camera network menu and select [ON] for [Wireless remote connection (ML-L7)].
Press the remote control power button.
The camera and remote will connect automatically.