Picture Controls
Types of Picture Controls
Nikon’s unique
- Picture Control: Picture Controls provided with the camera. Basic Picture Controls, including [Auto] and [Standard] modes (0 ‘Set Picture Control’).
- Creative Picture Control: Picture Controls provided with the camera. These controls offer unique combinations of hue, tone, saturation, and other settings tuned for particular effects (0 ‘Set Picture Control’).
- Picture Control (HLG): Picture Controls provided with the camera. They are selected via [Set Picture Control (HLG)] in the photo shooting menu when [Tone mode] in the photo shooting menu is set to [HLG] in photo mode (0 ‘Set Picture Control (HLG)’).
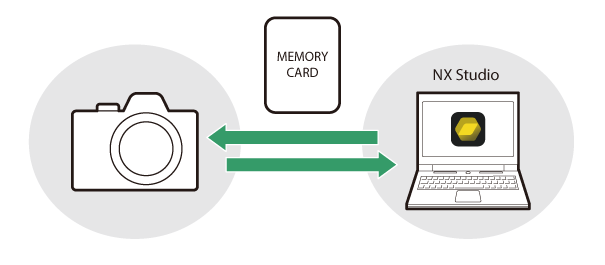
Custom Picture Control: Picture Controls created with the camera or NX Studio computer software. These can be added to the camera separately based on the Picture Controls provided with the camera. To create Custom Picture Controls with the camera, use [Manage Picture Control] in the photo shooting or video recording menu (0 Custom Picture Controls). If using NX Studio, create a Custom Picture Control on the software, export it as a file, copy to a memory card, and import it to the camera (0 Copy Custom Picture Controls to and from a Memory Card). For details on using NX Studio to create and export Custom Picture Controls, see the NX Studio online help.
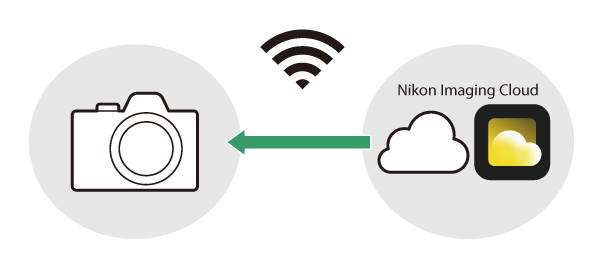
Cloud Picture Control: Picture Controls provided by the Nikon Imaging Cloud cloud service. They can be downloaded and imported to the camera as Picture Controls. These Picture Controls can be adjusted once added to the camera as Custom Picture Controls (0 Cloud Picture Controls).
About Picture Controls
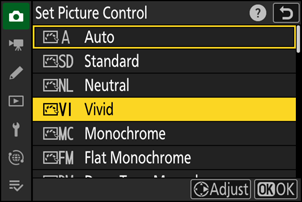
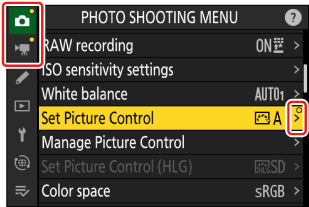
Choosing a Picture Control
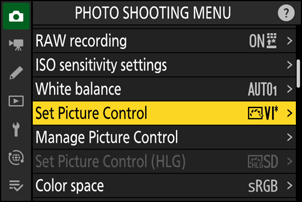
- In video mode or when [SDR] is selected for [Tone mode] in the photo shooting menu in photo mode, select Picture Controls for [Set Picture Control] in the i menu, photo shooting menu, or video recording menu.

- When [HLG] is selected for [Tone mode] in the photo shooting menu in photo mode, select Picture Controls for [Set Picture Control (HLG)] in the photo shooting menu.
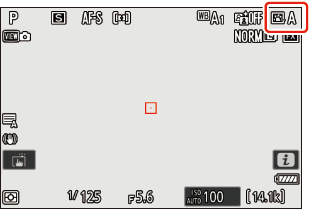
- The selected Picture Control's icon is shown in the shooting display.
- The [Set Picture Control] item in the video recording menu also offers a [Same as photo settings] option that sets the Picture Control for videos to the same as that used for photographs.
“Set Picture Control”
| Option | Description | |
|---|---|---|
| n | [Auto] | The camera automatically adjusts hues and tones based on the [Standard] (photo mode) or [Neutral] (video mode) Picture Control. |
| Q | [Standard] | Standard processing for balanced results. Recommended for most situations. |
| R | [Neutral] | Minimal processing for natural results. Choose for pictures that will later be processed or retouched. |
| S | [Vivid] | Pictures are enhanced for a vivid, photoprint effect. Choose for pictures that emphasize primary colors. |
| T | [Monochrome] | Take monochrome pictures. |
| 2 | [Flat Monochrome] | Features gentle gradations from highlights to shadows, producing soft monochrome pictures. |
| 3 | [Deep Tone Monochrome] | Choose for slightly darker tones in the range from shadows to mid-tones, with brightness rapidly increasing as tones progress from mid-tones to highlights. |
| o | [Portrait] | Smooth complexions for natural-looking portraits. |
| 4 | [Rich Tone Portrait] | Produces more vivid results than [Portrait] while capturing details of the subject’s complexion and avoiding loss of detail in highlights. Choose for pictures that will later be processed or retouched. |
| p | [Landscape] | Shoot vibrant landscapes and cityscapes. Choose for pictures that emphasize blues and greens. |
| q | [Flat] | Details are preserved over a wide tone range, from highlights to shadows. Choose for pictures that will later be extensively processed or retouched. |
k01–k20 |
[Creative Picture Control] (Creative Picture Control) |
Creative Picture Controls offer unique combinations of hue, tone, saturation, and other settings tuned for particular effects. Choose from a total of 20 options, including [Dream] and [Morning]. |
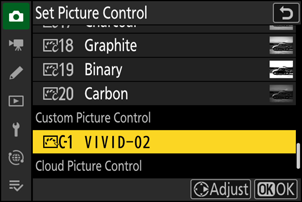
h C-1–h C-9 |
[Custom Picture Control] (Custom Picture Control) |
Displayed if a modified Picture Control is saved as a Custom Picture Control to the camera (0 Custom Picture Controls). The default name is the name of the existing Picture Control with a two-digit number appended. This can be changed as desired. |
n–o |
[Cloud Picture Control] (Cloud Picture Control) |
Displayed if Picture Controls are downloaded from Nikon Imaging Cloud cloud service and imported to the camera (0 Cloud Picture Controls). |
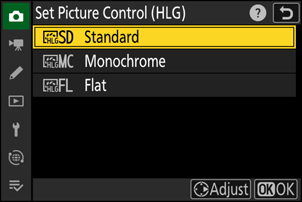
“Set Picture Control (HLG)”
| Option | Description | |
|---|---|---|
| c | [Standard] | Standard processing for balanced results. Recommended for most situations. |
| d | [Monochrome] | Take monochrome photographs. |
| e | [Flat] | Choose for photographs that will later be extensively processed or retouched. |
Modifying Picture Controls
Picture Controls can be adapted to suit the scene or the photographer’s creative intent.
Select a Picture Control.
Select [Set Picture Control] in the photo shooting or video recording menu or [Set Picture Control (HLG)] in the photo shooting menu, highlight the Picture Control to be adjusted, and press 2.
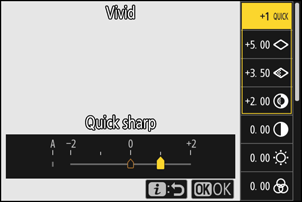
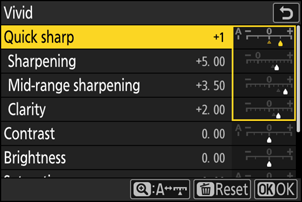
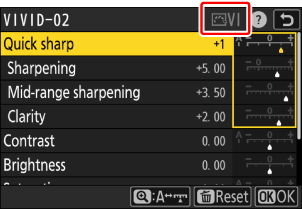
Adjust settings.
- Press 1 or 3 to highlight settings and 4 or 2 to choose a value. Each press increments the highlighted value by 1.
- The options available vary with the Picture Control selected.
- To quickly adjust levels for balanced [Sharpening], [Mid-range sharpening], and [Clarity], highlight [Quick sharp] and press 4 or 2.
- To abandon any changes and start over from default settings, press the O button.
Save changes and exit.
Press J to save changes. Picture Controls that have been modified from default settings are indicated by an asterisk (“U”).
Picture Control Settings
| Option | Description | |
|---|---|---|
| [Effect level] | Displayed only when a Creative Picture Control is selected. Mute or heighten the effect of the selected Picture Control. | |
| [Quick sharp] | Apply sharpening to areas of contrast within the picture.
|
|
| [Sharpening] | Apply sharpening to small areas of contrast. | |
| [Mid-range sharpening] | Apply sharpening to areas of contrast larger than those affected by [Sharpening] and smaller those affected by [Clarity]. | |
| [Clarity] | Apply sharpening to large areas of contrast.
|
|
| [Contrast] | Adjust overall contrast. | |
| [Highlights] | Displayed only for [Set Picture Control (HLG)]. Adjust highlights. Choose higher values to make highlights brighter. | |
| [Shadows] | Displayed only for [Set Picture Control (HLG)]. Adjust shadows. Choose higher values to make shadows brighter. | |
| [Brightness] | Brighten or darken mid-tones (tones that fall in the range between highlights and shadows). The effect does not extend to highlights and shadows, ensuring that details in these areas of the image are preserved.
|
|
| [Saturation] | Control the vividness of colors.
|
|
| [Hue] | Adjust hue.
|
|
| [Filter effects] | Displayed only with [Monochrome], [Flat Monochrome], [Deep Tone Monochrome], and certain Creative Picture Controls. Simulate the effect of color filters on monochrome pictures. | |
| [Toning] | Displayed only with [Monochrome], [Flat Monochrome], [Deep Tone Monochrome], and certain Creative Picture Controls. Choose a tint for monochrome pictures. Choose from 9 different tints, including cyanotype and old-fashioned sepia.
|
|
| [Toning] (Creative Picture Controls) | Displayed only with certain Creative Picture Controls. Choose the shade of color used. | |
The j indicator under the value display in the Picture Control setting menu indicates the value saved in the camera.

- Selecting the [A] (auto) option available for some settings lets the camera adjust the setting automatically.
- Results vary with exposure and the position of the subject in the frame.
Choose from the following [Filter effects]:
| Option | Description |
|---|---|
| [Y] (yellow) * | These options enhance contrast and can be used to tone down the brightness of the sky in landscape photographs. Orange [O] produces more contrast than yellow [Y], red [R] more contrast than orange. |
| [O] (orange) * | |
| [R] (red) * | |
| [G] (green) * | Green softens skin tones. Use for portraits and the like. |
The term in parentheses is the name of the corresponding third-party color filter for black-and-white photography.
Using “Filter Effects” with “Deep Tone Monochrome”
[Deep Tone Monochrome] features a strong built-in red filter effect that applies even when [OFF] is selected for [Filter effects]. Because [Filter effects] cannot be applied more than once, selecting an option other than [OFF] will disable the built-in red filter effect. Contrast can be reduced by enabling [Y], [O], and [R].
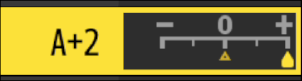
Settings can be adjusted in the range [A−2] to [A+2].
Editing Picture Controls with the i Menu
Highlighting [Set Picture Control] in the i menu and pressing J displays a Picture Control list. Highlight a Picture Control, press 3 to display options, and then edit settings while previewing the effect in the display.
- Same as when [Set Picture Control (HLG)] is assigned to i menu using Custom Setting f1 [Customize i menu] and selected.
- Press 1 or 3 to highlight settings. Press 4 or 2 to choose a value in increments of 1, or rotate the sub-command dial to choose a value in increments of 0.25.
- The options available vary with the Picture Control selected.
- To abandon any changes and start over from default settings, press the O button.
- Press J to save changes.
- Picture Controls that have been modified from default settings are indicated by an asterisk (“U”).

Custom Picture Controls
Save modified Picture Controls as Custom Picture Controls.
| Option | Description |
|---|---|
| [Save/edit] | Create a new Custom Picture Control based on an existing preset or Custom Picture Control, or edit existing Custom Picture Controls. |
| [Rename] | Rename Custom Picture Controls. |
| [Delete] | Delete Custom Picture Controls. |
| [Load/save] | Copy Custom Picture Controls to and from a memory card. |
Creating Custom Picture Controls
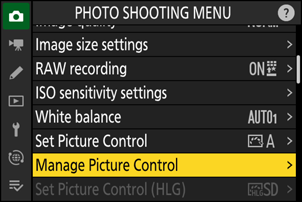
Highlight [Manage Picture Control] in the photo shooting or video recording menu and press 2.
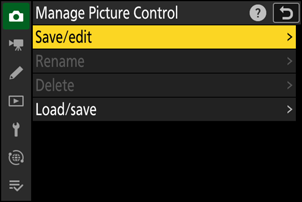
Select [Save/edit].
Highlight [Save/edit] and press 2 to view [Choose Picture Control] options.
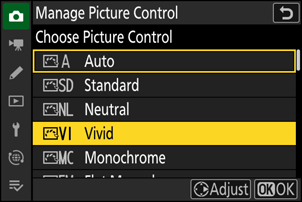
Select a Picture Control.
- Highlight an existing Picture Control and press 2 to display edit options.
- To save a copy of the highlighted Picture Control without further modification, press J. [Save as] options will be displayed; proceed to Step 5.
Adjust settings.
- The options and procedure are the same as for [Set Picture Control].
- Press J to display [Save as] options when settings are complete.
- To abandon any changes and start over from default settings, press the O button.
Select a destination.
Choose a destination for the Custom Picture Control (C-1 through C-9).

Name the Picture Control.
- Pressing 2 when a destination is highlighted in the previous step displays the [Rename] text-entry dialog.
- The default name, created by adding a two-digit number to the name of the existing Picture Control, appears in the text display area. The two-digit number is generated automatically by the camera.
- Custom Picture Control names can be up to nineteen characters long.
- For information on text entry, see “Text Entry” (0 Text Entry).
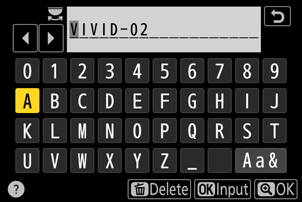
Press the X button.
- Text entry will end.
- The new Picture Control will be added to the Picture Control list.
The Original Picture Control Icon
The original preset Picture Control on which the Custom Picture Control is based is indicated by an icon in the edit display.
Custom Picture Control Options
The options available with Custom Picture Controls are the same as those on which the Custom Picture Control was based.
Copy Custom Picture Controls to and from a Memory Card
The [Load/save] item in the [Manage Picture Control] menu can be used to copy Custom Picture Controls from the camera to a memory card. You can also delete Custom Picture Controls or copy them from a memory card to the camera (the memory card must be inserted in the primary slot, as memory cards inserted in the slot designated as the secondary slot via [Primary slot selection] in the photo shooting menu will not be detected).
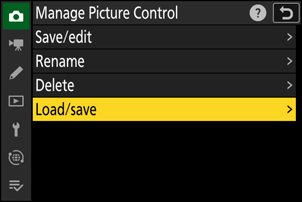
- [Copy to camera]: Copy (import) Custom Picture Controls from the memory card to the camera. The Picture Controls are copied to Custom Picture Controls C-1 through C-9 on the camera and can be named as desired.
- [Delete from card]: Delete selected Custom Picture Controls from the memory card.
- [Copy to card]: Copy (export) a Custom Picture Control from the camera to a memory card. Highlight a destination (1 through 99) for the selected Custom Picture Control and press J to export it to a “CUSTOMPC” sub-folder, which will automatically be created under the “NIKON” folder on the memory card.
- Exported Custom Picture Controls can be copied to another memory card using a computer. When copying Picture Controls to a memory card for import to the camera, be sure to save them to the card’s root (top) directory or to the “CUSTOMPC” folder under the “NIKON” folder.
When adjusting Picture Controls with the NX Studio computer software, selecting [Flexible Color] for the Picture Control option allows for a wider variety of Picture Control adjustments with Color Blender and Color Grading, in addition to other adjustment parameters. You can save Picture Controls adjusted using [Flexible Color] as Custom Picture Controls and export them to a file and import it to the camera.
- Custom Picture Controls based on [Flexible Color] cannot be adjusted or renamed on the camera.
Cloud Picture Controls
If Picture Controls are transferred to the camera from Nikon Imaging Cloud, they can be downloaded and read to the camera by [Set Picture Control] > [Add Cloud Picture Control files] in the camera photo shooting or video recording menu. These Picture Controls can be adjusted once selected and added to the camera via [Manage Picture Control] in the photo shooting or video recording menu (0 Creating Custom Picture Controls).
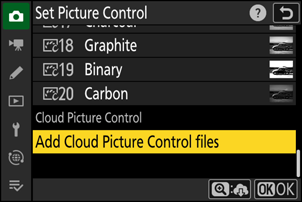
If there are Picture Controls in Nikon Imaging Cloud that have not been imported to the camera, notification marks will appear on the photo shooting and video recording menu tabs and [Set Picture Control] item in the camera menu.
- The camera and Nikon Imaging Cloud must be connected via Wi-Fi to download and import Picture Controls. In the camera network menu, set [Nikon Imaging Cloud] > [Connect to Nikon Imaging Cloud] to [ON], and then turn on the Nikon Imaging Cloud camera sign-in setting.
- See the Nikon Imaging Cloud online help for how to transfer Picture Controls to the camera and how to turn on the camera sign-in setting in Nikon Imaging Cloud.