Selecting Pictures for Upload
Follow the steps below to
- The i menu items used to select pictures for upload vary with the type of device connected.
- When connected to Nikon Imaging Cloud by [Nikon Imaging Cloud] (0 Nikon Imaging Cloud) in the network menu: [Select for upload to The Cloud]
- When connected to a smart device by [Connect to smart device] (0 Connect to Smart Device) in the network menu: [Select for upload to smart device]
- When connected to a computer by [Connect to computer] (0 Connect to Computer) in the network menu: [Select for upload to computer]
- When connected to an FTP server by [Connect to FTP server] (0 Connect to FTP Server) in the network menu: [Select for upload (FTP)]
- Videos cannot be selected for upload when the camera is connected to Nikon Imaging Cloud or to a smart device via the SnapBridge app.
- Videos over 4 GB in size cannot be selected for upload.
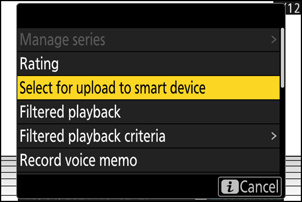
Select the desired picture and press the i button.
Highlight [Select for upload to The Cloud], [Select for upload to smart device], [Select for upload to computer], or [Select for upload (FTP)] and press J.
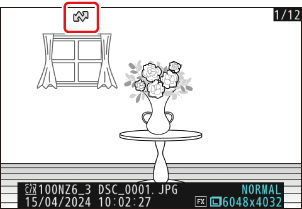
An icon appears on the selected pictures for upload. The displayed icons vary with the type of device currently connected.
- When connected to Nikon Imaging Cloud: p
- When connected to a smart device: W
- When connected to a computer or FTP server: s