RAW Processing
RAW processing is not available on this camera with following images:
- NEF (RAW) images shot with a different camera model,
- NEF (RAW) images shot using NX Tether and saved on a computer, or
- Images shot in image quality settings other than RAW.
- If NEF (RAW) pictures are converted to JPEG or HEIF format via RAW processing, the hues of resulting images may differ from the JPEG or HEIF pictures shot with the camera, even if the same shooting settings were applied during RAW processing.
Processing Photos Shot Using the “SDR” Tone Mode
Applying RAW processing to photos shot with [SDR] selected for tone mode creates JPEG copies.
Processing the Current Picture
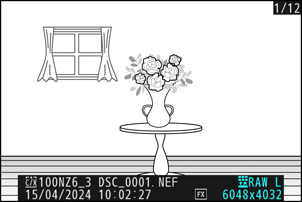
Display an NEF (RAW) picture shot with [SDR] selected for tone mode and then press the i button.
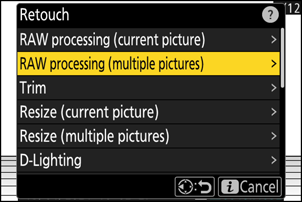
Select [Retouch] in the i menu, then highlight [RAW processing (current picture)] and press 2.

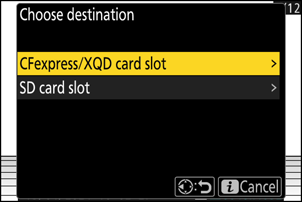
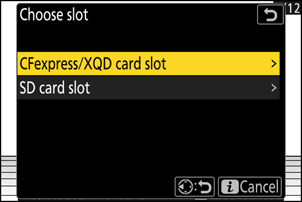
Choose a destination.
- Press 1 or 3 to highlight a card slot and press J.
- You will not be prompted to select the slot if only one memory card is inserted.
Copy the photograph.
- Highlight [EXE] and press J to create a JPEG copy of the selected photograph.

- Adjust settings such as white balance and Picture Control before processing. If necessary, change from the settings that were in effect when the photograph was taken. For items that can be configured, see “Configuration Items during SDR Image RAW Processing” (0 Configuration Items during SDR Image RAW Processing).
Processing Multiple Pictures
Display an NEF (RAW) picture shot with [SDR] selected for tone mode and then press the i button.
Select [Retouch] in the i menu, then highlight [RAW processing (multiple pictures)] and press 2.
Choose how pictures will be selected and where the copies will be saved.
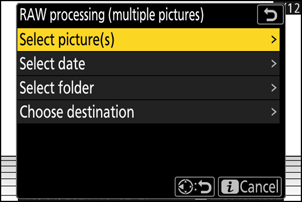
Option Description [Select picture(s)] Create JPEG copies of selected NEF (RAW) pictures. Multiple NEF (RAW) pictures can be selected. [Select date] Create JPEG copies of all NEF (RAW) pictures taken on selected dates. [Select folder] Create JPEG copies of all NEF (RAW) pictures in a selected folder. [Choose destination] Choose the destination for the JPEG copies. You will not be prompted to select the slot if only one memory card is inserted. If you chose [Select picture(s)], proceed to Step 5.
Select the source slot.
- Highlight the slot with the card containing the NEF (RAW) images and press 2.
- You will not be prompted to select the slot if only one memory card is inserted.
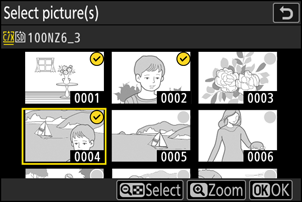
Select photographs.
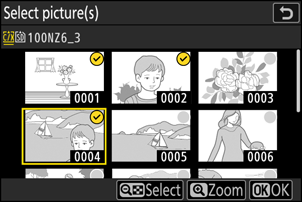
If you chose [Select picture(s)]:
- Highlight pictures using the multi selector.
- To view the highlighted picture full screen, press and hold the X button.
- To select the highlighted picture, press the W (Q) button. Selected pictures are marked with a check (
 ). To remove the check (
 ) and deselect the current picture, press the W (Q) button again. All pictures will be processed using the same settings.
 - Press J to proceed once selection is complete.
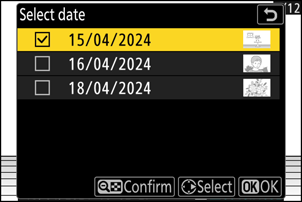
If you chose [Select date]:
- Highlight dates using the multi selector and press 2 to select (M) or deselect (U).
- All eligible images taken on dates marked with a check (M) will be processed using the same settings.
- Press J to proceed once selection is complete.
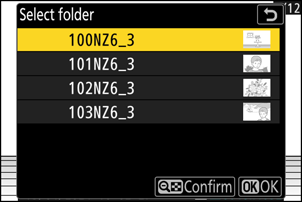
If you chose [Select folder]:
Highlight a folder and press J to select; all images in the selected folder will be processed using the same settings.
Copy the photographs.
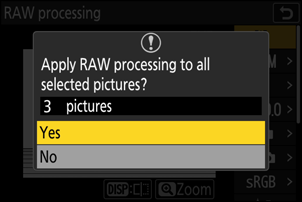
- Highlight [EXE] and press J to display a confirmation dialog and then highlight [Yes] and press J to create JPEG copies of the selected photos.
- To cancel the operation before all copies have been created, press the G button; when a confirmation dialog is displayed, highlight [Yes] and press J.
- Adjust settings such as white balance and Picture Control before processing. If necessary, change from the settings that were in effect when the photographs were taken. For items that can be configured, see “Configuration Items during SDR Image RAW Processing” (0 Configuration Items during SDR Image RAW Processing).
Configuration Items during SDR Image RAW Processing
Image settings can be changed before performing RAW processing from the settings that were in effect when the photographs were taken.
The items that can be configured are as follows.
- Image quality (0 Adjusting Image Quality)
- Image size (0 Choosing an Image Size)
- Exposure compensation (0 Exposure Compensation)
- White balance (0 White Balance)
- Picture Control (0 Picture Controls)
- Color space (0 Color Space)
- Active D-Lighting (0 Active D-Lighting)
- High ISO NR (0 High ISO NR)
- Vignette control (0 Vignette Control)
- Diffraction compensation (0 Diffraction Compensation)
- Portrait impression balance (0 Portrait Impression Balance)
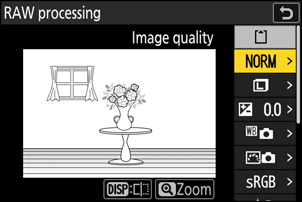
- The settings in effect when the photographs were taken will in some cases appear below the preview.
- To use the settings in effect when the photographs were taken, if applicable, select [Original] for each item.
- The effects can be previewed in the edit display. To view the unedited picture, press and hold the DISP button.
Processing Photos Shot Using the “HLG” Tone Mode
Applying RAW processing to photos shot with [HLG] selected for tone mode creates HEIF copies.
- NEF (RAW) pictures taken with [HLG] selected for tone mode can also be saved in JPEG format (0 Creating JPEG Copies from RAW Photos Shot Using the HLG Tone Mode). Note, however, that the JPEG copies may exhibit more “noise” in the form of randomly-spaced bright pixels, fog, or lines than do JPEG copies created from NEF (RAW) pictures taken with [SDR] selected for tone mode.
Processing the Current Picture
Display an NEF (RAW) picture shot with [HLG] selected for tone mode and then press the i button.
Choose a picture marked with the HLG icon.
Select [Retouch] in the i menu, then highlight [RAW processing (current picture)] and press 2.
Choose a destination.
- Press 1 or 3 to highlight a card slot and press J.
- You will not be prompted to select the slot if only one memory card is inserted.
Copy the photograph.
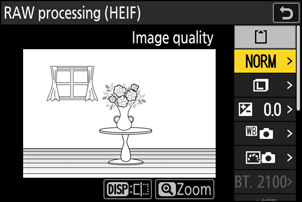
- Highlight [EXE (save in HEIF format)] and press J to create an HEIF copy of the current photograph.
- Adjust settings such as white balance and Picture Control before processing. If necessary, change from the settings that were in effect when the photograph was taken. For items that can be configured, see “Configuration Items during HLG Image RAW Processing” (0 Configuration Items during HLG Image RAW Processing).
Processing Multiple Pictures
Display an NEF (RAW) picture shot with [HLG] selected for tone mode and then press the i button.
Choose a picture marked with the HLG icon.
Select [Retouch] in the i menu, then highlight [RAW processing (multiple pictures)] and press 2.
Choose how pictures will be selected and where the copies will be saved.
Option Description [Select picture(s)] Create HEIF copies of selected NEF (RAW) pictures. Multiple NEF (RAW) pictures can be selected. [Select date] Create HEIF copies of all NEF (RAW) pictures taken on selected dates. [Select folder] Create HEIF copies of all NEF (RAW) pictures in a selected folder. [Choose destination] Choose the destination for the HEIF copies. You will not be prompted to select the slot if only one memory card is inserted. If you chose [Select picture(s)], proceed to Step 5.
Select the source slot.
- Highlight the slot with the card containing the NEF (RAW) images and press 2.
- You will not be prompted to select the slot if only one memory card is inserted.
Select photographs.
If you chose [Select picture(s)]:
- Highlight pictures using the multi selector.
- To view the highlighted picture full screen, press and hold the X button.
- To select the highlighted picture, press the W (Q) button. Selected pictures are marked with a check (). To remove the check () and deselect the current picture, press the W (Q) button again. All pictures will be processed using the same settings.
- Press J to proceed once selection is complete.
If you chose [Select date]:
- Highlight dates using the multi selector and press 2 to select (M) or deselect (U).
- All eligible images taken on dates marked with a check (M) will be processed using the same settings.
- Press J to proceed once selection is complete.
If you chose [Select folder]:
Highlight a folder and press J to select; all images in the selected folder will be processed using the same settings.
Copy the photographs.
- Highlight [EXE (save in HEIF format)] and press J to create HEIF copies of the selected photos.
- To cancel the operation before all copies have been created, press the G button; when a confirmation dialog is displayed, highlight [Yes] and press J.
- Adjust settings such as white balance and Picture Control before processing. If necessary, change from the settings that were in effect when the photographs were taken. For items that can be configured, see “Configuration Items during HLG Image RAW Processing” (0 Configuration Items during HLG Image RAW Processing).
Configuration Items during HLG Image RAW Processing
Image settings can be changed before performing RAW processing from the settings that were in effect when the photographs were taken.
The items that can be configured are as follows.
- Image quality (0 Adjusting Image Quality)
- Image size (0 Choosing an Image Size)
- Exposure compensation (0 Exposure Compensation)
- White balance (0 White Balance)
- Picture Control (HLG; 0 Set Picture Control (HLG))
- High ISO NR (0 High ISO NR)
- Vignette control (0 Vignette Control)
- Diffraction compensation (0 Diffraction Compensation)
- Portrait impression balance (0 Portrait Impression Balance)
- To RAW processing (JPEG)
- The settings in effect when the photographs were taken will in some cases appear below the preview.
- To use the settings in effect when the photographs were taken, if applicable, select [Original] for each item.
- The effects can be previewed in the edit display. To view the unedited picture, press and hold the DISP button.
Cautions: RAW Processing with HLG Tone Mode
- [Exposure compensation] can only be set to values between –2 and +2 EV.
- [Color space] is fixed at “BT.2100“.
- [Active D-Lighting] cannot be adjusted.
Creating JPEG Copies from RAW Photos Shot Using the HLG Tone Mode
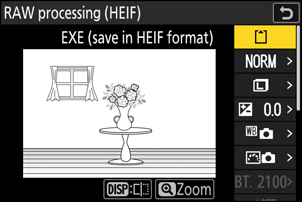
Selecting [To RAW processing (JPEG)] in the [RAW processing (HEIF)] dialog displays the [RAW processing (JPEG)] dialog, where you can adjust settings for saving the copies in JPEG format. To save the JPEG copies, highlight [EXE (save in JPEG format)] and press J.
- Exposure for JPEG copies created by applying [RAW processing (JPEG)] to RAW photos shot in HLG will be around 2 EV lower than that of JPEG copies created from RAW photos shot with [SDR] selected for tone mode. Exposure can be corrected as desired using the [Exposure compensation] option in the [RAW processing (JPEG)] dialog.
- [Set Picture Control] appears in the [RAW processing (JPEG)] display in place of [Set Picture Control (HLG)]. [Original] cannot be selected.
- You will be able to choose options for [Color space] and [Active D-Lighting]. Note, however, that choosing an option for [Active D-Lighting] may result in “noise” in the form of randomly-spaced bright pixels, fog, or lines.
- To return to the [RAW processing (HEIF)] display, select [To RAW processing (HEIF)] in the [RAW processing (JPEG)] dialog.
- The values selected in the [RAW processing (HEIF)] and [RAW processing (JPEG)] displays are stored separately and are not reset after processing or when you switch from one display to another using [To RAW processing (JPEG)] or [To RAW processing (HEIF)].