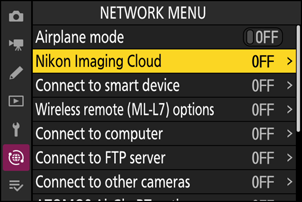
New Network Menu Item: “Nikon Imaging Cloud”
Use to connect the camera and
- Highlight [Nikon Imaging Cloud] in the network menu and press 2 to display [About Nikon Imaging Cloud] automatically when no network profiles to connect with the wireless router are available in the camera.
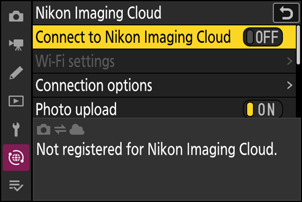
“Nikon Imaging Cloud” Menu Options
You can create profiles and add them to the camera or edit existing profiles.
Connect to Nikon Imaging Cloud
Choose whether to enable a wireless connection with Nikon Imaging Cloud.
- When no network profiles to connect with the wireless router are available in the camera, you can create profiles and add them to the camera (0Creating Network Profiles and Connecting the Camera to Nikon Imaging Cloud).
- If a network profile already exists, highlight [Use existing profile] and press 2 to select a profile to use. This item can also be used to choose from existing network profiles.
Wi-Fi Settings
- When no network profiles to connect with the wireless router are available in the camera, you can create profiles and add them to the camera (0Creating Network Profiles and Connecting the Camera to Nikon Imaging Cloud).
- If a network profile already exists, choose the profile and press the J button to connect.
To edit an existing profile, highlight it and press 2.
Option Description [Connect automatically] Choose whether to connect automatically when the camera detects a configured Wi-Fi network. [TCP/IP] Adjust the TCP/IP settings. An IP address is required.
- If [ON] is selected for [Obtain automatically], the IP address and sub-net mask will be acquired via a DHCP server or automatic IP addressing.
- Select [OFF] to enter the IP address ([Address]) and sub-net mask ([Mask]) manually.
Connection Options
Adjust connection and upload settings.
- [Only when powered via USB]: Select [ON] to limit automatic Wi-Fi connections to Nikon Imaging Cloud to when powered via USB.
- [Connect to Cloud while off]: Select [ON] to maintain Wi-Fi connections even when the camera is turned off.
- [Inactive connection timeout]: Select [ON] to end Wi-Fi connections when Wi-Fi communications are unavailable for a certain period of time.
Photo Upload
Select [ON] to automatically send photos from the camera to Nikon Imaging Cloud when shooting images that are configured by [Photo upload options].
Photo Upload Options
Configure image sending settings from the camera to Nikon Imaging Cloud.
[Auto select for upload]: Select [ON] to mark new photos for upload as they are taken.
- Videos cannot be uploaded to Nikon Imaging Cloud.
- Upload begins only after the photo has been recorded to the memory card. Be sure a memory card is inserted in the camera.
[Upload RAW + JPEG as]: When uploading RAW + JPEG pictures, choose whether to upload both the NEF (RAW) and JPEG files or only the NEF (RAW) or JPEG copy. Separate options can be selected for [Overflow/backup] and [RAW primary - JPEG secondary].
- The option selected for [Overflow/backup] takes effect during both auto and manual upload.
- The option selected for [RAW primary - JPEG secondary] applies only during auto upload.
[Upload RAW + HEIF as]: When uploading RAW + HEIF pictures, choose whether to upload both the NEF (RAW) and HEIF files or only the NEF (RAW) or HEIF copy. Separate options can be selected for [Overflow/backup] and [RAW primary - HEIF secondary].
- The option selected for [Overflow/backup] takes effect during both auto and manual upload.
- The option selected for [RAW primary - HEIF secondary] applies only during auto upload.
- [JPEG+JPEG slot selection]: Choose a source slot for auto upload when taking pictures with [JPEG primary - JPEG secondary] selected for [Secondary slot function] in the photo shooting menu.
- [HEIF+HEIF slot selection]: Choose a source slot for auto upload when taking pictures with [HEIF primary - HEIF secondary] selected for [Secondary slot function] in the photo shooting menu.
[Upload folder]: Mark all photos in a selected folder for upload. Marking will be applied to all photos, regardless of whether they have been uploaded previously.
- Videos cannot be uploaded to Nikon Imaging Cloud.
- [Deselect all?]: Remove upload marking from all pictures. Upload of pictures with an “uploading” icon will immediately be terminated.
View Errors
Error details and codes will be displayed if an error occurs during a connection or attempted connection to Nikon Imaging Cloud. Use the QR code displayed or the following URL to view the website when troubleshooting.
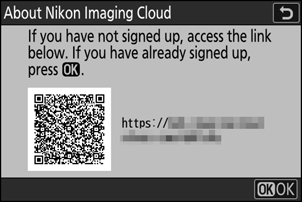
About Nikon Imaging Cloud
A QR code and URL will be displayed to browse Nikon Imaging Cloud from the web browser of a computer or smart device.
Unlink Nikon Imaging Cloud
Delete the connection information to Nikon Imaging Cloud.
- Delete connection information before discarding this product or transferring ownership to another person.
- If the connection information is deleted, images marked for upload to Nikon Imaging Cloud will no longer be sent.
- To re-connect the camera and Nikon Imaging Cloud after deleting connection information, set [Connect to Nikon Imaging Cloud] to [ON] and create a new network profile (0 Creating Network Profiles and Connecting the Camera to Nikon Imaging Cloud).
Notifications from Nikon Imaging Cloud
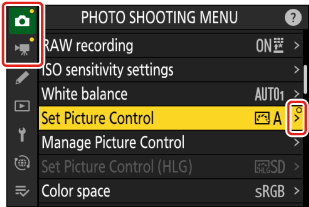
In the following cases, notification marks as shown will appear on the menu tabs and menu items in the camera menu. When a menu with a notification mark is selected for display, the mark will disappear.
- When there is a difference between the Picture Controls added to the camera and the Picture Controls in Nikon Imaging Cloud.
- When new camera firmware can be downloaded from Nikon Imaging Cloud.
- When an auto firmware update was performed.
- When there is an error notification related to connection or coordination between the camera and Nikon Imaging Cloud.
Creating Network Profiles and Connecting the Camera to Nikon Imaging Cloud
Use the camera and computer/smart device to establish a Wi-Fi connection between the camera and Nikon Imaging Cloud to access services.
Before Connecting Nikon Imaging Cloud
- You must create a Nikon ID and register with Nikon Imaging Cloud to use the service. Complete registration and sign in on the computer or smart device before connecting to the camera. See the Nikon Imaging Cloud online help for detailed instructions.
- A web browser is required to use Nikon Imaging Cloud.
- A Wi-Fi environment is required to connect the camera and Nikon Imaging Cloud. Connect the camera to an existing network (including home networks) via a wireless router.
Camera: Highlight [Nikon Imaging Cloud] in the network menu and press 2.
A QR code and URL to access Nikon Imaging Cloud on a computer or smart device will appear.
Camera: When a dialog is displayed as shown, press J to proceed.
Camera: Select [ON] for [Connect to Nikon Imaging Cloud].
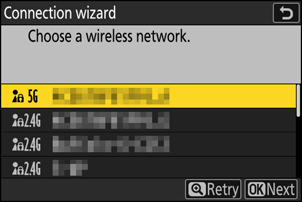
Camera: Highlight [Search for Wi-Fi network] and press J.
The camera will search for networks currently active in the vicinity and list them by name (SSID).

To connect without entering an SSID or encryption key, press X in Step 4. Next, highlight one of the following options and press J. After connecting, proceed to Step 7.
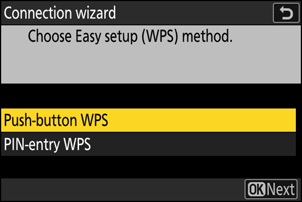
Option Description [Push-button WPS] For routers that support push-button WPS. Press the WPS button on the router and then press the camera J button to connect. [PIN-entry WPS] The camera will display a PIN. Using a computer, enter the PIN on the router. For more information, see the documentation provided with the router. Camera: Choose a network.
- Highlight a network SSID and press J.
- The SSIDs containing characters that cannot be entered on the camera will not be displayed.
- The band on which each SSID operates is indicated by an icon.
- Encrypted networks are indicated by a h icon. If the selected network is encrypted (h), you will be prompted to enter the encryption key. If the network is not encrypted, proceed to Step 8.
- If the desired network is not displayed, press X to search again.
Hidden SSIDs
Networks with hidden SSIDs are indicated by blank entries in the network list.
- To connect to a network with a hidden SSID, highlight a blank entry and press J. Next, press J; the camera will prompt you to provide an SSID.
- Enter the network name and press X. Press X again; the camera will now prompt you to enter the encryption key.

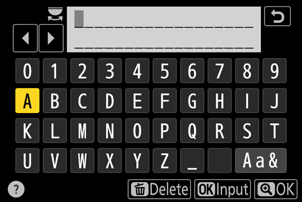
Camera: Enter the encryption key.
- Press J and enter the encryption key for the wireless router.
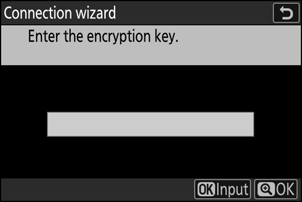
- For more information, see the documentation for the wireless router.
- Press X when entry is complete.
- Press X again to initiate the connection. A message will be displayed for a few seconds when the connection is established.

Camera: Obtain or select an IP address.
Highlight one of the following options and press J.
Option Description [Obtain automatically] Select this option if the network is configured to supply the IP address automatically. A “configuration complete” message will be displayed once an IP address has been assigned. [Enter manually] Enter the IP address, sub-net mask, gateway address, and Domain Name Server (DNS) address in that order manually. The items can be entered as follows.
IP address/gateway address/Domain Name Server (DNS):
- Press J; you will be prompted to enter the address.
- Rotate the main command dial to highlight segments.
- Press 4 or 2 to change the highlighted segment and press J to enter changes.
- When all digits have been entered, press X to save changes.
- Press X again to proceed.
Sub-net mask:
To change the highlighted digit, press 1 or 3. Press J to save changes and proceed.
Camera: Press J to proceed when the “configuration complete” message is displayed.
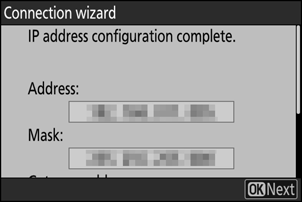
The camera accesses Nikon Imaging Cloud and prepares for connection. If preparation is complete, a QR code and URL to access Nikon Imaging Cloud on a computer or smart device will appear.
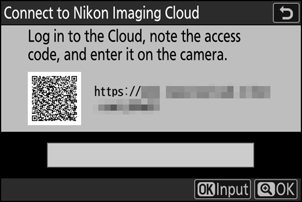
Computer/smart device: Click or tap the connect camera button in the Nikon Imaging Cloud home screen.
An access code to connect Nikon Imaging Cloud and the camera appears.
Camera: Enter the access code displayed on the computer/smart device in Step 9.
- Press J to enter the access code.
- Press X when entry is complete.
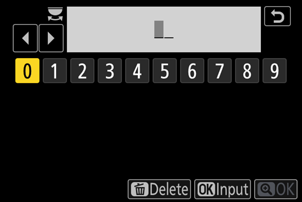
- Pressing X again connects the camera and Nikon Imaging Cloud and displays a QR code and URL to access to the Nikon Imaging Cloud from a computer or smart device.
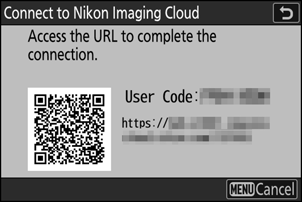
Computer/smart device: Scan the QR code displayed on the camera screen or enter the URL also displayed on the camera into a web browser.
- A connection confirmation screen appears.
- If a user-code entry screen appears on the computer/smart device, enter the user code displayed on the camera screen.
Computer/smart device: Click or tap the [Connect] button.
The network profile is added to the camera and Nikon Imaging Cloud and the camera are now connected via Wi-Fi. If connection completion screens appear on both the computer/smart device and the camera, you can use the camera with Nikon Imaging Cloud.
For information on using Nikon Imaging Cloud, see online help.
