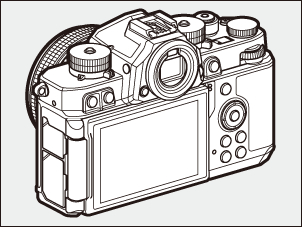
The Monitor
At default settings, the following indicators appear in the monitor. For a full list of the indicators that may be displayed, see “The Monitor” in the section on “Camera Displays” (0 The Monitor) in the “Technical Notes” chapter.
Photo Mode

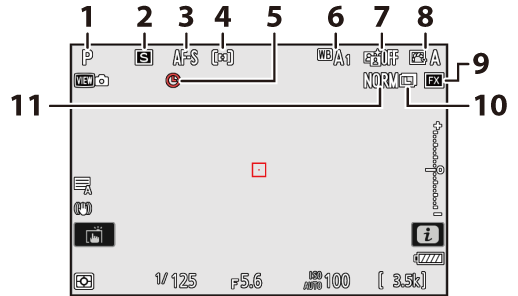
- Shooting mode (0 Choosing a Shooting Mode)
- Release mode (0 Release Mode)
- Focus mode (0 Focus Mode)
- AF-area mode (0 AF-Area Mode)
- t icon (0 The t Icon)
- White balance (0 White Balance)
- Active D-Lighting (0 Active D-Lighting)
- Picture Control (0 Picture Controls)
- Image area (0 Adjusting Image Area Settings)
- Image size (0 Choosing an Image Size)
- Image quality (0 Adjusting Image Quality)
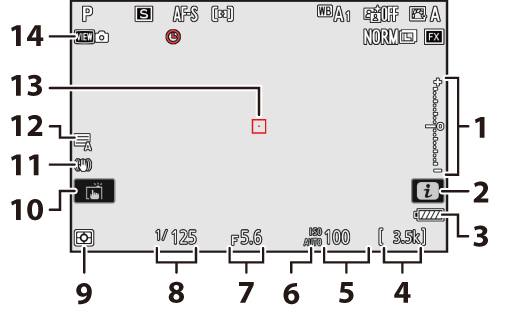
Exposure indicator
- Exposure (0 Exposure Indicators)
- Exposure compensation (0 Exposure Compensation)
- i icon (0 The i Button (i Menu), The i Button (Playback Mode))
- Battery indicator (0 Battery Level)
- Number of exposures remaining (0 Number of Exposures Remaining, Memory Card Capacity)
- ISO sensitivity (0 ISO Sensitivity)
ISO sensitivity indicator (0 ISO Sensitivity)
Auto ISO sensitivity indicator (0 Auto ISO Sensitivity Control)
- Aperture (0 A (Aperture-Priority Auto), M (Manual))
- Shutter speed (0 S (Shutter-Priority Auto), M (Manual))
- Metering (0 Metering)
- Touch shooting (0 The Touch Shutter)
- Vibration reduction indicator (0 Vibration Reduction)
- Shutter type (0 d5: Shutter Type)
- Focus point (0 Focus-Point Selection)
- View mode (photo live view; 0 d9: View Mode (Photo Lv))
Using the Monitor with the Camera in “Tall” Orientation
In photo mode, the playback, i menu, and shooting displays rotate to match camera orientation.
Press the

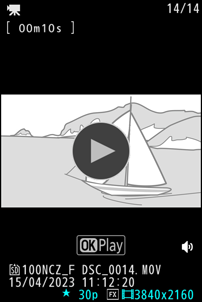
Video Mode

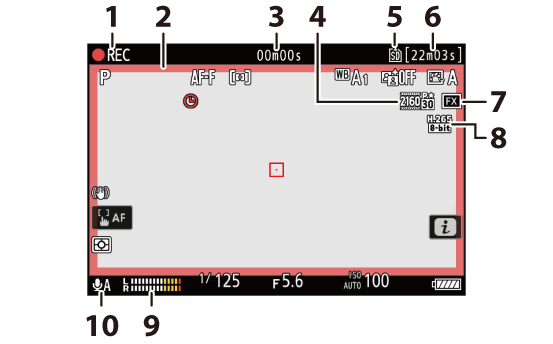
Recording indicator
“No video” indicator (0 The 0 Icon)
- Recording indicator (red border; 0 g17: Red REC Frame Indicator)
- Length of footage recorded
- Frame size and rate (0 Video Frame Size and Rate Options)
- Destination (0 Destination)
- Available recording time
- Image area (0 Video Image Area Options)
- Video file type (0 Video File Types)
- Sound level (0 Microphone Sensitivity)
- Microphone sensitivity (0 Microphone Sensitivity)
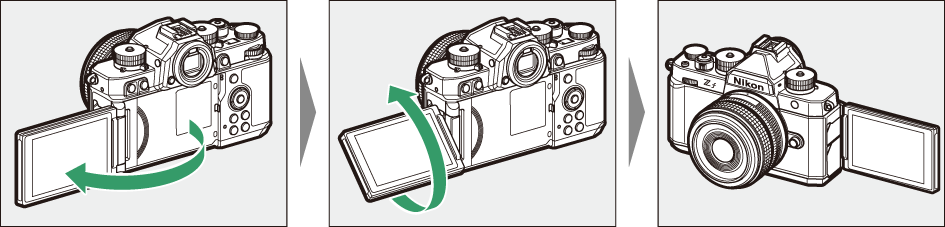
Angling the Monitor
The monitor can be angled and rotated.

- Normal use:
The monitor is normally used in storage position with the screen facing outward.
- Low-angle shots:
Tilt the monitor up to take shots with the camera held low.
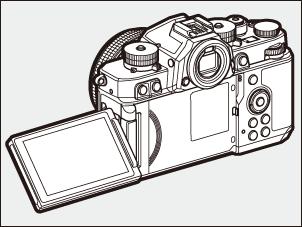
- High-angle shots:
Tilt the monitor down to take shots with the camera held high.

- Self-portraits:
Rotating the monitor to face the same direction as the lens enables self-portrait mode (0Self-Portrait Mode).

- Rotate the monitor gently within the limits of its hinges. Using excessive force could damage the camera or monitor.
- We recommend returning the monitor to the storage position with the screen facing inward to keep it free of dust and scratches when not in use.
- Do not lift or carry the camera by the monitor. Failure to observe this precaution could result in damage to the camera.
Self-Portrait Mode
Rotating the monitor to the self-portrait position triggers self-portrait mode.
- The monitor shows a mirror image of the view through the lens, but pictures recorded by the camera are not mirrored.
- If desired, you can tap the self-timer icon (q) in the monitor to set the self-timer and choose the number of shots taken when the timer expires.
- When the exposure compensation dial is rotated to C, you can also adjust exposure compensation by tapping the exposure compensation icon (w).

- Press the shutter-release button halfway to focus. Press it the rest of the way down to take a photograph.
- If the self-timer is enabled, a count-down timer will be displayed in the monitor when the shutter-release button is pressed all the way down.
- You can also use the monitor for touch AF and take pictures via the touch shutter.
- In video mode, recording can be started by pressing the video-record button.
- Self-portrait mode ends when the monitor is moved to another position.
Note the following points when using the camera in self-portrait mode:
- Selecting self-portrait mode disables all controls other than the power switch, the shutter-release and video-record buttons, the mode and photo/video selectors, and the shutter speed, ISO sensitivity, and exposure compensation dials.
- The standby timer will expire if no operations are performed for either one minute or the time selected for Custom Setting c3 [Power off delay] > [Standby timer], whichever is longer.
The following settings are fixed at the values below.
- [Release mode]: [Self-timer]
- [Focus mode] in the video recording menu: [Full-time AF]
- [Touch controls] >[Enable/disable touch controls]: [Enable]
- The viewfinder cannot be used.
The following features are disabled:
- [Long exposure NR]
- [Auto bracketing]
- [HDR overlay]
- [Extended shutter speeds (M)]
- Rotating the monitor to the self-portrait position will not trigger self-portrait mode when [OFF] is selected for [Self-portrait mode] in the setup menu (0 Self-Portrait Mode).