New Setup Menu Item: “C2PA/Content Credentials”
A [
- Use the "
content provenance recording " feature (0 Using the Content Provenance Recording) by importing to your camera a digital certificate that is issued by a digital certificate vendor in accordance with the Coalition for Content Provenance and Authenticity (C2PA) standards. - Content provenance recording allows you to record information in photos such as the camera used, shooting date and time, and the photographer in a format that is difficult to tamper with.
- You can view provenance information in Nikon Imaging Cloud's
Nikon Authenticity Service. Enhance the credibility of your content by using provenance information.
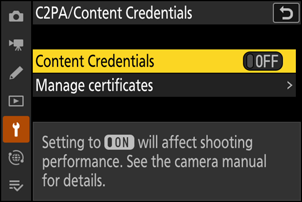
| Option | Description |
|---|---|
| [Content Credentials] | If [ON] is selected, the camera records provenance information on photos. |
| [Manage certificates] |
|
Displaying “C2PA/Content Credentials” in the Camera Setup Menu
To add [C2PA/Content Credentials] to your camera, you must first apply for the Nikon Authenticity Service on Nikon Imaging Cloud, then connect your camera to Nikon Imaging Cloud.
Using Content Provenance Recording
Follow the steps below to use the content provenance recording feature. Provenance information is only recorded on photos taken when [SDR] is selected for [Tone mode] in the photo shooting menu.
Apply for the Nikon Authenticity Service on Nikon Imaging Cloud.
You can apply through the Nikon Authenticity Service page on Nikon Imaging Cloud to use the service.
Connect the Camera to Nikon Imaging Cloud.
- See the camera Reference Guide for detailed instructions.
- When the camera is connected to Nikon Imaging Cloud, [C2PA/Content Credentials] will appear in the camera setup menu.
Import a digital certificate (0 Importing a Digital Certificate).
- Import a digital certificate issued by a digital certificate vendor in accordance with the C2PA standards to your camera via Nikon Imaging Cloud.
- Nikon does not issue digital certificates.
Take Photos with Content Provenance (0 Taking Photos with Content Provenance).
The camera records provenance information on photos.
Importing a Digital Certificate
Before using content provenance recording on your camera for the first time, you must import a digital certificate from Nikon Imaging Cloud.
Connect the Camera to Nikon Imaging Cloud.
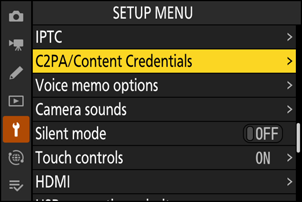
Highlight [C2PA/Content Credentials] in the setup menu and press 2.
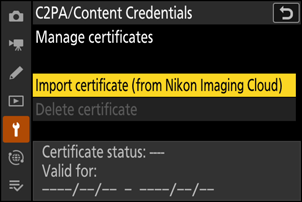
Select [Manage certificates], highlight [Import certificate (from Nikon Imaging Cloud)], and press J.
The camera will import the digital certificate.
Deleting a Digital Certificate from the Camera
Select [Manage certificates], highlight [Delete certificate], and press J to delete the digital certificate.
- Delete the digital certificate before discarding the camera or transferring ownership to another person.
- The digital certificate will also be deleted if the default settings are restored using the [Reset all settings] item in the setup menu.
- Deleting the digital certificate disables content provenance recording.
Cautions: Deleting Digital Certificates
Deleting a digital certificate from the camera and attempting to import a new one will revoke the old digital certificate stored in Nikon Imaging Cloud and will issue a new certificate for import to the camera. Digital certificates can be issued up to ten times. If you exceed this limit, you will no longer be able to issue digital certificates. When deleting a digital certificate from your camera, pay attention to the number of digital certificates you have issued.
Revoking a Digital Certificate Imported to a Camera
To revoke the certificate imported to your camera, first perform the certificate revocation procedure in Nikon Imaging Cloud. See the Nikon Imaging Cloud online help for detailed instructions. Connecting your camera to Nikon Imaging Cloud after revoking the digital certificate will also revoke the digital certificate on the camera. Delete the revoked digital certificate from the camera.
- If you do not connect your camera to Nikon Imaging Cloud after revoking the digital certificate, the camera will still display the certificate as valid, but the provenance information cannot be viewed since the certificate is no longer valid.
Taking Photos with Content Provenance
Highlight [C2PA/Content Credentials] in the setup menu and press 2.
Select [ON] for [Content Credentials].
- Content provenance recording is enabled.
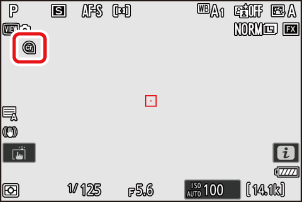
- A J icon will appear in the shooting display.
Take pictures.
Content provenance recording is available for still photography modes such as single-frame or burst shooting.
Pictures with provenance information are indicated by a I icon.

Cautions: Shooting Bursts with Content Provenance Recording
- The memory buffer capacity may drop.
- It will take time for the frame rate to recover if the rate drops and "r000" appears in the shooting display.
View Content Provenance
You can view provenance information on Nikon Imaging Cloud. See the Nikon Imaging Cloud online help to upload pictures from the camera and view provenance information.
[Content Credentials] can now be assigned to the i menu in Custom Setting f1 [Customize i menu]. Content provenance recording can be set to [ON] or [OFF].
- This item will not appear in the functions that can be assigned to i menu via Custom Setting f1 [Customize i menu] until [C2PA/Content Credentials] is displayed in the setup menu.