g2: Custom Controls
G button U A Custom Settings menu
Choose the operations performed in video mode using lens rings and camera buttons and command dials.
- You can also choose the roles played by the controls on optional battery packs connected to the camera.
Choose the roles played by the controls below. Highlight the desired control and press J.
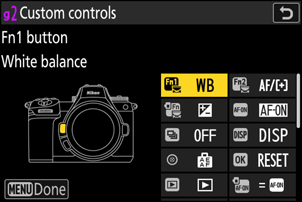
Option w [Fn1 button] y [Fn2 button] n [Fn button for vertical shooting] V [AF-ON button] l [Release mode/protect button] D [DISP button] 8 [Sub-selector center] p [OK button] q [Playback button] j [AF-ON button for vertical shooting] F [Vertical multi selector center] G [Shutter-release button] z [Video record button] Q [Exposure compensation button] R [ISO sensitivity button] y [Command dials] S [Lens Fn button] 3 [Lens Fn2 button] S [Lens Fn ring (counterclockwise)] R [Lens Fn ring (clockwise)] T [Lens memory set button] l [Lens control ring] The roles that can be assigned are listed below. The roles available vary with the control.
Role Description K [Select center focus point] Pressing the control selects the center focus point. F [Save focus position] Holding the control saves the current focus position.
- The saved position can be restored using a control to which [Recall focus position] has been assigned (“memory recall”).
When saving the focus position, you can choose whether it can be recalled using any of the controls to which [Recall focus position] is assigned ([Save to all]) or using only a specific control ([Save individually]).
For more information, see “Saving and Recalling Focus Positions” (0 Saving and Recalling Focus Positions).
H [Recall focus position] Pressing the control recalls a focus position saved using a control to which [Save focus position] has been assigned.
- For more information, see “Saving and Recalling Focus Positions” (0 Saving and Recalling Focus Positions).
z [Switch eyes] Press the control to choose the eye used for focus when the camera detects the eyes of a human or animal portrait subject. A [AF-ON] Pressing the control initiates autofocus, duplicating the function of the AF-ON button.
- When AF-C is selected for focus mode, the camera will focus at the speed selected for Custom Setting g5 [AF speed].
G [Fast AF‑ON] Pressing the control initiates autofocus, duplicating the function of the AF-ON button.
- When AF-C is selected for focus mode, the camera will focus at maximum speed, regardless of the option chosen for Custom Setting g5 [AF speed].
F [AF lock only] Focus locks while the control is pressed. E [AE lock (Hold)] Exposure locks when the control is pressed. Exposure lock does not end when recording begins. Exposure remains locked until the control is pressed a second time or the standby timer expires. N [AWB lock (hold)] If [Auto] or [Natural light auto] is selected for white balance, white balance will lock when the control is pressed (white-balance lock). White-balance lock does not end when recording begins. The lock will however be released when the control is pressed a second time or the standby timer expires. O [AE/AWB lock (hold)] Exposure locks when the control is pressed. White balance will also lock provided [Auto] or [Natural light auto] is selected for white balance. Exposure and white-balance lock do not end when recording begins. The lock will however be released when the control is pressed a second time or the standby timer expires. C [AE lock only] Exposure locks while the control is pressed. B [AE/AF lock] Focus and exposure lock while the control is pressed. K [Switch FX/DX] Press the control to switch between [FX] and [DX] image areas. p [View assist] Press the control to select [ON] for Custom Setting g11 [View assist]. Press again to select [OFF]. E [High-frequency flicker reduction] Pressing the control allows shutter speed to be fine-tuned in smaller increments. Press the control a second time to restore normal shutter-speed selection.
L [Silent mode] Press the control to enable silent mode. Press again to disable. M [Cycle live view info display] Press the control to cycle the shooting display. The type and content of the displays available can be chosen using Custom Settings g16 [Custom monitor shooting display] and g17 [Custom viewfinder shooting display]. b [Live view info display off] Press the control to hide icons and other information in the shooting display. Press again to view. b [Framing grid] Press the control to display a framing grid. To hide the grid, press the control again. The display type can be selected using Custom Setting g14 [Grid type]. p [Zoom on/off] Press the control to zoom the display in on the area around the current focus point. Press again to cancel zoom.
- To choose the zoom ratio, highlight [Zoom on/off] and press 2.
D [Virtual horizon] Press the control to enable the virtual horizon display. Press again to hide the display. The display type can be selected using Custom Setting d18 [Virtual horizon type]. W [Focus peaking display] Press the control once to enable focus peaking when MF is selected for focus mode. Press again to end focus peaking. 8 [Enable/disable touch Fn] Press the control to enable or disable touch Fn. O [MY MENU] Press the control to display “MY MENU”. 3 [Access top item in MY MENU] Press the control to jump to the top item in “MY MENU”. Select this option for quick access to a frequently-used menu item. K [Playback] Press the control to start playback. l [Filtered playback] Press the control to view only pictures that meet the criteria selected for [Filtered playback criteria] in the playback menu. N [Filtered playback (select criteria)] Press the control to jump to [Filtered playback criteria] in the playback menu. t [Power aperture (open)] - Aperture widens while the button is pressed. This option is enabled automatically when [Power aperture (close)] is selected for [Fn2 button].
- Rotate the lens Fn ring counterclockwise to widen the lens aperture. This option is enabled automatically when [Power aperture (close)] is selected for [Lens Fn ring (clockwise)].
q [Power aperture (close)] - Aperture narrows while the button is pressed. This option is enabled automatically when [Power aperture (open)] is selected for [Fn1 button].
- Rotate the lens Fn ring clockwise to narrow the lens aperture. This option is enabled automatically when [Power aperture (open)] is selected for [Lens Fn ring (counterclockwise)].
i [Exposure compensation +] - Exposure compensation increases while the button is pressed. This option is enabled automatically when [Exposure compensation −] is selected for [Fn2 button].
- Rotate the lens Fn ring clockwise for increased exposure compensation. This option is enabled automatically when [Exposure compensation −] is selected for [Lens Fn ring (counterclockwise)].
h [Exposure compensation −] - Exposure compensation decreases while the button is pressed. This option is enabled automatically when [Exposure compensation +] is selected for [Fn1 button].
- Rotate the lens Fn ring counterclockwise to reduce exposure compensation. This option is enabled automatically when [Exposure compensation +] is selected for [Lens Fn ring (clockwise)].
B [ISO sensitivity (increase)] Rotate the lens Fn ring clockwise to increase ISO sensitivity. This option is enabled automatically when [ISO sensitivity (decrease)] is selected for [Lens Fn ring (counterclockwise)]. C [ISO sensitivity (decrease)] Rotate the lens Fn ring counterclockwise to decrease ISO sensitivity. This option is enabled automatically when [ISO sensitivity (increase)] is selected for [Lens Fn ring (clockwise)]. I [Hi-Res Zoom +] - Zoom in using Hi-Res Zoom; the zoom ratio increases while the control is pressed. This option is enabled automatically when [Hi-Res Zoom −] is selected for [Fn2 button].
- Rotate the lens Fn ring clockwise to zoom in using Hi-Res Zoom. This option is enabled automatically when [Hi-Res Zoom −] is selected for [Lens Fn ring (counterclockwise)].
J [Hi-Res Zoom −] - Zoom out using Hi-Res Zoom; the zoom ratio decreases while the control is pressed. This option is enabled automatically when [Hi-Res Zoom +] is selected for [Fn1 button].
- Rotate the lens Fn ring counterclockwise to zoom out using Hi-Res Zoom. This option is enabled automatically when [Hi-Res Zoom +] is selected for [Lens Fn ring (clockwise)].
Y [Power zoom +] When a power zoom lens is attached, the camera zooms in while the control is pressed. This option is enabled automatically when [Power zoom −] is selected for [Fn2 button]. Z [Power zoom −] When a power zoom lens is attached, the camera zooms out while the control is pressed. This option is enabled automatically when [Power zoom +] is selected for [Fn1 button]. 9 [Pattern tone range] Press the control to cycle through zebra pattern tone range options (0 Pattern Tone Range). e [Same as AF-ON button] The control performs the role currently selected for the AF-ON button. 1 [Record videos] Press the control to start recording. Press again to end recording. J [Choose image area] Press the control and rotate a command dial to choose the image area for videos. Note that the image area cannot be changed while recording is in progress. m [White balance] Hold the control and rotate the main command dial to adjust white balance for videos. Some options offer sub-options that can be selected by rotating the sub-command dial. h [Set Picture Control] Press the control and rotate a command dial to choose a Picture Control. y [Active D-Lighting] Press the control and rotate a command dial to adjust Active D-Lighting for videos. h [Skin softening] Press the control and rotate a command dial to adjust skin softening. i [Portrait impression balance] Press the control and rotate a command dial to choose a portrait impression balance mode. w [Metering] Press the control and rotate a command dial to choose a metering option for use during video recording. z [Focus mode/AF-area mode] Hold the control and rotate the main command dial to choose the focus mode, the sub-command dial to choose the AF-area mode. a [Control lock] - Press the control and rotate the main command dial to lock shutter speed (mode M). To lock aperture (modes A and M), press the control and rotate the sub-command dial.
- To lock focus-point selection, hold the control while using the multi selector to choose the focus point.
H [Audio input sensitivity] Press the control and rotate a command dial to adjust audio input sensitivity. X [Focus (M/A)] The lens control ring can be used for manual focus regardless of the option selected for focus mode. To refocus using autofocus, press the shutter-release button halfway or press a control to which AF-ON has been assigned. q [Power aperture] Rotate the lens control ring to adjust aperture. E [Exposure compensation] Adjust exposure compensation either by holding the control and rotating a command dial or by rotating the lens control ring. 9 [ISO sensitivity] Adjust ISO sensitivity either by holding the control and rotating a command dial or by rotating the lens control ring. H [Hi-Res Zoom] Rotate the lens control ring to zoom in or out using Hi-Res Zoom. [None] The control has no effect.
- Power aperture is available only in modes A and M.
- The display may flicker while aperture is adjusted.
Command Dials
The following roles can be assigned to the command dials. To view options, highlight items and press 2.
| Role | Description |
|---|---|
| [Exposure setting] | Reverse the roles of the main and sub-command dials in selected modes. Press 4 or 2 to highlight a mode and 1 or 3 to switch roles. |
| [Focus/AF-area mode selection] | Switch the roles played by rotating the main and sub-command dials while holding a control to which [Focus mode/AF-area mode] has been assigned using Custom Setting g2 [Custom controls]. |
| [Sub-command dial zoom role] | Choose the role played by the sub-command dial in the zoom display.
|