The Built-In Flash
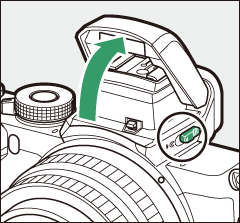
You’ll find that the built-in flash enhances the photographic experience in a variety of situations, including when lighting is poor or when you need to fill in shadows and backlit subjects. Before using the built-in flash, raise it by sliding the flash pop-up control.
-
Slide the flash pop-up control to raise the built-in flash.
-
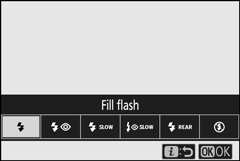
Choose a flash mode.
Select Flash mode in the i or photo shooting menu and choose a flash mode.
-
Take a picture after pressing the shutter-release button halfway to focus.
Flash Modes
Use the Flash mode option in the i or photo shooting menu to choose the effect produced by the flash. The options available vary with the shooting mode selected.
| Option | Description | Available in |
|---|---|---|
| I | Fill flash (front-curtain sync): The flash fires with every shot. | P, S, A, M |
| J | Red-eye reduction: Use for portraits. The red-eye reduction lamp lights before the flash fires to help reduce “red-eye”. | P, S, A, M |
| L | Slow sync: As for “fill flash”, except that shutter speed slows automatically to capture background lighting at night or under low light. | P, A |
| K | Slow sync + red-eye: Use for portraits or similar shots taken against a night or evening backdrop. In addition to performing red-eye reduction, the camera uses slow shutter speeds to capture background lighting. | P, A |
| M | Rear-curtain sync: Normally the flash fires as the shutter opens (front-curtain sync); in rear-curtain sync, the flash fires just before the shutter closes. Slow sync is automatically enabled in modes P and A. | P, S, A, M |
| X | Auto: The flash fires automatically as required when lighting is poor or the subject is backlit. | b, k, p, n, s, f, V, T, U, 5 |
| s | Auto + red-eye reduction: As for “red-eye reduction”, except that the flash fires only as required. | b, k, p, n, s, f, V, T, U, 5 |
| t | Auto slow sync: As for “slow sync”, except that the flash fires only as required. | o |
| u | Auto slow sync + red-eye: As for “slow-sync + red-eye”, except that the flash fires only as required. | o |
| s | Flash off: The flash does not fire. | b, P, S, A, M, k, p, n, o, s, f, V, T, U, 5 |
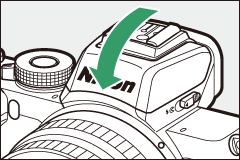
Lowering the Built-In Flash
To save power when the flash is not in use, press it gently downward until the latch clicks into place.
Using the Built-In Flash
- Remove lens hoods to prevent shadows.
- If the built-in flash is used with continuous low-speed or continuous high-speed selected for release mode, only one picture will be taken each time the shutter-release button is pressed. Selecting continuous high-speed (extended) enables burst photography and disables the built-in flash.
- The shutter release may be briefly disabled to protect the flash after it has been used for several consecutive shots. The flash can be used again after a short pause.
Shutter Speeds Available with the Built-In Flash
Shutter speed can be set as follows when the built-in-flash unit is used:
| Mode | Shutter speed |
|---|---|
| b, p, n, s, f, 0, V, T, U, 5 | Set automatically by camera (1/200 s–1/60 s) |
| k | Set automatically by camera (1/200 s–1/30 s) |
| o | Set automatically by camera (1/200 s–2 s) |
| P, A | Set automatically by camera (1/200 s–1/60 s) * |
| S | 1/200 s–30 s |
| M | 1/200 s–30 s, Bulb, Time |
Shutter speed may be set as slow as 30 s if slow sync, rear-curtain sync, or slow sync with red-eye reduction is selected for flash mode.
Aperture, Sensitivity, and Flash Range
Flash range varies with sensitivity (ISO equivalency) and aperture.
| Aperture at ISO equivalent of | Approximate range | ||||||||||
|---|---|---|---|---|---|---|---|---|---|---|---|
| 100 | 200 | 400 | 800 | 1600 | 3200 | 6400 | 12800 | 25600 | 51200 | m | ft |
| 1.4 | 2 | 2.8 | 4 | 5.6 | 8 | 11 | 16 | 22 | 32 | 0.7–5.0 | 2 ft 4 in.–16 ft 5 in. |
| 2 | 2.8 | 4 | 5.6 | 8 | 11 | 16 | 22 | 32 | — | 0.6–3.5 | 2 ft–11 ft 6 in. |
| 2.8 | 4 | 5.6 | 8 | 11 | 16 | 22 | 32 | — | — | 0.6–2.5 | 2 ft–8 ft 3 in. |
| 4 | 5.6 | 8 | 11 | 16 | 22 | 32 | — | — | — | 0.6–1.8 | 2 ft–5 ft 11 in. |
| 5.6 | 8 | 11 | 16 | 22 | 32 | — | — | — | — | 0.6–1.3 | 2 ft–4 ft 3 in. |
| 8 | 11 | 16 | 22 | 32 | — | — | — | — | — | 0.6–0.9 | 2 ft–3 ft |
The flash has a minimum range of about 0.6 m (2 ft).
Flash Compensation
Flash compensation is used to alter flash output by from –3 EV to +1 EV, changing the brightness of the main subject relative to the background. By default, adjustments to exposure compensation are made in increments of 1/3 EV. This can be changed to 1/2 EV using Custom Setting b1 (EV steps for exposure cntrl). Flash output can be increased to make the main subject appear brighter, or reduced to prevent unwanted highlights or reflections. In general, choose positive values to make the main subject brighter, negative values to make it darker.
To choose a value for flash compensation, use the Flash compensation item in the photo shooting menu. At values other than ±0.0, a Y icon will appear in the shooting display.
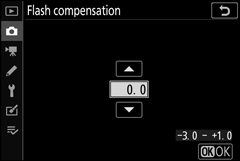
Normal flash output can be restored by setting flash compensation to ±0.0. Flash compensation is not reset when the camera is turned off.
FV Lock
This feature is used to lock flash output, allowing photographs to be recomposed without changing the flash level and ensuring that flash output is appropriate to the subject even when the subject is not positioned in the center of the frame. Flash output is adjusted automatically for any changes in ISO sensitivity and aperture. FV lock is not available in b, h, and q modes.
To use FV lock:
-
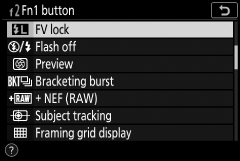
Assign FV lock to a camera control.
Assign FV lock to a control using Custom Setting f2 (Custom controls (shooting)).
-
Raise the flash.
Slide the flash pop-up control to raise the built-in flash.
-
Focus.
Position the subject in the center of the frame and press the shutter-release button halfway to focus.


-
Lock flash level.
After confirming that the flash-ready indicator (c) appears in the camera display, press the control selected in Step 1. The flash unit will emit a monitor pre-flash to determine the appropriate flash level. Flash output will be locked at this level and FV lock icon (r) will appear in the camera display.

-
Recompose the photograph.
Flash output will remain locked at the value metered in Step 4.

-
Take the photograph.
Press the shutter-release button the rest of the way down to shoot. If desired, additional pictures can be taken without releasing FV lock.
-
Release FV lock.
Press the control selected in Step 1 to release FV lock. Confirm that the FV lock icon (r) is no longer displayed.
Optional Flash Units
Turn the flash unit on and select TTL for Flash control > Flash control mode (external) (SB-500, SB-400, or SB-300) or set the flash control mode to TTL, monitor pre-flash qA, or monitor pre-flash A (other flash units; see the documentation provided with the flash unit for details).