Connecting to HDMI Devices
The camera can be connected to high-definition video devices using a third-party HDMI cable (type D). Always turn the camera off before connecting or disconnecting an HDMI cable.
Connect to camera
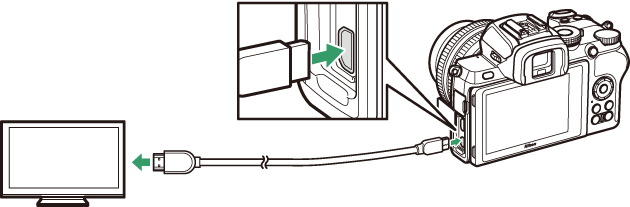
Connect to high-definition device (choose cable with connector for HDMI device)
Connecting to HDMI TVs
After connecting the camera to an HDMI television or other display, tune the device to the HDMI channel, then turn the camera on and press the K button. During playback, images will be displayed on the television screen. Volume can be adjusted using television controls; the camera controls cannot be used.
Connecting to Other HDMI Devices
Use the HDMI option in the setup menu to adjust settings for HDMI output.
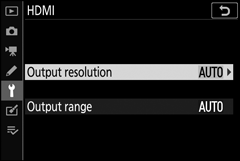
- Output Resolution: Choose the format for images output to the HDMI device. If Auto is selected, the camera will automatically select the appropriate format.
- Output range: Auto is recommended in most situations. If the camera is unable to determine the correct RGB video signal output range for the HDMI device, you can choose Limited range for devices with an RGB video signal input range of 16 to 235 or Full range for devices with an RGB video signal input range of 0 to 255. Choose Limited range if you notice a loss of detail in shadows, Full range if shadows are “washed out” or too bright.
HDMI Output
HDMI output is not available while movies are being recorded at movie frame sizes of 1920 × 1080 120p, 1920 × 1080 100p, or 1920 × 1080 slow-motion or when the camera is connected to a computer running Camera Control Pro 2.