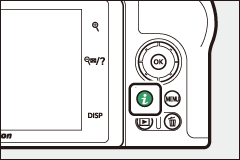
The i Button: Playback
Pressing the i button during playback zoom or full-frame or thumbnail playback displays the i menu for playback mode. Select options using the multi selector and J button and press the i button to exit the menu and return to playback.
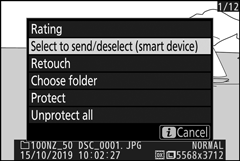
The options available in the playback i menu vary with the type of picture.
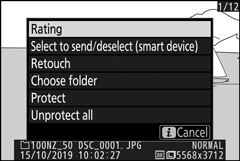
Photos: Pressing the i button when a photo is selected displays the options listed below.
- Quick crop (displayed only during playback zoom): Save a copy of the current image cropped to the area visible in the display. This option is not available when histograms are displayed.
- Rating: Rate the current picture (0 Rating Pictures).
- Select to send/deselect (smart device/PC): Select the current picture for upload. The option displayed varies with the type of device connected (0 Select to Send/Deselect).
- Retouch: Use the options in the retouch menu (0 N The Retouch Menu: Creating Retouched Copies) to create a retouched copy of the current photograph.
- Choose folder: Choose a folder for playback. Highlight a folder and press J to view the pictures in the highlighted folder.
- Protect: Add protection to or remove protection from the current picture (0 Protecting Pictures from Deletion).
- Unprotect all (not available during playback zoom): Remove protection from all pictures in the folder currently selected for Playback folder in the playback menu.
Movies: The options below are available when a movie is selected.
- Rating: Rate the current picture (0 Rating Pictures).
- Select to send/deselect (PC): Select the current picture for upload. The option displayed varies with the type of device connected (0 Select to Send/Deselect).
- Volume control: Adjust playback volume.
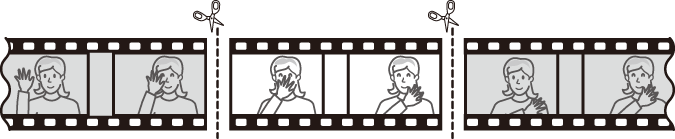
- Trim movie: Trim footage from the current movie and save the edited copy in a new file (0 Choose Start/End Point).
- Choose folder: Choose a folder for playback. Highlight a folder and press J to view the pictures in the highlighted folder.
- Protect: Add protection to or remove protection from the current picture (0 Protecting Pictures from Deletion).
- Unprotect all: Remove protection from all pictures in the folder currently selected for Playback folder in the playback menu.
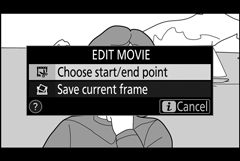
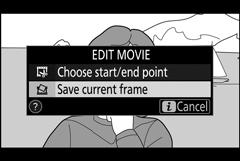
Movies (playback paused): The options below are available when movie playback is paused.
- Choose start/end point: Trim footage from the current movie and save the edited copy in a new file (0 Choose Start/End Point).
- Save current frame: Save a selected frame as a JPEG still (0 Save Current Frame).
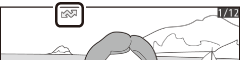
Select to Send/Deselect
Follow the steps below to select the current picture for upload to a smart device or computer. The i menu options used to select pictures for upload vary with the type of device connected:
- Select to send/deselect (smart device): Displayed when the camera is connected to a smart device via built-in Bluetooth using the Connect to smart device item in the setup menu (0 Connect to Smart Device).
- Select to send/deselect (PC): Displayed when the camera is connected to a computer via built-in Wi-Fi using the Connect to PC item in the setup menu (0 Connect to PC).
-
Select a picture.
Display a picture in full-frame playback or playback zoom or select it in the thumbnail list.
-
Choose Select to send/deselect.
Press the i button to display the i menu, then highlight Select to send/deselect and press J. Pictures selected for upload are indicated by a W icon; to deselect, repeat Steps 1 and 2.
Movies
Movies cannot be selected for upload when the camera is connected to a smart device via the SnapBridge app. The maximum file size for movies uploaded by other means is 4 GB.
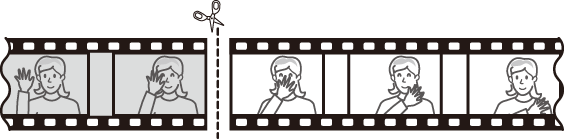
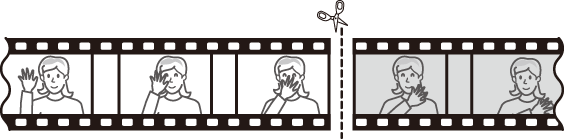
Choose Start/End Point
Follow the steps below to create trimmed copies of movies.
-
Display a movie full frame.
-
Pause the movie on the new opening frame.
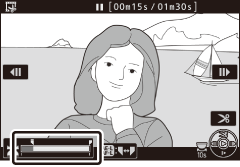
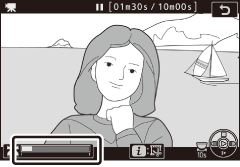
Play the movie back as described in “Viewing Movies” (0 Viewing Movies), pressing J to start and resume playback and 3 to pause, and pressing 4 or 2 or rotating the main command dial to locate the desired frame. Your approximate position in the movie can be ascertained from the movie progress bar. Pause playback when you reach the new opening frame.
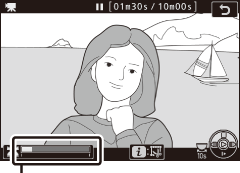
Movie progress bar
-
Select Choose start/end point.
Press the i button to display the i menu, then highlight Choose start/end point and press J.
-
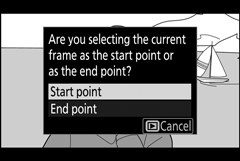
Select Start point.
To create a copy that begins from the current frame, highlight Start point and press J. The frames before the current frame will be removed when you save the copy in Step 9.
Start point
-
Confirm the new start point.
If the desired frame is not currently displayed, press 4 or 2 to advance or rewind (to skip to 10 s ahead or back, rotate the main command dial; to skip to the first or last frame, rotate the sub-command dial).
-
Choose the end point.
Press the A (L) button to switch from the start point (w) to the end point (x) selection tool and then select the closing frame as described in Step 5. The frames after the selected frame will be removed when you save the copy in Step 9.
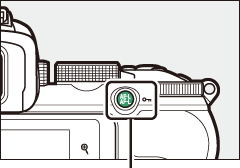
A (L) button
End point
-
Create the copy.
Once the desired frame is displayed, press 1.
-
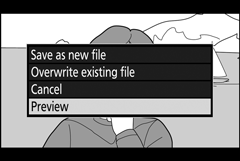
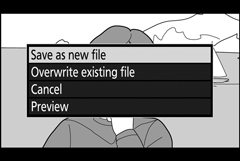
Preview the movie.
To preview the copy, highlight Preview and press J (to interrupt the preview and return to the save options menu, press 1). To abandon the current copy and select a new start point or end point as described above, highlight Cancel and press J; to save the copy, proceed to Step 9.
-
Save the copy.
Highlight Save as new file and press J to save the copy to a new file. To replace the original movie file with the edited copy, highlight Overwrite existing file and press J.
Trimming Movies
Movies must be at least two seconds long. The copy will not be saved if there is insufficient space available on the memory card.
Copies have the same time and date of creation as the original.
Removing Opening or Closing Footage
To remove only the opening footage from the movie, proceed to Step 7 without pressing the A (L) button in Step 6. To remove only the closing footage, select End point in Step 4, select the closing frame, and proceed to Step 7 without pressing the A (L) button in Step 6.
“Trim Movie”
Movies can also be edited using the Trim movie option in the retouch menu.
Save Current Frame
To save a copy of a selected frame as a JPEG still:
-
Pause the movie on the desired frame.
Play the movie back as described in “Viewing Movies” (0 Viewing Movies), pressing J to start and resume playback and 3 to pause. Pause the movie at the frame you intend to copy.
-
Choose Save current frame.
Press the i button to display the i menu, then highlight Save current frame and press J to create a JPEG copy of the current frame. The image will be recorded at the dimensions selected for Frame size/frame rate in the movie shooting menu.
Save Current Frame
JPEG movie stills created with the Save current frame option cannot be retouched. JPEG movie stills lack some categories of photo information.