Connecting to HDMI Devices
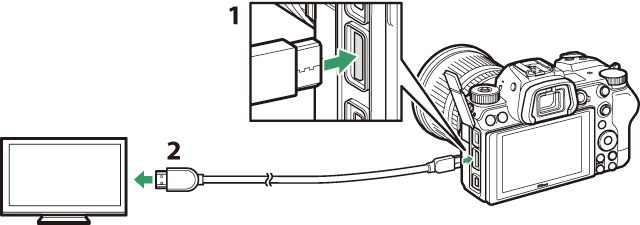
The camera can be connected to TVs, recorders, and other devices featuring HDMI connectors. Use the optional HDMI cable (HDMI Cables) or a third-party type C HDMI cable. These items must be purchased separately. Always turn the camera off before connecting or disconnecting an HDMI cable.
| 1 |
HDMI connector for connection to camera |
|---|
| 2 |
HDMI connector for connection to external device * |
|---|
-
Choose a cable with a connector that matches the connector on the HDMI device.
TVs
-
After tuning the TV to the HDMI input channel, turn the camera on and press the K button to view pictures on the television screen.
-
Audio playback volume can be adjusted using the controls on the TV. Camera controls cannot be used.
-
If the camera is paired with a smart device running the SnapBridge app, the device can be used to control playback remotely while the camera is connected to a TV. See the SnapBridge app online help for details.
Recorders
The camera can record video directly to connected HDMI recorders. Use the [] item in the setup menu to adjust settings for HDMI output. Some recorders will start
and stop recording in response to camera controls.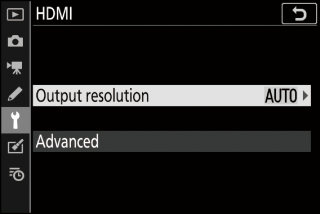
Output Resolution
Choose the format for images output to the HDMI device. If [] is selected, the camera will automatically choose the appropriate format.
Advanced
Adjust settings for connection to the HDMI device.
|
Option |
Description |
|---|---|
|
[] |
The RGB video signal input range varies with the HDMI device. [], which matches the output range to the HDMI device, is recommended in most situations. If the camera is unable to determine the correct RGB video signal output range for the HDMI device, you can choose from the following options:
|
|
[] |
Choosing [] allows camera controls to be used to start and stop recording when the camera is connected via HDMI to a third-party recorder that supports the Atomos Open Protocol.
|
|
[] |
Choose a bit depth for HDMI output. |
|
[] |
Preserve details in highlights and shadows and avoid over-saturated colors when recording movies. [] is intended for footage that will be color graded during post-production. [] is used to record footage in HLG format for such applications as HDR broadcasting.
|
|
[] |
Choose [] for a live preview of video footage recorded with [] or [] selected for [], but note that the colors in the preview are simplified for enhanced contrast. This has no effect on the footage actually recorded. |

HDMI output is not available when:
-
1920 × 1080 120p, 1920 × 1080 100p, or 1920 × 1080 slow-motion is selected for frame size/frame rate, or
-
the camera is in movie mode and connected to a computer running Camera Control Pro 2
-
The HDMI signal will be output at a bit depth of 10 bits only to HDMI recorders that support this option.
-
Regardless of the option selected for monitor mode, the display will switch to the camera monitor and the viewfinder will turn off.
-
When 3840 × 2160 is selected for movie frame size:
-
movies will not be recorded to memory cards inserted in the camera, and
-
the angle of view when shooting in DX format with the Z 7II will be reduced to about 90%. The angle of view for the Z 6II is reduced to about 90% regardless of format.
-
-
The indicators in the camera monitor will be displayed at low resolution.
-
No photos will be recorded when the shutter-release button is pressed all the way down.
-
Electronic vibration reduction is disabled.
-
Frame size/frame rate settings of 3840 × 2160; 60p or 3840 × 2160; 50p are not available for footage output via HDMI. If 3840 × 2160; 60p or 3840 × 2160; 50p was selected before recording began, the footage will be output at 3840 × 2160; 30p or 3840 × 2160; 25p, respectively.
Footage output to external recorders with 3840 × 2160; 60p or 3840 × 2160; 50p selected for frame size/frame rate is not output at a frame rate of 60 or 50 fps. The camera automatically selects [] for [] > [] in the setup menu, even if the option last selected by the user is [].
Optimal color reproduction can only be achieved if your storage device, computer, monitor, operating system, software, and other equipment support HDR (HLG). If a signal is received from the connected device indicating that it supports HDR (HLG), the camera will respond with a “gamma: HLG” identifier.
-
Zooming in on the display in movie mode automatically causes the camera to select [] for [] > [] in the setup menu, even if the option last selected by the user is [].
-
Display zoom will not be available during movie recording if all the following conditions are met:
-
HDMI output is enabled with [] selected for [],
-
3840 × 2160 is selected for frame size or [] or [] selected for [], and
-
the footage is being recorded to an external recorder.
-