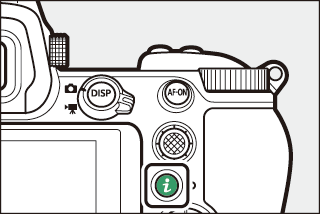
The i Button (Playback Mode)
Pressing the i button during playback zoom or full-frame or thumbnail playback displays the i menu for playback mode. Highlight items and press J or 2 to select.
|
|
|
Press the i button again to return to playback.
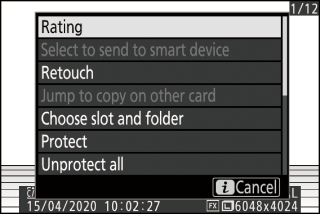
Photos
|
Option |
Description |
|---|---|
|
[] 1 |
Save a copy of the current image cropped to the area visible in the display. This option is not available when RGB histograms are displayed (RGB Histogram). |
|
[] |
Rate the current picture (Rating Pictures). |
|
[] |
Select the current picture for upload (Select to Send). The option displayed varies with the type of device connected. |
|
[] |
|
|
[] |
|
|
[] |
Create a retouched copy of the current picture (N The Retouch Menu: Creating Retouched Copies). |
|
[] |
If the current picture is one of a pair created with [] or [] selected for [], choosing this option displays the copy on the card in the other slot. |
|
[] |
Choose a slot and folder for playback. Highlight a slot and press 2 to display a list of the folders on the memory card in the selected slot. You can then highlight a folder and press J to view the pictures it contains. |
|
[] |
Add protection to or remove protection from the current picture (Protecting Pictures from Deletion). |
|
[] 2 |
Remove protection from all pictures in the folder currently selected for [] in the playback menu. |
|
[] 3 |
Compare retouched copies to the originals. |
-
Available only during playback zoom.
-
Not available during playback zoom.
-
Available only when a retouched copy (indicated by a p icon) or the source picture for a retouched copy is selected.
Choose [] to compare retouched copies with the unretouched originals.
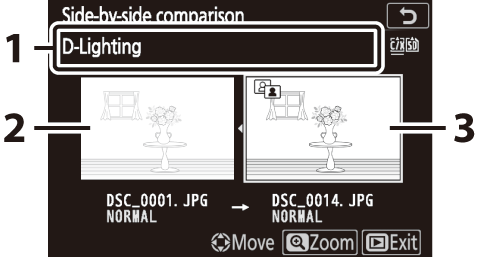
| 1 |
Options used to create copy |
|---|---|
| 2 |
Source image |
| 3 |
Retouched copy |
|---|
-
The source image is displayed on the left, the retouched copy on the right.
-
The options used to create the copy listed at the top of the display.
-
Press 4 or 2 to switch between the source image and the retouched copy.
-
If the copy is an overlay created from multiple source images, press 1 or 3 to view the other images.
-
If the source has been copied multiple times, press 1 or 3 to view the other copies.
-
To view the highlighted picture full screen, press and hold the X button.
-
Press J to return to playback with the highlighted image displayed full-frame.
-
To exit to playback, press the K button.
-
The source image will not be displayed if the copy was created from a photograph that is now protected.
-
The source image will not be displayed if the copy was created from a photograph that has since been deleted.
Movies
|
Option |
Description |
|---|---|
|
[] |
Rate the current picture (Rating Pictures). |
|
[] |
Select the current picture for upload (Select to Send). |
|
[] |
|
|
[] |
Adjust playback volume. |
|
[] |
Trim footage from the current movie and save the edited copy in a new file (Choose Start/End Point). |
|
[] |
Choose a slot and folder for playback. Highlight a slot and press 2 to display a list of the folders on the memory card in the selected slot. You can then highlight a folder and press J to view the pictures it contains. |
|
[] |
Add protection to or remove protection from the current picture (Protecting Pictures from Deletion). |
|
[] |
Remove protection from all pictures in the folder currently selected for [] in the playback menu. |
Movies (Playback Paused)
|
Option |
Description |
|
|---|---|---|
|
9 |
[] |
Trim footage from the current movie and save the edited copy in a new file (Choose Start/End Point). |
|
4 |
[] |
Save a selected frame as a JPEG still (Save Current Frame). |
Select to Send
Follow the steps below to select the current picture for upload to a smart device or computer.
-
The i menu items used to select pictures for upload vary with the type of device connected:
-
[]: Displayed when the camera is connected to a smart device via built-in Bluetooth using [] in the setup menu (Connect to Smart Device).
-
[]: Displayed when the camera is connected to a computer via built-in Wi-Fi using [] in the setup menu (Connect to PC).
-
[]: Displayed when the camera is connected to a computer via an WT-7 wireless transmitter (available separately) using the [] item in the setup menu (Wireless Transmitter (WT-7)).
-
-
Movies cannot be selected for upload when the camera is connected to a smart device via the SnapBridge app.
-
The maximum file size for movies uploaded by other means is 4 GB.
-
Select the desired picture and press the i button.
-
Highlight [], [], or [] and press J.
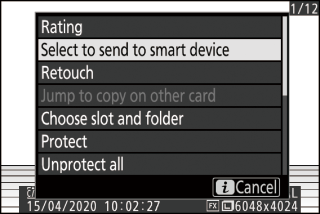
The picture will be marked with a W icon.
To remove upload marking, repeat Steps 1 and 2.
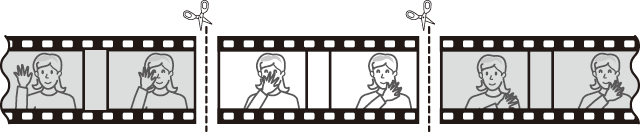
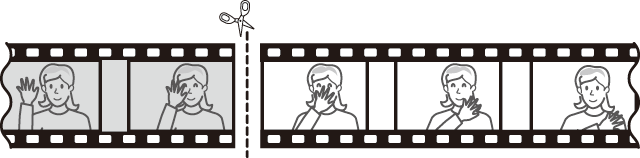
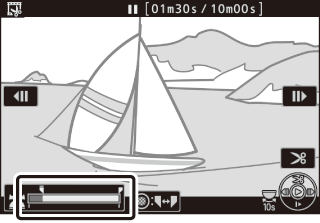
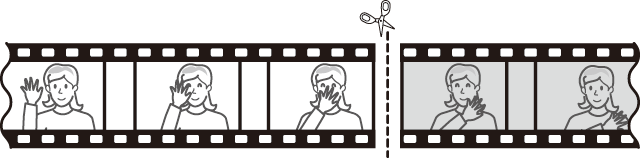
Choose Start/End Point
Trim footage from the current movie and save the edited copy in a new file.
-
Display a movie full frame.
-
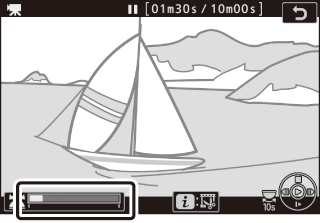
Pause the movie on the new opening frame.
-
Press the J button to start playback movies. Press 3 to pause.
-
Your approximate position in the movie can be ascertained from the movie progress bar.
-
Press 4 or 2 or rotate the main command dial to locate the desired frame.
-
-
Select [].

Press the i button, highlight [], and press J.
-
Choose the start point.
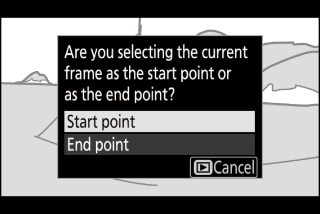
To create a copy that begins from the current frame, highlight [] and press J.
-
Confirm the new start point.
-
If the desired frame is not currently displayed, press 4 or 2 to advance or rewind.
-
Rotate the main command dial one stop to skip ahead or back 10 s.
-
Rotate the sub-command dial to skip to the last or first frame.
-
-
Choose the end point.
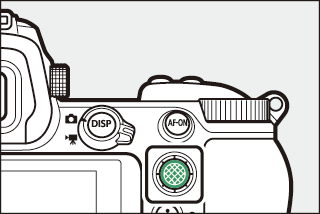
Press the center of the sub-selector to switch to the end-point selection tool (x) and then select the closing frame (x) as described in Step 5.
-
Press 1 to create the copy.
-
Preview the copy.
-
To preview the copy, highlight [] and press J (to interrupt the preview and return to the save options menu, press 1).
-
To abandon the current copy and return to Step 5, highlight [] and press J.
-
-
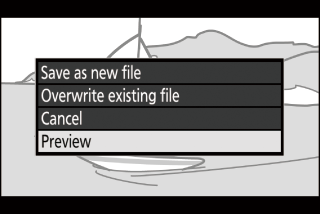
Choose a save option.
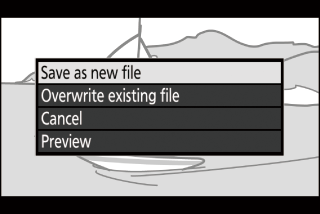
-
Choose [] and press the J button to save the edited copy as a new file.
-
To replace the original movie with the edited copy, highlight [], press J, and then highlight [] and press J.
-
-
The copy will not be saved if there is insufficient space available on the memory card.
-
Movies less than two seconds long cannot be edited using [].
-
Copies have the same time and date of creation as the original.
-
To remove only the closing footage from a movie, choose [] in Step 4, select the closing frame, and proceed to Step 7 without pressing the center of sub-selector in Step 6.
-
To remove only the opening footage, proceed to Step 7 without pressing the center of sub-selector in Step 6.
Movies can also be edited using the [] item in the retouch menu.
Save Current Frame
Save a selected frame as a JPEG still.
-
Pause the movie on the desired frame.
-
Press 3 to pause playback.
-
Press 4 or 2 to locate the desired frame.
-
-
Choose [].
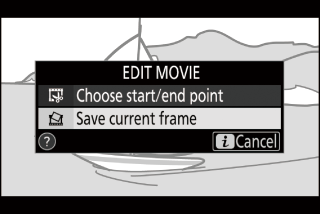
Press the i button, then highlight [] and press J to create a JPEG copy of the current frame.
-
Stills are saved at the dimensions selected for [] in the movie shooting menu when the movie was recorded.
-
They cannot be retouched.
-
Some categories of photo information are not displayed during playback.