Other Compatible Accessories
A variety of accessories are available for your Nikon camera.
-
Availability may vary with country or region.
-
See our website or brochures for the latest information.
-
EN‑EL15c Rechargeable Li-ion Battery: EN‑EL15c batteries can be used with Nikon Z 7II/Z 6II digital cameras.
-
EN‑EL15b/EN‑EL15a/EN‑EL15 batteries can also be used. Note, however, that fewer pictures can be taken on a single charge than with the EN‑EL15c (Battery Endurance).
-
-
MH‑25a Battery Charger: The MH‑25a can be used to recharge EN‑EL15c batteries.
-
MB-N11 Power Battery Pack/MB-N10 Battery Pack: Battery packs for Nikon mirrorless cameras. Attached to the camera, both allow the use of up to two EN‑EL15c rechargeable Li-ion batteries as a power source.
-
The MB-N11 is equipped with a shutter-release button, main and sub-command dials, a multi selector, and Fn and AF-ON buttons for use when the camera is rotated to take pictures in portrait (“tall”) orientation.
-
EN-EL15b/EN-EL15a/EN-EL15 batteries can be used in place of the EN‑EL15c. The number of pictures that can be taken on a single charge (i.e., battery endurance) will however drop compared to the EN-EL15c (Battery Endurance).
-
An EH-7P charging AC adapter connected to the battery pack’s charging connector can be used to charge batteries inserted in the pack. When connected to an MB-N11, it can also supply power to the camera.
-
Information on connecting and removing the battery pack and instructions on its use and care are available either via the manual supplied with the MB-N10 or, in the case of the MB-N11, in “Optional MB-N11 Power Battery Packs” (Optional MB-N11 Power Battery Packs).
-
-
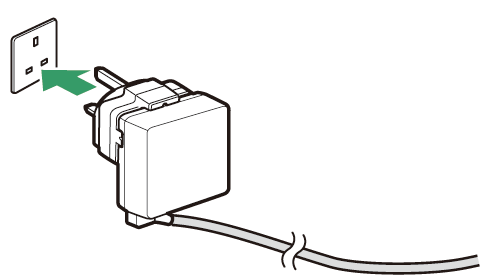
EH‑7P Charging AC Adapter: The EH‑7P can be used to charge batteries inserted in the camera.
-
The battery will not charge while the camera is on.
-
It cannot be used to charge EN‑EL15a/EN‑EL15 batteries.
-
The charging AC adapter can be used to power the camera; to do so, select [] for [] in the setup menu. For more information, see “USB Power Delivery” (USB Power Delivery).
-
-
EP‑5B Power Connector, EH‑5d/EH‑5c/EH‑5b AC Adapter: Use AC adapters to power the camera for extended periods.
-
The EP‑5B is needed to connect the EH‑5d/EH‑5c/EH‑5b to the camera. See “Attaching a Power Connector and AC Adapter” (Attaching a Power Connector and AC Adapter) for details.
-
-
Neutral Color (NC) filters can be used to protect the lens.
-
Filters may cause ghosting when the subject is framed against a bright light, or when a bright light source is in the frame. Filters can be removed if ghosting occurs.
-
Matrix metering may not produce the desired results with filters with exposure factors (filter factors) over 1× (Y44, Y48, Y52, O56, R60, X0, X1, C‑PL, ND2S, ND4, ND4S, ND8, ND8S, ND400, A2, A12, B2, B8, B12); we suggest that [] be selected instead. See the filter manual for details.
-
Filters intended for special-effects photography may interfere with autofocus or the in-focus indicator (I).
MC‑DC2 Remote Cord (length 1 m/3 ft 4 in.): When connected to the camera accessory terminal, the MC‑DC2 can be used to release the shutter remotely.
-
UC‑E24 USB Cable: A USB cable with a type C connector for connection to the camera and a type A connector for connection to the USB device.
-
UC‑E25 USB Cable: A USB cable with two type C connectors.
HC‑E1 HDMI Cable: An HDMI cable with a type C connector for connection to the camera and a type A connector for connection to HDMI devices.
AS‑15 Sync Terminal Adapter: Mount the AS‑15 on the camera hot shoe to connect studio strobe lights or other flash equipment via a sync terminal.
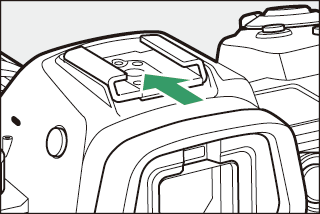
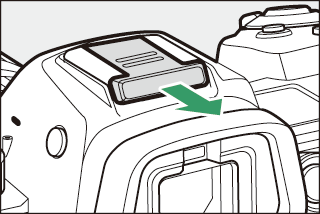
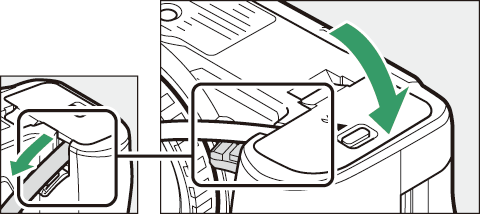
BS‑1 Accessory Shoe Cover: A cover protecting the accessory shoe when no flash unit is attached.
BF‑N1 Body Cap: The body cap prevents dust entering the camera when no lens is in place.
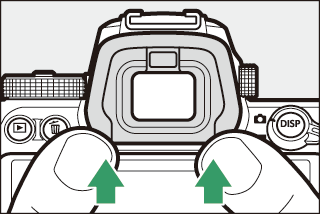
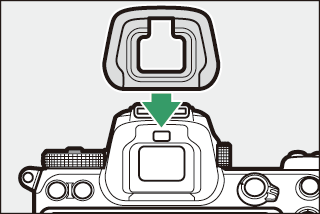
DK‑29 Rubber Eyecup: A rubber eyecup that can be fitted to the camera viewfinder. The DK‑29 makes the image in the viewfinder easier to see, preventing eye fatigue.
|
Remove |
Replace |
-
SB-5000, SB-910, SB-900, SB-800, SB-700, SB-600, SB-500, SB-400, SB-300, and SB-R200 Speedlights: These units can be mounted on the camera for flash photography. Some also support wireless remote control for off-camera flash photography with multiple flash units.
-
See the manual supplied with each Speedlight for information on mounting the unit on the camera.
-
For more information on flash photography, see “On-Camera Flash Photography” (On-Camera Flash Photography), “Remote Flash Photography” (Remote Flash Photography), and “Compatible Flash Units” (Compatible Flash Units).
-
-
SU-800 Wireless Speedlight Commander: A wireless commander for use with SB-5000, SB-910, SB-900, SB-800, SB-700, SB-600, SB-500, and SB-R200 flash units. Flash units can be divided into up to three groups for remote flash control. The SU-800 itself is not equipped with a flash.
FTZ II/FTZ Mount Adapter: An adapter that allows NIKKOR F mount lenses to be used with digital cameras that support interchangeable Z mount lenses.
-
For information on attaching, removing, maintaining, and using mount adapters, refer to the product documentation.
-
Update to the latest version of the mount adapter firmware if so prompted after attaching the adapter. Information on performing firmware updates is available via the Nikon website for your country or region.
-
-
ME‑1 Stereo Microphone: Connect the ME‑1 to the camera microphone jack to record stereo sound. Using an external microphone also reduces the chance of picking up equipment noise, such as the sounds produced during movie recording when focus is achieved using autofocus.
-
ME‑W1 Wireless Microphone: A wireless Bluetooth microphone. Use the ME‑W1 for off-camera recording.
WT-7 Wireless Transmitter: Use the WT-7 to upload pictures over a wireless network or control the camera from a computer running Camera Control Pro 2 (available separately). You can also take and browse pictures remotely from a computer or smart device.
-
Requires a wireless network and some basic network knowledge. Be sure to update the wireless transmitter software to the latest version.
-
WR-R11b, WR-R10, and WR-T10 Wireless Remote Controllers
-
When a WR-R11b/WR-R10 wireless remote controller is attached to the accessory terminal, the camera can be controlled wirelessly using a WR‑T10 wireless remote controller.
-
WR-R11b/WR-R10 wireless remote controllers can also be used to control radio-controlled flash units.
-
For synchronized release involving more than one camera, ready multiple cameras with paired WR-R11b/WR-R10 units attached.
-
When connecting the WR-R11b/WR-R10, be sure the cover for the accessory terminal and the USB and HDMI connectors is fully open.
-
-
WR‑1 Wireless Remote Controller: WR‑1 units are used with WR-R11b/WR-R10 or WR‑T10 wireless remote controllers or with other WR‑1 remote controllers, with the WR‑1 units functioning as either transmitters or receivers. When a WR-R11b/WR-R10 or a WR‑1 configured as a receiver is connected to the camera accessory terminal, a second WR‑1 configured as a transmitter can be used to take pictures and adjust camera settings remotely.
-
When using a wireless remote controller with the WR-R10, be sure the firmware for the WR-R10 and WR‑1 have been updated to the latest versions (WR-R10 firmware version 3.0 or later and WR‑1 firmware version 1.0.1 or later). For information on firmware updates, see the Nikon website for your area. Consult a Nikon-authorized service representative when updating the firmware for the WR-R10 from versions prior to version 2.0 to version 3.0 or later.
-
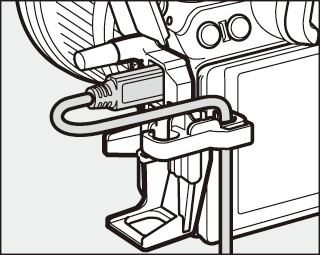
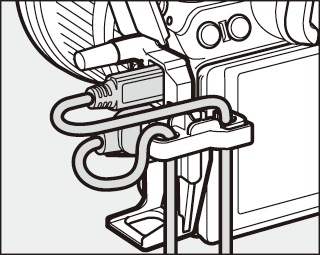
To prevent accidental disconnection, attach the supplied clip to USB cables or optional HDMI cables as shown (note that the clip may not fit all third-party HDMI cables).
-
The illustrations show the USB cable. Pass HDMI cables through the other channel.
-
Keep the monitor in the storage position when using the cable clip.
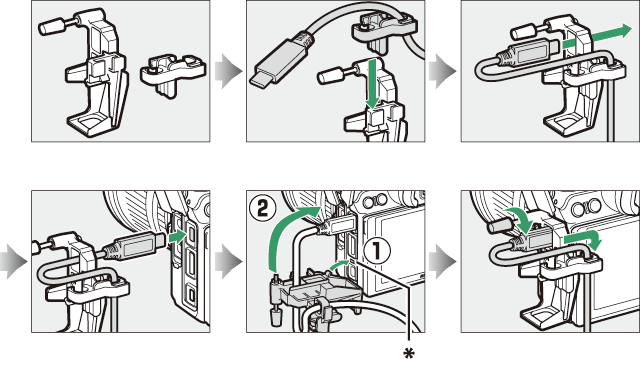
-
Insert the projection on the HDMI/USB cable clip into the matching indentation on the camera before plugging the cable in.
|
USB cable |
HDMI cable and USB cable used simultaneously |
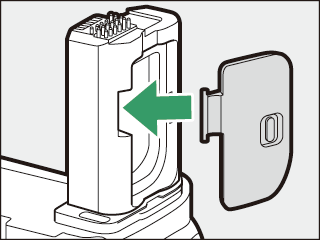
The cover slides into the shoe as shown. To remove the cover, hold the camera firmly, press the cover down with a thumb and slide it in the direction shown.
|
|
|
Optional MB-N11 Power Battery Packs
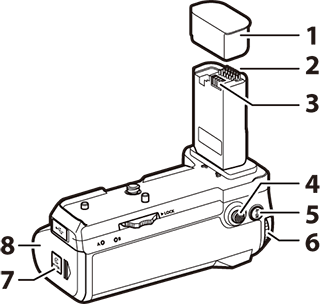
Parts of the MB-N11: Names and Functions
The name and function of each part of the MB-N11 are listed below.
|
1 |
Contact cap |
Protects the MB-N11’s power/signal contacts. |
|
2 |
Signal contacts |
— |
|
3 |
Power contacts |
— |
|
4 |
Multi selector for vertical shooting |
Performs the role selected using Custom Setting f9 []. |
|
5 |
AF-ON button for vertical shooting |
Performs the role selected using Custom Setting f9 or g7 []. |
|
6 |
Main command dial for vertical shooting |
Performs the same role as the matching control on the camera. |
|
7 |
Holder-chamber latch |
See “Inserting Batteries in the MB-N11” (Inserting Batteries in the MB-N11) and “If the Holder-Chamber Cover Detaches” (If the Holder-Chamber Cover Detaches). |
|
8 |
Holder-chamber cover |
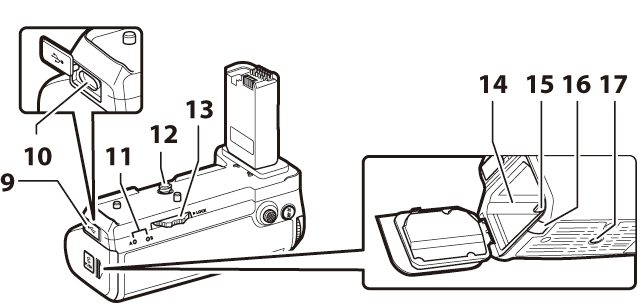
|
9 |
Charging connector cover |
Used when connecting an optional EH-7P charging AC adapter. |
|
10 |
Charging connector |
|
|
11 |
LED lamp (×2) |
Light while batteries are charging. |
|
12 |
Mounting screw |
Used when attaching the MB-N11 to the camera. |
|
13 |
Attachment wheel |
|
|
14 |
Battery-holder chamber |
Where the battery holder is inserted. |
|
15 |
Battery-holder latch |
Locks the battery holder in place after insertion. |
|
16 |
Power connector cover |
For use with optional EP‑5B power connectors. |
|
17 |
Tripod socket |
— |
|
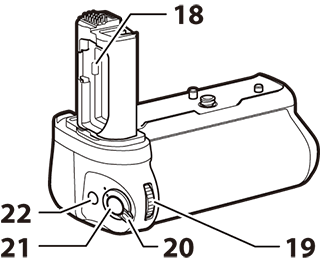
18 |
Battery-chamber cover holder |
Holds the camera battery-chamber cover while it is removed from the camera. |
|
19 |
Sub-command dial for vertical shooting |
Performs the same role as the matching control on the camera. |
|
20 |
Control lock |
Locks the controls on the MB-N11 to prevent accidental operation.
|
|
21 |
Shutter-release button for vertical shooting |
Performs the same role as the matching control on the camera. |
|
22 |
Fn button for vertical shooting |
Performs the role selected using Custom Setting f9 or g7 []. |
|
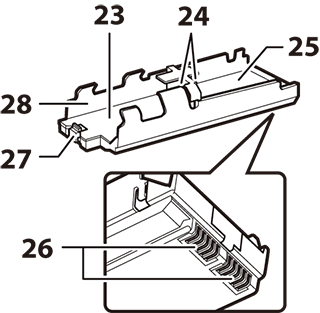
23 |
Battery Chamber A |
Holds one EN-EL15c rechargeable Li-ion battery. |
|
24 |
Battery power terminals (×2) |
See “Inserting Batteries in the MB-N11” (Inserting Batteries in the MB-N11). |
|
25 |
Battery Chamber B |
Holds one EN-EL15c rechargeable Li-ion battery. |
|
26 |
Battery holder power terminals |
See “Inserting Batteries in the MB-N11” (Inserting Batteries in the MB-N11) |
|
27 |
Battery latch |
Locks the battery in Chamber A in place after insertion. |
|
28 |
Battery holder |
See “Inserting Batteries in the MB-N11” (Inserting Batteries in the MB-N11). |
Attaching the MB-N11
Before attaching the MB-N11, turn the camera off. To prevent unintended operation while attachment is in progress, leave the control lock on the MB-N11 in the L (locked) position until the process is complete.
-
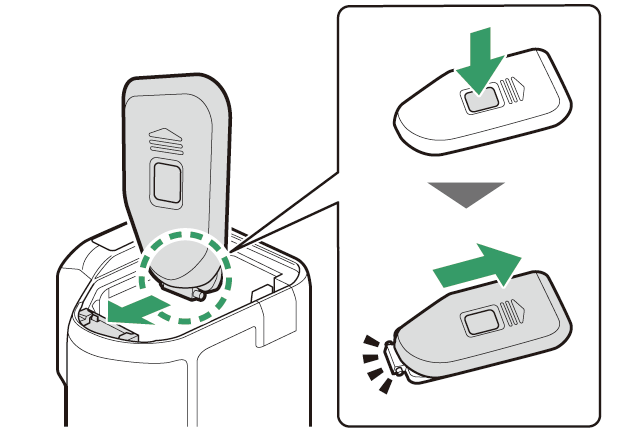
Remove the contact cap from the battery pack.
Keep the contact cap in a safe place.
-
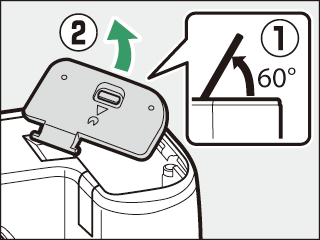
Remove the battery-chamber cover from the bottom of the camera and place it in the battery-chamber cover holder on the MB-N11.
If a battery is inserted in the camera, remove it.

-
Attach the MB-N11 to the camera.
Rotate the attachment wheel in the direction shown by the FLOCK arrow to secure the battery pack in place.
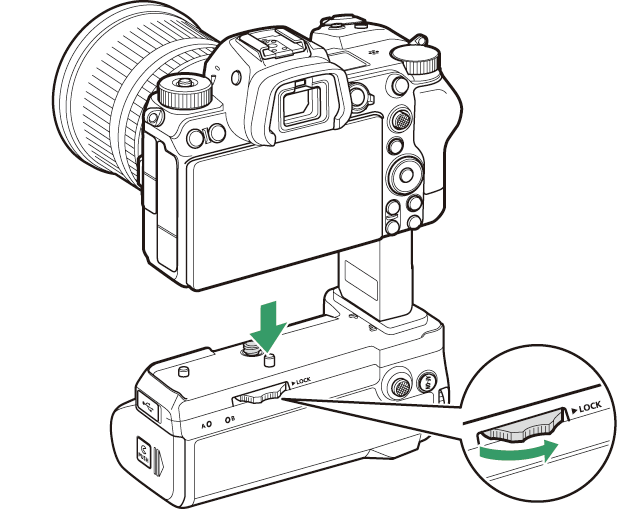
To remove the MB-N11, turn the camera off, then loosen the attachment wheel by turning it in the direction opposite to that shown by the arrow. After removing the MB-N11, remove the battery-chamber cover from the battery-chamber cover holder and replace it on the camera.
-
Be sure to replace the contact cap on the MB-N11 when the battery pack is not in use.
Inserting Batteries in the MB-N11
The MB-N11 can be used with up to two ENEL15c rechargeable Li-ion batteries. Before inserting the batteries, turn the camera off. To prevent unintended operation while the batteries are being exchanged, you will also need to leave the control lock on the MB-N11 in the L (locked) position until the exchange is complete.
-
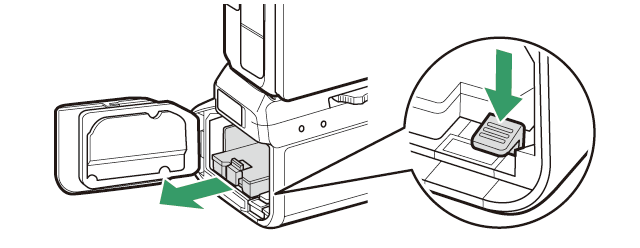
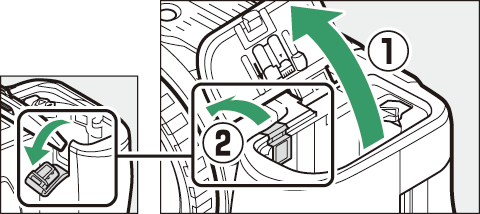
Keeping the holder-chamber latch pressed, slide the holder-chamber cover in the direction shown, and then swing the cover open.
-
Press the battery-holder latch in the direction shown and remove the battery holder.
-
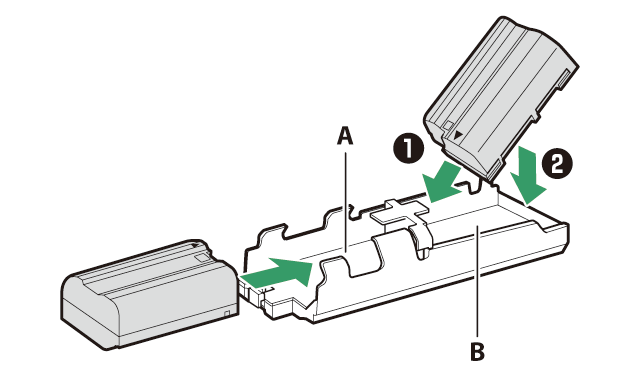
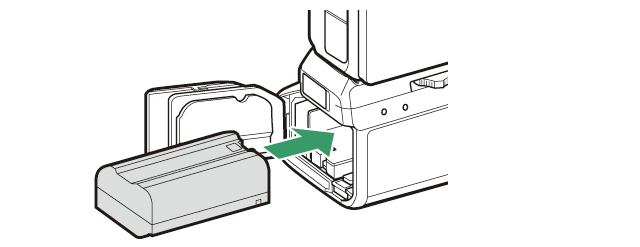
Insert the batteries in the battery holder.
Insert the batteries as shown. The battery latch will click into place when the battery in Chamber A is fully inserted.
-
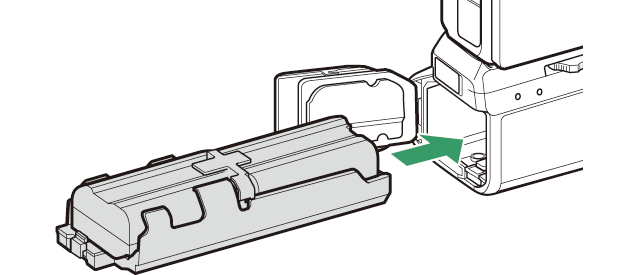
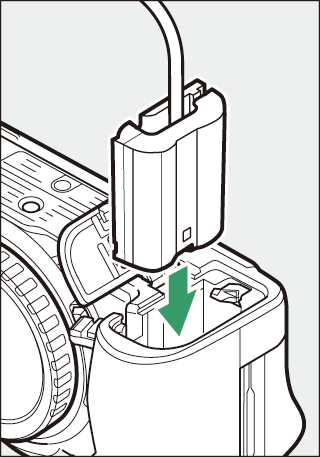
Insert the battery holder terminals-first.
Using the bottom of the battery holder to depress the battery-holder latch, slide the battery holder into the chamber terminals-first. The latch will click back into place when the holder is fully inserted.
-
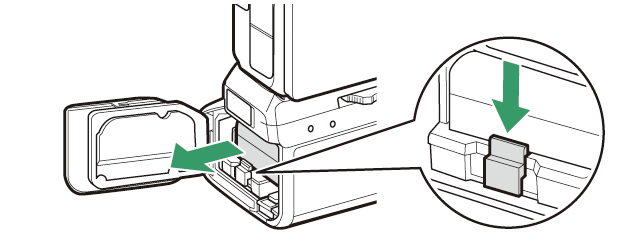
Close the holder-chamber cover and latch it by pressing and sliding it in the direction shown.
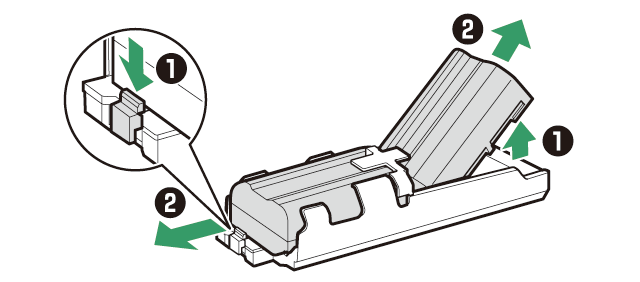
Remove the holder and then remove the batteries as shown.
-
The battery in Chamber A can be exchanged without removing the battery holder. Slide the battery into the chamber, stopping when the latch clicks into place.
-
The battery can be removed by pressing the latch as shown and sliding the battery from the holder.
When two batteries are inserted, you can replace the battery in Chamber A without
turning the camera off. You may find this useful when using the camera continuously
for extended periods. Be careful not to press the battery-holder latch or remove the
battery holder while exchanging batteries.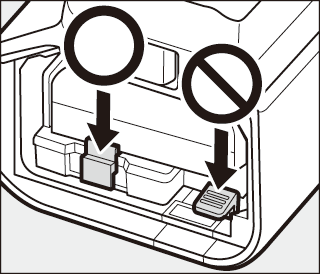
-
If you are using only one battery, it can be inserted in either chamber.
-
When two batteries are inserted, the battery in Chamber A will be used first. The camera will switch to the battery in Chamber B when the battery in Chamber A is exhausted.
Charging Batteries Using a Charging AC Adapter
Optional EH-7P charging AC adapters can be used to charge batteries inserted in the MB-N11.
-
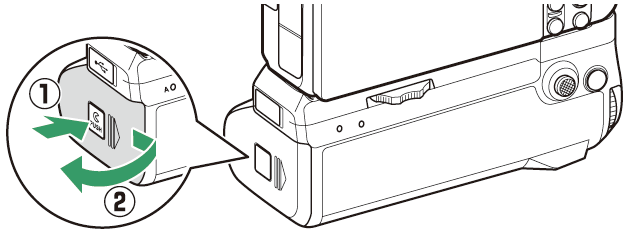
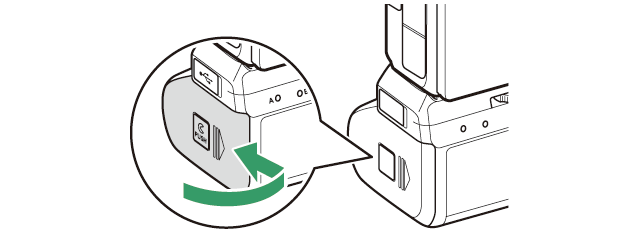
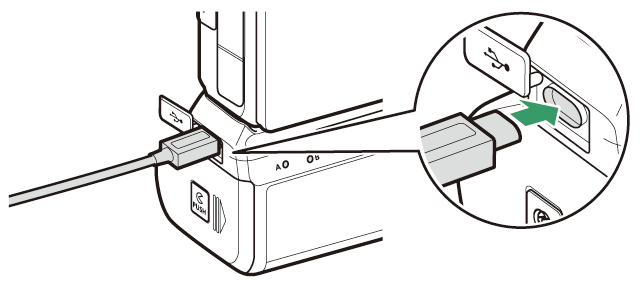
Connect an EH‑7P charging AC adapter to the charging connector on the MB‑N11.
-
Turn the camera off. The batteries will not charge while the camera is on.
-
Batteries can be charged in the MB-N11 even when the pack is removed from the camera. Be sure to attach the contact cap to the MB-N11 before proceeding.
-
-
Plug the charging AC adapter into a household power outlet.
-
The batteries charge while the camera is off.
-
The LED lamp for the battery that is currently charging will light while charging is in progress. The LED lamp turns off when charging is complete.
-
The time needed to charge two fully-exhausted batteries is about 5 hours and 30 minutes.
-
If two batteries are inserted, the battery in Chamber B will charge first.
-
The shape of the EH-7P varies with the country or region of sale.
-
-
When charging is complete, unplug the charging AC adapter and disconnect it from the MB-N11.
-
The EH‑7P will not charge the batteries if connected to the camera USB port while the MB-N11 is attached. Connect the EH-7P to the charging connector on the MB-N11.
-
The EH‑7P can be used to charge EN‑EL15c and EN‑EL15b batteries only. EN‑EL15a and EN‑EL15 batteries cannot be charged using the EH‑7P. Use an MH-25a battery charger instead.
-
If the battery cannot be charged using the charging AC adapter, for example because the battery is not compatible or the temperature of the battery pack is elevated, the LED lamp will flash rapidly for 30 seconds and then turn off.
Using a Charging AC Adapter as a Power Source
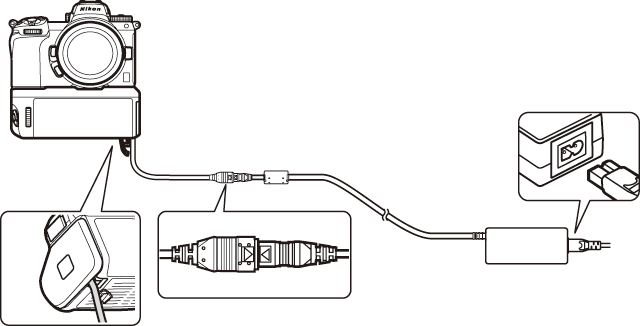
Optional EH-7P charging AC adapters can power the camera while connected to the MB-N11’s charging connector.
-
The charging AC adapter will supply power to the camera only if a battery is inserted in one or both of Chambers A and B. The EH-7P will supply power when EN-EL15c, EN-EL15b, EN-EL15a, or EN-EL15 batteries are inserted.
-
The batteries in the battery pack will not charge while the camera is powered by an outside power source. For more information, see “‘Power Delivery’ Versus ‘Charging’” (“Power Delivery” Versus “Charging”).
-
Connect an EH-7P charging AC adapter to the MB-N11’s charging connector.
Turn the camera off before proceeding.
-
Plug in the charging AC adapter into a household power outlet.
The shape of the EH-7P varies with the country or region of sale.
-
To begin the supply of power to the camera, turn the camera on and select [] for [] in the setup menu.
-
To end the supply of power to the camera, unplug the charging AC adapter and disconnect it from the MB-N11.
The optional EH‑5d AC adapter and EP‑5B power connector provide a steady supply of power when the camera must be left on for extended periods. When using the adapter with the MB-N11, insert the EP-5B in Chamber A before connecting it to the EH‑5d.
-
An EH‑5c or EH‑5b can be used in place of the EH‑5d.
-
The EP‑5B can be inserted only in Chamber A.
-
After connecting the EP‑5B, open the power connector cover on the MB-N11, position the power connector cable so that it passes through the power connector slot and close the holder-chamber cover.
-
There is no need to insert a battery in Chamber B. Batteries inserted in Chamber B are not used while the camera is being powered by an AC adapter and power connector.
-
If the EP-5B is inserted while a battery is inserted in Chamber B, the battery will not charge and the EP-5B will not supply power to the camera when a charging AC adapter is connected.
Checking the Level of the Batteries in the MB-N11
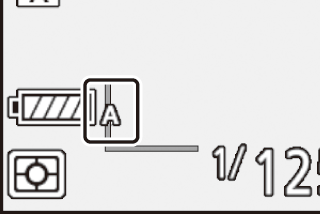
When the MB-N11 is connected, the level of the battery currently providing power to
the camera is shown in the shooting display and control panel while the camera is
on (Battery Level).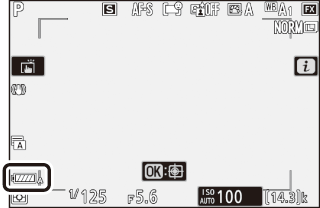
-
The chamber containing the battery currently in use is indicated by an icon next to the battery level in the shooting display.
-
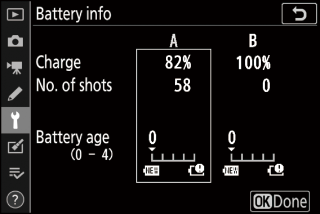
Additional information, including the battery age and precise battery level, can be viewed using the [] item in the setup menu.
Precautions for Use
Observe the following precautions when using the MB-N11.
-
Touching the power/signal contacts with metal objects could cause a short-circuit; replace the contact cap before storing or transporting the battery pack.
-
The camera memory card access lamp may light when the MB‑N11 is attached to or removed from the camera.
-
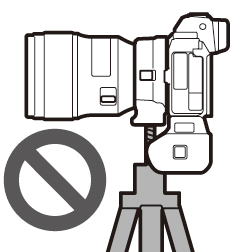
When using the camera with both the MB-N11 and an optional FTZ mount adapter attached, connect tripods to the tripod mount on either the lens or the MB-N11, not to the tripod mount on the FTZ.
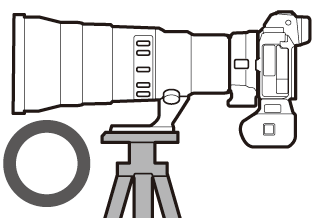
Lens
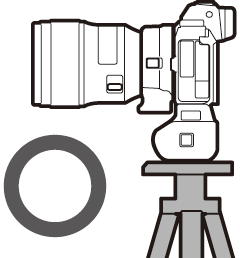
MB-N11
FTZ
-
The MB-N11 is not equipped with a power switch. Use the camera power switch to turn the camera on and off.
If the camera displays one of the following messages, take the steps described below.
-
If the camera displays the message [], insert a spare battery. Turn the camera off before proceeding if the battery in question is inserted in Chamber B or if there is only one battery in the holder and it is inserted in Chamber A.
-
If the camera displays the message [], press the shutter-release button. If the problem persists or recurs frequently, consult a Nikon-authorized service representative.
If the Holder-Chamber Cover Detaches
In order to protect the holder-chamber cover from damage, it may detach if force is applied while it is open. The holder-chamber cover can be re-attached as shown.
-
Before re-attaching the holder-chamber cover, slide the cover so that the hinge is visible.
Specifications
|
Power source |
Up to two EN‑EL15c rechargeable Li-ion batteries*
|
|
Charging time |
Approx. 5 hours and 30 minutes
|
|
Charging connector |
USB Type C. Can only be used to connect the EH‑7P charging AC adapter and not for uploading pictures or other purposes. |
|
Operating temperature |
0 °C–40 °C (+32 °F–104 °F) |
|
Dimensions (W× H × D) |
Approx. 138.5 × 113.5 × 76 mm/5.5 × 4.5 × 3 in., excluding projections |
|
Weight |
|
-
Nikon reserves the right to change the appearance, specifications, and performance of the product described in this manual at any time and without prior notice.
The camera may not function at low temperatures (approximately 10 °C/50 °F or below) when powered by partially-charged batteries. In cold weather, charge one set of batteries before use and keep another in a warm place, ready to be exchanged as necessary. Once warmed, cold batteries may recover some of their charge.
Attaching an optional battery pack with two fully-charged EN-EL15c batteries increases the number of shots and length of movie footage that can be recorded (battery endurance) by approximately 1.9 times over the amount that can be shot with the camera alone.
Attaching a Power Connector and AC Adapter
Turn the camera off before attaching an optional power connector and AC adapter.
-
Open the battery-chamber (q) and power connector (w) covers.
-
Insert the EP‑5B power connector.
-
Be sure to insert the connector in the correct orientation.
-
Using the connector to keep the orange battery latch pressed to one side, slide the connector into the battery chamber until the latch locks the connector in place.
-
-
Close the battery-chamber cover.
Position the power connector cable so that it passes through the power connector slot and close the battery-chamber cover.
-
Connect the EH‑5d/EH‑5c/EH‑5b AC adapter to the EP‑5B power connector.
-
Connect the AC adapter power cable to the AC socket on the AC adapter (e).
-
Insert the DC plug into the DC IN connector (r).
-
A P icon is displayed when the camera is powered by the AC adapter and power connector.

-