The Viewfinder
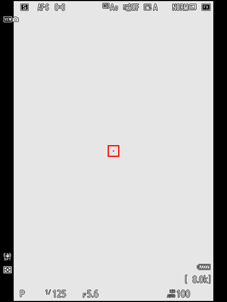
At default settings, the following indicators appear in the viewfinder. For a full list of the indicators that may be displayed, see “The Viewfinder” in the section on “Camera Displays” (0 The Viewfinder) in the “Technical Notes” chapter.
Photo Mode

- View mode (photo live view; 0 d9: View Mode (Photo Lv))
- t icon (0 The t Icon)
- Release mode (0 Release Mode)
- Focus mode (0 Focus Mode)
- AF-area mode (0 AF-Area Mode)
- White balance (0 White Balance)
- Active D-Lighting (0 Active D-Lighting)
- Picture Control (0 Picture Controls)
- Image quality (0 Adjusting Image Quality)
- Image size (0 Choosing an Image Size)
- Image area (0 Adjusting Image Area Settings)

- Battery indicator (0 Battery Level)
- Number of exposures remaining (0 Number of Exposures Remaining, Memory Card Capacity)
- ISO sensitivity (0 ISO Sensitivity)
ISO sensitivity indicator (0 ISO Sensitivity)
Auto ISO sensitivity indicator (0 Auto ISO Sensitivity Control)
Exposure indicator
- Exposure (0 Exposure Indicators)
- Exposure compensation (0 Exposure Compensation)
- Aperture (0 A (Aperture-Priority Auto), M (Manual))
- Shutter speed (0 S (Shutter-Priority Auto), M (Manual))
- Shooting mode (0 Choosing a Shooting Mode)
- Vibration reduction indicator (0 Vibration Reduction)
- Metering (0 Metering)
- Focus point (0 Focus-Point Selection)
Using the Viewfinder with the Camera in “Tall” Orientation
In photo mode, the playback, i menu, and shooting displays rotate to match camera orientation.
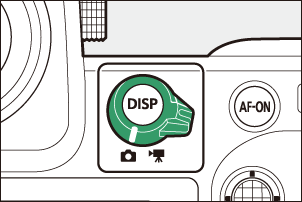
Press the DISP button to cycle the shooting display. Choose from up to four displays, each with a customizable selection of icons and indicators. The items displayed can be selected using Custom Setting d20 [Custom viewfinder shooting display] (0 d20: Custom Viewfinder Shooting Display).
Video Mode
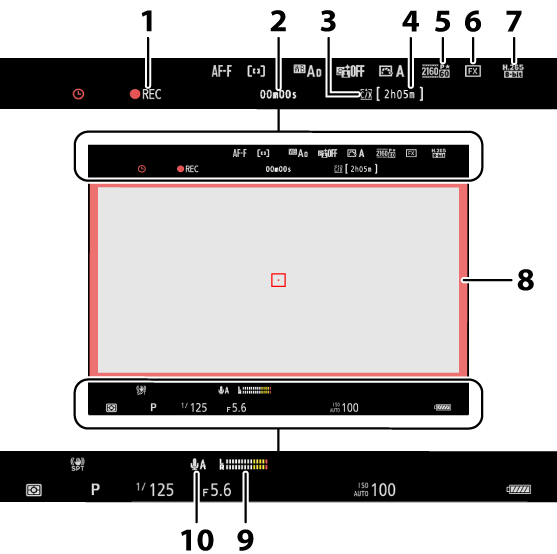
Recording indicator
“No video” indicator (0 The 0 Icon)
- Length of footage recorded
- Destination (0 Destination)
- Available recording time
- Frame size and rate (0 Video Frame Size and Rate Options)
- Image area (0 Video Image Area Options)
- Video file type (0 Video File Types)
- Recording indicator (red border; 0 g22: Red REC Frame Indicator)
- Sound level (0 Microphone Sensitivity)
- Microphone sensitivity (0Microphone Sensitivity)
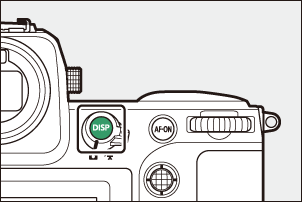
The Monitor Mode Button and the Eye Sensor
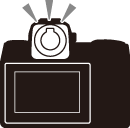
Placing your eye to the viewfinder activates the eye sensor, switching the display from the monitor to the viewfinder. Note that the eye sensor will also respond to other objects, such as your fingers.

- The viewfinder can be used for menus and playback if desired.
Press the M (monitor mode) button to cycle between viewfinder and monitor displays.

Press the M button to cycle through the displays as follows.
[Automatic display switch]: The camera automatically switches between the viewfinder and monitor displays based on information from the eye sensor.


[Viewfinder only]: The monitor remains blank. The viewfinder is used for shooting, menus, and playback.
- In photo mode, the viewfinder turns on for a few seconds after the camera is turned on, the shutter-release button is pressed halfway, or the AF-ON button is pressed, regardless of whether placing your eye to the viewfinder.

[Monitor only]: The monitor is used for shooting, menus, and playback. The viewfinder display will remain blank even if you put your eye to the viewfinder.

[Prioritize viewfinder (1)]: Placing your eye to the viewfinder turns the viewfinder on; the monitor remains off after you take your eye away. In video mode, the displays function as per [Automatic display switch].
[Prioritize viewfinder (2)]: In photo mode, in addition to when you look through it, the viewfinder turns on for a few seconds after the camera is turned on, the shutter-release button is pressed halfway, or the AF-ON button is pressed regardless of whether placing your eye to the viewfinder. In video mode, the displays function as per [Automatic display switch].
- The shooting display appears in the viewfinder if you put your eye to it while the monitor is used for menus or playback.
The Diopter Adjustment Control
- The viewfinder can be focused by lifting and rotating the diopter adjustment control.
- Be careful not to put your fingers or fingernails in your eye.
- After adjusting diopter, push the diopter adjustment control back into its original position.

Putting your eye to the camera when the monitor is tilted will not trigger the viewfinder if both the following conditions are met:
- [Automatic display switch], [Prioritize viewfinder (1)], or [Prioritize viewfinder (2)] is selected for monitor mode, and
- a menu, picture, or other display currently appears in the monitor.
When using the viewfinder for extended periods, you can select [Adjust for ease of viewing] for Custom Setting d9 [View mode (photo Lv)] to ensure that viewfinder brightness and hue are adjusted for ease of viewing.
You can limit the choice of monitor modes available using the [Limit monitor mode selection] item in the setup menu.