Computers: Connecting via Ethernet
A USB (Type C) to Ethernet adapter (available separately from third-party sources) is required for Ethernet connections. Be sure to connect the adapter to the camera’s USB data connector.
The following USB-to-Ethernet adapters have been tested and approved for use:
- Anker A83130A1 PowerExpand USB‑C to Gigabit Ethernet adapters
- Anker A83130A2 PowerExpand USB‑C to Gigabit Ethernet adapters
- Note that USB-to-Ethernet adapters will not function when connected to the camera’s USB Power Delivery connector.
Connecting to Multiple Devices
The camera can connect to only one type of device (computer, FTP server, or smart device) at a time. End the current connection before attempting to connect to a device of a different type.
For information on wireless- or Ethernet-related errors, see “Troubleshooting Wireless LAN and Ethernet Connections” (0Troubleshooting Wireless LAN and Ethernet Connections).
The Wireless Transmitter Utility
Before you will be able to connect via Ethernet, you will need to pair the camera with the computer using Nikon’s Wireless Transmitter Utility software.
- Once the devices are paired, you will be able to connect to the computer from the camera.
The Wireless Transmitter Utility is available for download from the Nikon Download Center. Check the version and system requirements and be sure to download the latest version.
Connecting to Computers via Ethernet
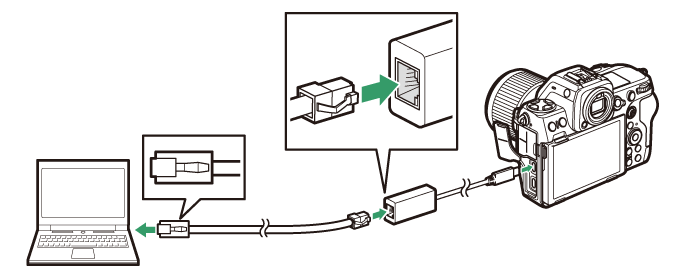
Connect to computers via a third-party USB (Type C) to Ethernet adapter connected to the camera’s USB data connector.
- Before proceeding, check that the Wireless Transmitter Utility (0The Wireless Transmitter Utility) is installed on the computer.
Attach a third-party USB-to-Ethernet adapter to the camera’s USB data connector and then connect to the computer using an Ethernet cable.
- Connect the Ethernet cable to the USB-to-Ethernet adapter. Do not use force or attempt to insert the connectors at an angle.
- Connect the other end of the cable to a computer or router.
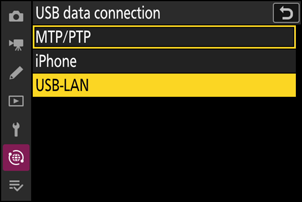
Select [USB-LAN] for [USB data connection] in the network menu.
Select [Connect to computer] in the network menu, then highlight [Network settings] and press 2.

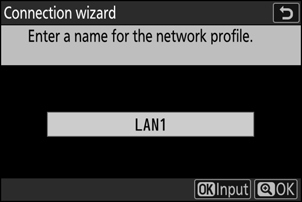
Highlight [Create profile] and press J.

Name the new profile.
- To proceed to the next step without changing the default name, press X.
- Whatever name you choose will appear in the network menu [Connect to computer] > [Network settings] list.
- To rename the profile, press J. For information on text entry, see “Text Entry” (0Text Entry). Press X to proceed after entering a name.
- There may be a delay before the camera detects the USB-to-Ethernet adapter. If the camera is unable to detect an Ethernet connection, the wizard will be configured to begin creation of a wireless LAN profile with the default name “WLAN1”. Tap Z or press 4 to return to Step 4, wait about 10 seconds, and then try again.
Obtain or select an IP address.
Highlight one of the following options and press J.

Option Description [Obtain automatically] Select this option if the network is configured to supply the IP address automatically. A “configuration complete” message will be displayed once an IP address has been assigned. [Enter manually] Enter the IP address and sub-net mask manually.
- Press J; you will be prompted to enter the IP address.
- Rotate the main command dial to highlight segments.
- Press 4 or 2 to change the highlighted segment and press J to save changes.
- Next, press X; a “configuration complete” message will be displayed. Press X again to display the sub-net mask.
- Press 1 or 3 to edit the sub-net mask and press J; a “configuration complete” message will be displayed.
Press J to proceed when the “configuration complete” message is displayed.
Start pairing.
When prompted, launch the Wireless Transmitter Utility on the computer.

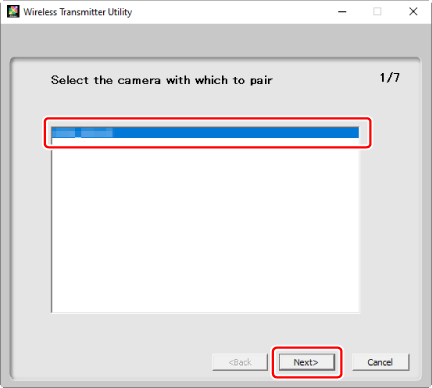
Select the camera in the Wireless Transmitter Utility.
Select the name displayed by the camera in Step 8 and click [Next].
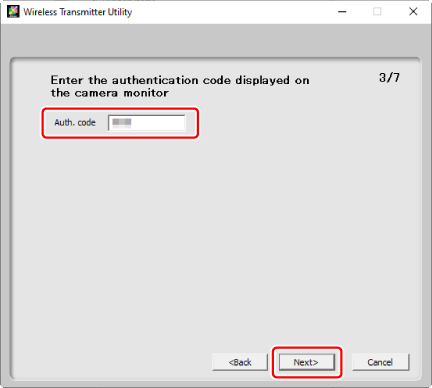
In the Wireless Transmitter Utility, enter the authentication code displayed by the camera.
- The camera will display an authentication code.

- Enter the authentication code in the dialog displayed by the Wireless Transmitter Utility and click [Next].
Complete the pairing process.
- When the camera displays a message stating that pairing is complete, press J.
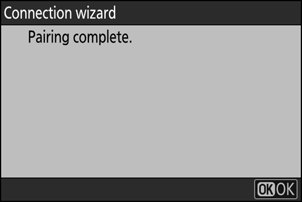
- In the Wireless Transmitter Utility, click [Next]; you will be prompted to choose a destination folder. For more information, see online help for the Wireless Transmitter Utility.

- A connection will be established between the camera and computer when pairing is complete.
Check the connection.
When a connection is established, the profile name will be displayed in green in the camera [Connect to computer] menu.
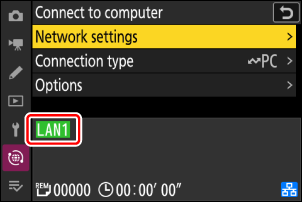
A connection has now been established between the camera and the computer.
Pictures taken with the camera can be uploaded to the computer as described under “Uploading Pictures” (0 Uploading Pictures) in the chapter titled “What You Can Do When the Camera Is Connected to a Computer or FTP Server”.
For information on controlling the camera from a computer using Camera Control Pro 2 or NX Tether, see the section on “Camera Control” (0 Camera Control) in the chapter titled “What You Can Do When the Camera Is Connected to a Computer or FTP Server”.
Ending the Connection to the Computer
You can end the connection by:
- turning the camera off, or
- selecting [End current connection] for [Connect to computer] > [Network settings] in the network menu.