Release Mode
Choosing a Release Mode
To choose the operation performed when the shutter-release button is pressed all the way down, hold the c button and rotate the main command dial.
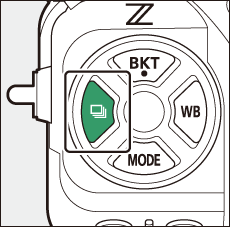

- Options for the selected setting, if any, can be chosen by holding the c button and rotating the sub-command dial.
| Mode | Description | |
|---|---|---|
| U | Single frame | The camera takes one photograph each time the shutter-release button is pressed. |
| V | Continuous low-speed | The camera takes photographs at a selected rate while the shutter-release button is pressed.
|
| W | Continuous high-speed | The camera takes photographs at a selected rate while the shutter-release button is pressed. Use for active subjects.
|
| A | C15 | The camera takes photographs at 15, 30, 60, or 120 fps while the shutter-release button is pressed (0High-Speed Frame Capture + (C15/C30/C60/C120)). |
| A | C30 | |
| C | C60 | |
| B | C120 | |
| E | Self-timer | Take pictures with the self-timer (0Using the Self-Timer (E)). |
- The frame rates for continuous low-speed and continuous high-speed modes can also be selected using Custom Setting d1 [Continuous shooting speed].
- The actual frame rate when a frame advance rate of 8 fps is selected in continuous low-speed mode is 7.5 fps.
The values given above for frame advance rate assume a focus mode of AF‑C, shooting mode M, a shutter speed of ¹⁄₂₅₀ s or faster, and default values for all other settings. Frame advance rates may slow:
- during flash photography,
- in silent mode,
- when flicker is detected with [ON] selected for [Photo flicker reduction] in the photo shooting menu,
- if aperture is stopped down to a very high f-number, or
- at slow shutter speeds.
- When [ON] is selected for [Photo flicker reduction] in the photo shooting menu (0Photo Flicker Reduction), the shooting display will briefly go dark during burst photography.
- Depending on shooting conditions and memory card performance, the memory card access lamp may light for anywhere from a few tens of seconds to around a minute. Do not remove the memory card while the memory card access lamp is lit. Not only could any unrecorded pictures be lost, but the camera or memory card could be damaged.
- At shutter speeds slower than ¹⁄₂₅₀ s, the shooting display does not update in real time during burst photography. To track your subject during shooting, choose shutter speeds faster than ¹⁄₂₅₀ s.
- If the camera is switched off while the memory card access lamp is lit, it will not power off until all pictures in the buffer have been recorded.
- If the battery is exhausted while pictures remain in the buffer, the shutter release will be disabled and the pictures transferred to the memory card.
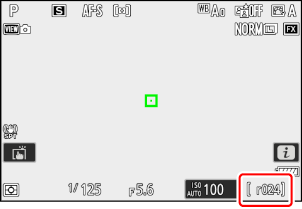
- While the shutter-release button is pressed halfway, the frame-count display will show the number of pictures that can be stored in the memory buffer.
- When the buffer is full, the display will show r000 and the frame rate will drop.
- The number shown is approximate. The actual number of photos that can be stored in the memory buffer varies with camera settings and shooting conditions.
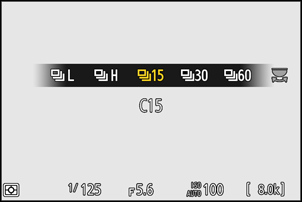
High-Speed Frame Capture + (C15/C30/C60/C120)
For high-speed burst photography at frame rates of 15, 30, 60, or 120 fps (high-speed frame capture +), hold the c button and rotate the main command dial to choose [C15], [C30], [C60], or [C120].
- The maximum length of bursts taken using high-speed frame capture + varies with the frame rate.
- The photos recorded may also include the final pictures from frames buffered while the shutter-release button is pressed halfway (“Pre-Release Capture”); to choose how much of the buffer is saved, use Custom Setting d3 [Pre-Release Capture options]. You can also limit the length of the burst recorded after the shutter-release button is pressed all the way down (0 d3: Pre-Release Capture Options).
- Image quality can be adjusted using the [Image quality settings] > [Image quality (HSFC)] item in the photo shooting menu.
- The touch shutter can be used only to take one picture at a time. Use the shutter-release button for high-speed frame capture +.
High-Speed Frame Capture +: Restrictions
The options available for image area vary with the frame advance rate.
- [C15]/[C30]: Choose from [FX (36×24)] and [DX (24×16)]
- [C60]: The only option available is [DX (24×16)]
- [C120]: The only option available is [FX (36×24)]
- If a DX lens is attached when [C120] is selected, the release mode will change to [C60] and image area will be fixed at [DX (24×16)].
- Pictures are recorded in JPEG format.
Image size is fixed as follows.
- [C15]/[C30]/[C60]: [Large]
- [C120]: [Small]
The options available for shutter speed vary with the frame advance rate.
- [C15]/[C30]/[C60]: ¹⁄₃₂₀₀₀–¹⁄₆₀ s
- [C120]: ¹⁄₃₂₀₀₀–¹⁄₁₂₅ s
- Exposure compensation is restricted to values between −3 and +3 EV, although settings between −5 and +5 EV can be selected.
- The upper limit for ISO sensitivity is ISO 25600, even when higher values (Hi 0.3 through Hi 2.0) are selected.
- The option chosen for [Minimum shutter speed] will not apply if [ON] is selected for [ISO sensitivity settings] > [Auto ISO sensitivity control] in the photo shooting menu.
High-speed frame capture + cannot be combined with some camera features, including:
- flexible program,
- HLG tone mode,
- photo flicker reduction,
- flash photography,
- bracketing,
- multiple exposures,
- HDR overlay,
- interval-timer photography,
- time-lapse video recording,
- focus shift, and
- pixel shift.
Memory cards with a high write speed are recommended (0Approved Memory Cards).
Using the Self-Timer (E)
In self-timer mode, pressing the shutter-release button all the way down starts a timer, and a photo is taken when the timer expires.
Hold the c button and rotate the main command dial to select E.
Hold the c button and rotate the sub-command dial to choose the self-timer delay.
Frame the photograph and focus.
The timer will not start if the shutter cannot be released, as may be the case, for example, if the camera is unable to focus when AF-S is selected for focus mode.

Start the timer.

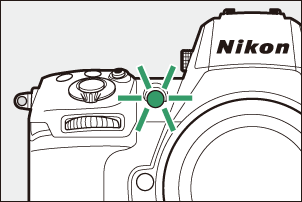
- Press the shutter-release button all the way down to start the timer; the self-timer lamp will begin to flash. The lamp stops flashing two seconds before the timer expires.
- The timer duration, the number of shots taken, and the interval between shots can be selected using Custom Setting c2 [Self-timer].