What You Can Do When the Camera Is Connected to a Computer or FTP Server
Ethernet and wireless LAN connections can be used to upload pictures or control the camera remotely.
Uploading Pictures
Pictures can be selected for upload during playback. They can also be uploaded automatically as they are taken.
Before uploading pictures, connect the camera to the destination via Ethernet or wireless LAN (0Computers: Connecting via Wireless LAN, Computers: Connecting via Ethernet, FTP Servers: Connecting via Wireless LAN, FTP Servers: Connecting via Ethernet). After creating a profile, confirm that the profile name is listed in green in the [Connect to computer] or [Connect to FTP server] display.

To upload pictures to a computer, select [Picture transfer] for [Connect to computer] > [Connection type] in the network menu.

Caution: Wi-Fi Access Point Mode
Select a host profile and enable camera Wi-Fi before connecting.
Destination Folders for Upload to a Computer
By default, pictures are uploaded to the following folders:
- Windows: \Users\(user name)\Pictures\Wireless Transmitter Utility
- macOS: /Users/(user name)/Pictures/Wireless Transmitter Utility
- The destination folder can be selected using the Wireless Transmitter Utility. For more information, see online help for the Wireless Transmitter Utility.
Selecting Pictures for Upload
Press the K button on the camera and select full-frame or thumbnail playback.
Select a picture and press the i button.
The i menu items used to select pictures for upload vary with the type of device connected.

Highlight [Select for upload to computer], [Select for upload (FTP)], [Select for priority upload to computer], or [Select for priority upload (FTP)] and press J.
- Selecting [Select for upload to computer] or [Select for upload (FTP)] displays a white “upload” icon and pictures will be uploaded in the specified order. Pictures with this marking will be added to the end of the upload queue and will not begin uploading until all other pictures have uploaded.
- Selecting [Select for priority upload to computer] or [Select for priority upload (FTP)] displays a white “priority upload” icon, and pictures selected for priority upload will begin uploading immediately even if pictures marked for upload already are in the upload queue.
- Upload will begin when a connection is established.
- Repeat Steps 2–3 to upload additional pictures.

- Repeat Steps 2–3 to remove upload marking from selected pictures.
- To remove upload marking from all pictures, select [Connect to computer] or [Connect to FTP server] in the network menu and choose [Options] > [Deselect all?].
The [Filtered playback] item in the playback i menu can be used to display only pictures that meet chosen criteria (0 Filtered Playback). The pictures can then all be selected for upload by highlighting [Select all for computer upload] or [Select all for upload (FTP)] in the i menu and pressing J.
Uploading Photos as They Are Taken
To upload new photos as they are taken, select [Connect to computer] or [Connect to FTP server] in the network menu and choose [ON] for [Options] > [Auto upload].
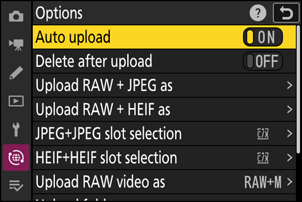
- Upload begins only after the photo has been recorded to the memory card. Be sure a memory card is inserted in the camera.
- Videos are not uploaded automatically. They must instead be uploaded manually from the playback display.
The Upload Icon
Upload status is indicated by the upload icon.
- W (white): Upload
This icon appears on pictures with the following upload status. The pictures will be sent in the order in which they were taken or selected for update.
- Marked for auto upload,
- Selected with [Select for upload to computer],
- Selected with [Select for upload (FTP)], or
- Filtered with a “select all for upload” option.
- s (white): Priority upload
- This icon appears on pictures selected with [Select for priority upload to computer] or [Select for priority upload (FTP)]. Pictures marked with this icon will be uploaded before pictures marked W (“upload”).
- X (green): Uploading
- Upload in progress.
- Y (blue): Uploaded
- Upload complete.
The “Connect to Computer”/“Connect to FTP Server” Upload Status Display
The [Connect to computer] and [Connect to FTP server] displays show the following:
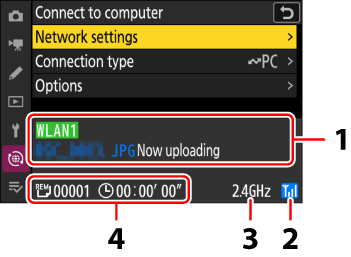
- Status:
The status of the connection to the host. The profile name is displayed in green when a connection is established.
While files are being transferred, the status display shows “Now uploading” preceded by the name of the file being sent. Errors are also displayed here.
- The display for [Connect to FTP server] also includes error codes (0 Error Codes).
- Signal strength: The wireless signal strength. Ethernet connections are shown by d.
- Band: When connecting wirelessly in Wi-Fi station mode, the radio frequency band of the connected SSID network is displayed. In Wi-Fi access point mode, the radio frequency band that the camera is outputting is displayed.
- Pictures/time remaining: The number of pictures remaining and the time needed to send them. The time remaining is an estimate only.
Wireless transmission may be interrupted if the signal is lost. Upload of pictures with upload marking can be resumed by turning the camera off and then on again once the signal has been re-established.
Do not remove the memory card or disconnect the Ethernet cable during upload.
Voice memos will be included when the associated pictures are transmitted. They cannot, however, be uploaded separately.
The camera saves transfer marking when turned off and resumes upload when next turned on.
Caution: Uploading Protected Pictures via FTP
The copies on the FTP server will not be protected even if the originals are. Markings can be added using ratings (0 Rating Pictures).
Camera Control
The camera can be controlled from a computer running Camera Control Pro 2 (available separately) or free NX Tether software. Photos can be saved directly to the computer instead of to the memory card and can consequently be taken even when no memory card is inserted in the camera.
- You will still need to insert a memory card when filming videos.
- Note that the camera standby timer does not expire in camera control mode.
Before using Camera Control Pro 2 or NX Tether, connect the camera and computer via Ethernet or wireless LAN (0 Computers: Connecting via Wireless LAN, Computers: Connecting via Ethernet). After creating a profile, confirm that the profile name is listed in green in the [Connect to computer] display.
Select [Camera control] for [Connect to computer] > [Connection type] in the network menu.

Launch the copy of Camera Control Pro 2 or NX Tether installed on the host computer.
Control the camera using Camera Control Pro 2 or NX Tether.
For information on taking pictures using Camera Control Pro 2 or NX Tether, see the online help or other documentation for the software in question.
The “Connect to Computer” Camera Control Display
The [Connect to computer] display shows the following:
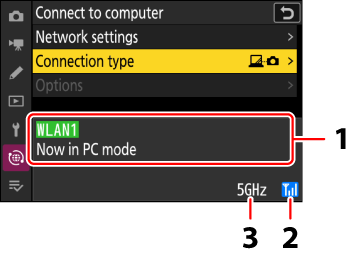
- Status: The status of the connection to the host. The profile name is displayed in green when a connection is established. Errors are also displayed here (0 Problems and Solutions).
- Signal strength: The wireless signal strength. Ethernet connections are shown by d.
- Band: When connecting wirelessly in Wi-Fi station mode, the radio frequency band of the connected SSID network is displayed. In Wi-Fi access point mode, the radio frequency band that the camera is outputting is displayed.
Loss of signal while the camera is connected to a wireless network may disrupt the connection to the computer. Select [End current connection] for [Connect to computer] > [Network settings] in the network menu before connecting to the network again. When the signal is re-established, the camera will reconnect to the computer and resume upload of any pictures that have yet to be transferred. Note that upload cannot be resumed if you turn the camera off before transfer is complete.
Do not disconnect the Ethernet cable during upload or while the camera is on.
Response may slow on wireless networks.