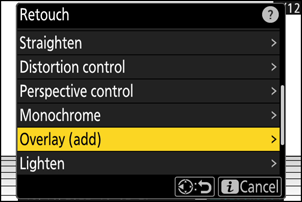
Overlay (Add)
Combine two existing photographs to create a single picture that is saved separately from the originals.

Select [Retouch] in the i menu, then highlight [Overlay (add)] and press 2.
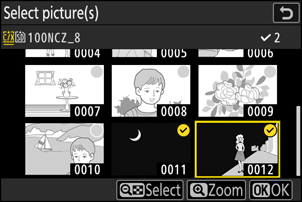
Select pictures.
- Highlight pictures using the multi selector.
- To view the highlighted picture full screen, press and hold the X button.
- To select the highlighted picture, press the W (Q) button. Selected pictures are marked with a check (
 ). To remove the check (
 ) and deselect the current picture, press the W (Q) button again.
 - Pictures with different image areas cannot be selected.
- Press J to proceed once the second picture is selected.
Adjust balance.
The overlay can be previewed in the display. Press 1 or 3 to adjust the balance between the two pictures. Press 1 to make the first picture more visible and the second less, 3 for the opposite effect.

Save the overlay.
Press J to save the overlay.

- Colors and brightness in the preview may differ from the final picture.
- Only pictures created with this camera can be selected. Pictures created with other models cannot be selected.
- The overlay will include only pictures created with the same options selected for [Image area] > [Choose image area] in the photo shooting menu.
- The image quality setting for the completed overlay is that of the highest quality picture it contains.
- Overlays that include NEF (RAW) pictures will be saved at an image quality of [JPEG/HEIF finem].
- All JPEG pictures in the overlay must be the same size.
- The size of overlays that include both NEF (RAW) and JPEG images is determined by the JPEG picture.
- The overlay has the same photo info (including date of recording, metering, shutter speed, aperture, shooting mode, exposure compensation, focal length, and picture orientation) and values for white balance and Picture Control as the first of the two pictures selected. Copyright information, however, is not copied to the new picture. The comment is similarly not copied; instead, the comment currently active on the camera, if any, is appended.