Set Picture Control (HLG)
G button U C photo shooting menu
Choose image processing (“Picture Control”) options for photos taken with [HLG] selected for tone mode.
| Option | Description | |
|---|---|---|
| c | [Standard] | Standard processing for balanced results. Recommended for most situations. |
| d | [Monochrome] | Take monochrome photographs. |
| e | [Flat] | Choose for photographs that will later be extensively processed or retouched. |
Modifying HLG Picture Controls
HLG Picture Controls can be adapted to suit the scene or the photographer’s creative intent.
Select [HLG] for [Tone mode] in the photo shooting menu.

Select [Set Picture Control (HLG)] in the photo shooting menu and choose a Picture Control.
Highlight the desired Picture Control and press 2.

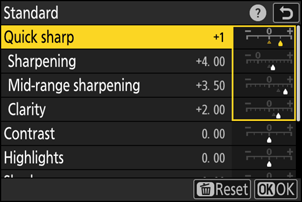
Adjust settings.
- Press 1 or 3 to highlight settings. Press 4 or 2 to choose a value in increments of 1, or rotate the sub-command dial to choose a value in increments of 0.25.
- The options available vary with the Picture Control selected.
- To quickly adjust levels for balanced [Sharpening], [Mid-range sharpening], and [Clarity], highlight [Quick sharp] and press 4 or 2.
- To abandon any changes and start over from default settings, press the O (Q) button.
Save changes and exit.
- Press J to save changes. Picture Controls that have been modified from default settings are indicated by an asterisk (“U”).

HLG Picture Control Settings
| Option | Description | |
|---|---|---|
| [Quick sharp] | Use [Quick sharp] to quickly adjust levels for balanced [Sharpening], [Mid-range sharpening], and [Clarity]. These parameters can also be adjusted individually. | |
| [Sharpening] | Control the sharpness of details and outlines. | |
| [Mid-range sharpening] | Adjust the sharpness of patterns and lines in the range between [Sharpening] and [Clarity]. | |
| [Clarity] | Adjust overall sharpness and the sharpness of thicker outlines without affecting brightness or dynamic range. | |
| [Contrast] | Adjust contrast. | |
| [Highlights] | Adjust highlights. Choose higher values to make highlights brighter. | |
| [Shadows] | Adjust shadows. Choose higher values to make shadows brighter. | |
| [Saturation] | Control the vividness of colors.
|
|
| [Hue] | Adjust hue.
|
|
| [Filter effects] | Displayed only with [Monochrome]. Simulate the effect of color filters on monochrome pictures. | |
| [Toning] | Displayed only with [Monochrome]. Choose the tint used in monochrome pictures. Pressing 3 when an option other than [B&W] (black-and-white) is selected displays saturation options. | |
The j indicator under the value display in the Picture Control setting menu indicates the previous value for the setting.

Choose from the following [Filter effects]:
| Option | Description |
|---|---|
| [Y] (yellow) * | These options enhance contrast and can be used to tone down the brightness of the sky in landscape photographs. Orange [O] produces more contrast than yellow [Y], red [R] more contrast than orange. |
| [O] (orange) * | |
| [R] (red) * | |
| [G] (green) * | Green softens skin tones. Use for portraits and the like. |
The term in parentheses is the name of the corresponding third-party color filter for black-and-white photography.