Adjust white balance. For more information, see the “White Balance” sections in “Basic Settings” (0 White Balance) and “The i Menu” (0 White Balance).
- The White Balance Menu: Fine-Tuning
- The White Balance Menu: Choosing a Color Temperature
- Preset Manual: Copying White Balance from a Photograph
The White Balance Menu: Fine-Tuning
Fine-tuning is available via the camera menus. For more information on fine-tuning, see “Fine-Tuning White Balance” (0 Fine-Tuning White Balance). For information on fine-tuning preset manual white balance, see “Fine-Tuning Preset White Balance” (0 Fine-Tuning Preset White Balance).
-
Display fine-tuning options.
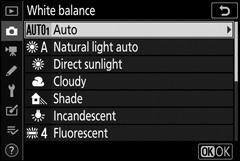
Go to White balance in the photo shooting menu, highlight a white balance option, and press 2.
-
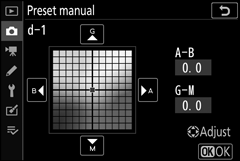
Fine-tune white balance.
Use the multi selector to fine-tune white balance. White balance can be fine-tuned on the Amber–Blue axis in steps of 0.5 and the Green–Magenta axis in steps of 0.25. The horizontal (Amber–Blue) axis corresponds to color temperature, while the vertical (Green–Magenta) axis has the similar effects to the corresponding color compensation (CC) filters. The horizontal axis is ruled in increments equivalent to about 5 mired, the vertical axis in increments of about 0.05 diffuse density units.
Coordinates
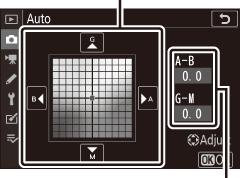
Adjustment
-
Save changes and exit.
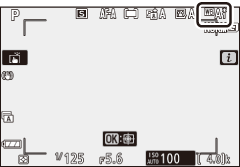
Press J to save settings and return to the photo shooting menu. If white balance has been fine-tuned, an asterisk (“U”) will appear next to the white balance icon in the shooting display.
White Balance Fine-Tuning
The colors on the fine-tuning axes are relative, not absolute. For example, moving the cursor to B (blue) when a “warm” setting such as J (Incandescent) is selected for white balance will make photographs slightly “colder” but will not actually make them blue.
“Mired”
Any given change in color temperature produces a greater difference in color at low color temperatures than it would at higher color temperatures. For example, a change of 1000 K produces a much greater change in color at 3000 K than at 6000 K. Mired, calculated by multiplying the inverse of the color temperature by 10 6, is a measure of color temperature that takes such variation into account, and as such is the unit used in color-temperature compensation filters. E.g.:
- 4000 K–3000 K (a difference of 1000 K)=83 mired
- 7000 K–6000 K (a difference of 1000 K)=24 mired
The White Balance Menu: Choosing a Color Temperature
Color temperature can be selected using the White balance > Choose color temperature option in the photo shooting menu. Enter values for the amber–blue and green–magenta axes as described below.
-
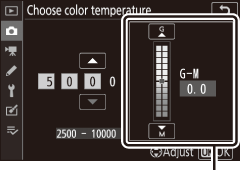
Select Choose color temperature.
Go to White balance in the photo shooting menu, highlight Choose color temperature and press 2.
-
Select values for amber–blue and green–magenta.
Press 4 or 2 to highlight digits on the Amber–Blue or Green–Magenta axis and press 1 or 3 to change.
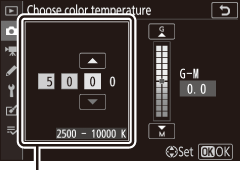
Value for Amber–Blue axis
Value for Green–Magenta axis
-
Save changes and exit.
Press J to save settings and return to the photo shooting menu. If a value other than zero is selected for the Green–Magenta axis, an asterisk (“U”) will appear next to the white balance icon in the shooting display.
Choose Color Temperature
Note that the desired results will not be obtained with fluorescent lighting. Choose I (Fluorescent) for fluorescent light sources. With other light sources, take a test shot to determine if the selected value is appropriate.
Preset Manual: Copying White Balance from a Photograph
The Preset manual option in the white balance menu can be used to copy a white balance value from an existing photograph. For more information on preset manual white balance, see “Preset Manual” (0 Preset Manual).
-
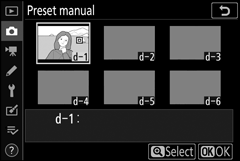
Select Preset manual.
Go to White balance in the photo shooting menu, highlight Preset manual, and press 2.

-
Select a destination.
Highlight the destination preset (d-1 to d-6) and tap X.
-
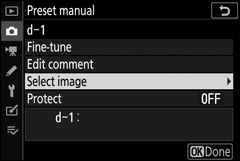
Choose Select image.
The preset manual white balance menu will be displayed; highlight Select image and press 2.
-
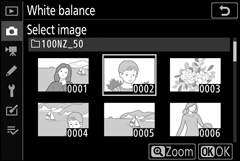
Highlight a source image.
Highlight the source image. To view the highlighted image full frame, touch and hold the X button.
-
Copy white balance.
Press J to copy the white balance value from the highlighted photograph to the selected preset. If the highlighted photograph has a comment, the comment will be copied to the comment for the selected preset.
Fine-Tuning Preset White Balance
The current preset can be fine-tuned by selecting Fine-tune in the preset manual white balance menu and adjusting white balance as described in “The White Balance Menu: Fine-Tuning” (0 The White Balance Menu: Fine-Tuning).
Edit Comment
To enter a descriptive comment of up to 36 characters for the current white-balance preset, select Edit comment in the preset manual white balance menu.

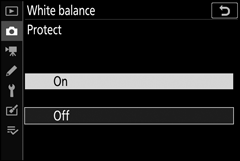
Protect
To protect the current white-balance preset, select Protect in the preset manual white balance menu, then highlight On and press J. Protected presets cannot be modified and the Fine-tune and Edit comment options cannot be used.