Vary exposure, Active D-Lighting (ADL), or white balance slightly with each shot, “bracketing” the current value. Bracketing can be used in situations in which getting the right settings is difficult and there is not time to check results and adjust settings with each shot, or to experiment with different settings for the same subject. The following options are available:
- Auto bracketing set: Choose the setting or settings bracketed when auto bracketing is in effect. Choose AE bracketing perform exposure bracketing, WB bracketing to perform white-balance bracketing, or ADL bracketing to perform bracketing using Active D-Lighting.
- Number of shots: Choose the number of shots in the bracketing sequence.
- Increment: Choose the amount the selected settings vary with each shot (ADL bracketing excluded).
- Amount: Choose how Active D-Lighting varies with each shot (ADL bracketing only).
Exposure Bracketing
Vary exposure over a series of photographs.
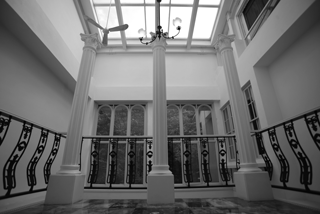
Exposure modified by: 0 EV
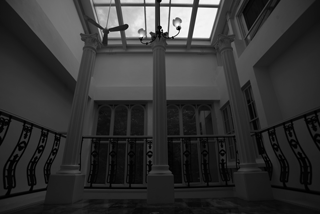
Exposure modified by: –1 EV

Exposure modified by: +1 EV
-
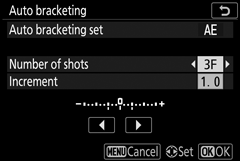
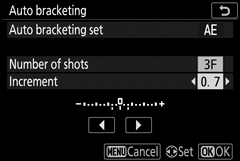
Select AE bracketing for Auto bracketing set.
The camera will display Number of shots and Increment options.
-
Choose the number of shots.
Highlight Number of shots and press 4 or 2 to choose the number of shots in the bracketing sequence.
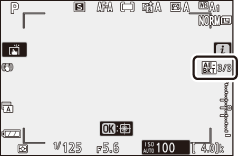
At settings other than 0F, a bracketing icon will appear in the display.
-
Choose a bracketing increment.
Highlight Increment and press 4 or 2 to choose the bracketing increment. When 1/3 step is selected for Custom Setting b1 (EV steps for exposure cntrl), the size of the increment can be chosen from 0.3 (1/3), 0.7 (2/3), 1, 2, and 3 EV. The bracketing programs with an increment of 0.3 (1/3) EV are listed below.
“Number of shots” Bracketing indicator No. of shots Bracketing order (EVs) 0F 
0 0 +3F 
3 0/+0.3/+0.7 −3F 
3 0/–0.7/–0.3 +2F 
2 0/+0.3 −2F 
2 0/–0.3 3F 
3 0/–0.3/+0.3 5F 
5 0/–0.7/–0.3/+0.3/+0.7 7F 
7 0/–1.0/–0.7/–0.3/+0.3/+0.7/+1.0 9F 
9 0/–1.3/–1.0/–0.7/–0.3/+0.3/+0.7/+1.0/+1.3 Note that for exposure increments of 2 EV or more, the maximum number of shots is 5; if a higher value was selected in Step 2, the number of shots will automatically be set to 5.
-
Frame a photograph, focus, and shoot.
The camera will vary exposure shot-by-shot according to the bracketing program selected; the modified values for shutter speed and aperture are shown in the display. Modifications to exposure are added to those made with exposure compensation.

While bracketing is in effect, the display shows a bracketing icon, a bracketing progress indicator, and the number of shots remaining in the bracketing sequence. After each shot, a segment will disappear from the indicator and the number of shots remaining will be reduced by one.

No. shots: 3; increment: 0.7

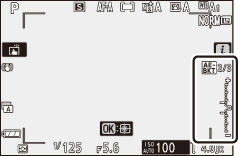
Display after first shot
Canceling Bracketing
To cancel bracketing, select 0F for Number of shots.
Exposure Bracketing
In continuous release modes, shooting will pause after the number of shots specified in the bracketing program have been taken. Shooting will resume the next time the shutter-release button is pressed.
If the memory card fills before all shots in the sequence have been taken, shooting can be resumed from the next shot in the sequence after the memory card has been replaced or shots have been deleted to make room on the memory card. If the camera is turned off before all shots in the sequence have been taken, bracketing will resume from the next shot in the sequence when the camera is turned on.
The camera modifies exposure by varying shutter speed and aperture (mode P), aperture (mode S), or shutter speed (modes A and M). If On is selected for ISO sensitivity settings > Auto ISO sensitivity control in modes P, S, and A, the camera will automatically vary ISO sensitivity for optimum exposure when the limits of the camera exposure system are exceeded; in mode M, the camera will first use auto ISO sensitivity control to bring exposure as close as possible to the optimum and then bracket this exposure by varying shutter speed.
White Balance Bracketing
The camera creates multiple copies of each photograph, each with a different white balance.
-
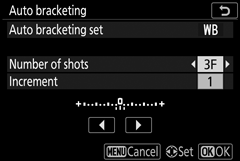
Choose WB bracketing.
Select WB bracketing for Auto bracketing set.
-
Choose the number of shots.
Highlight Number of shots and press 4 or 2 to choose the number of shots in the bracketing sequence.
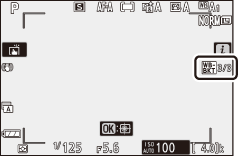
At settings other than 0F, a bracketing icon will appear in the display.
-
Choose a bracketing increment.
Highlight Increment and press 4 or 2 to choose the bracketing increment. Each increment is roughly equivalent to 5 mired. Choose from increments of 1 (5 mired), 2 (10 mired), or 3 (15 mired). Higher B values correspond to increased amounts of blue, higher A values to increased amounts of amber. The bracketing programs with an increment of 1 are listed below.

“Number of shots” Bracketing indicator No. of shots Increment Bracketing order 0F 
0 1 0 B3F 
3 1B 0/B1/B2 A3F 
3 1A 0/A2/A1 B2F 
2 1B 0/B1 A2F 
2 1A 0/A1 3F 
3 1A, 1B 0/A1/B1 5F 
5 0/A2/A1/B1/B2 7F 
7 0/A3/A2/A1/B1/B2/B3 9F 
9 0/A4/A3/A2/A1/B1/B2/B3/B4 -
Frame a photograph, focus, and shoot.
Each shot will be processed to create the number of copies specified in the bracketing program, and each copy will have a different white balance. Modifications to white balance are added to the white balance adjustment made with white balance fine-tuning.
If the number of shots in the bracketing program is greater than the number of exposures remaining, the shutter release will be disabled. Shooting can begin when a new memory card is inserted.
Canceling Bracketing
To cancel bracketing, select 0F for Number of shots.
White Balance Bracketing
White balance bracketing is not available at an image quality of NEF (RAW). Selecting an NEF (RAW) or NEF (RAW) + JPEG option cancels white balance bracketing.
White balance bracketing affects only color temperature (the amber-blue axis in the white balance fine-tuning display). No adjustments are made on the green-magenta axis.
In self-timer mode, the number of copies specified in the bracketing program will be created each time the shutter is released, regardless of the option selected for Custom Setting c2 (Self-timer) > Number of shots.
If the camera is turned off while the memory card access lamp is lit, the camera will power off only after all photographs in the sequence have been recorded.
ADL Bracketing
The camera varies Active D-Lighting over a series of exposures.
-
Choose ADL bracketing.
Select ADL bracketing for Auto bracketing set.
-
Choose the number of shots.
Highlight Number of shots and press 4 or 2 to choose the number of shots in the bracketing sequence. Choose two shots to take one photograph with Active D-Lighting off and another at the value selected in Step 3. Choose three to five shots to take a series of photographs with Active D-Lighting set to Off, Low, and Normal (three shots), Off, Low, Normal, and High (four shots), or Off, Low, Normal, High, and Extra high (five shots). If you choose more than two shots, proceed to Step 4.
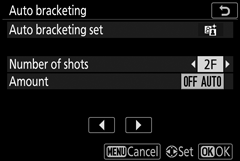
At settings other than 0F, a bracketing icon will appear in the display.

-
Choose a value for Active D-Lighting.
Highlight Amount and press 4 or 2 to choose an option. The chosen setting applies when 2F is selected for Number of shots.
Amount Bracketing order OFF L Off/Low OFF N Off/Normal OFF H Off/High OFF H+ Off/Extra high OFF AUTO Off/Auto -
Frame a photograph, focus, and shoot.
The camera will vary Active D-Lighting shot-by-shot according to the bracketing program selected.
While bracketing is in effect, the display shows an ADL bracketing icon and the number of shots remaining in the bracketing sequence. After each shot, the number of shots remaining will be reduced by one.

Canceling Bracketing
To cancel bracketing, select 0F for Number of shots.
ADL Bracketing
In continuous release modes, shooting will pause after the number of shots specified in the bracketing program have been taken. Shooting will resume the next time the shutter-release button is pressed.
If the memory card fills before all shots in the sequence have been taken, shooting can be resumed from the next shot in the sequence after the memory card has been replaced or shots have been deleted to make room on the memory card. If the camera is turned off before all shots in the sequence have been taken, bracketing will resume from the next shot in the sequence when the camera is turned on.