Connecting to HDMI Devices
The optional High-Definition Multimedia Interface (HDMI) cable (0 Other Accessories) or a type C HDMI cable (available separately from third-party suppliers) can be used to connect the camera to high-definition video devices. Always turn the camera off before connecting or disconnecting an HDMI cable.
Connect to camera
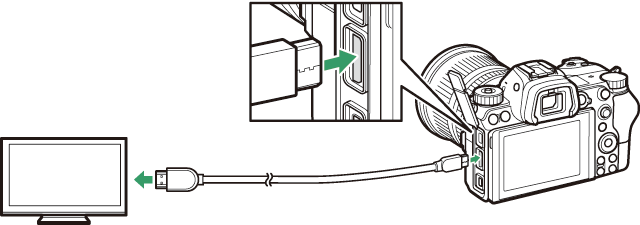
Connect to high-definition device (choose cable with connector for HDMI device)
HDMI Displays
After connecting the camera to an HDMI television or other display, tune the device to the HDMI channel, then turn the camera on and press the K button. During playback, images will be displayed on the television screen. Volume can be adjusted using television controls; the camera controls cannot be used.
HDMI Recorders
The camera can record video directly to connected HDMI recorders. Some recorders will even start and stop recording in response to camera controls. Use the HDMI option in the setup menu to adjust settings for HDMI output.
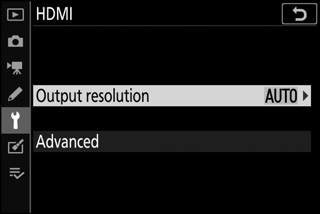
- Output Resolution: Choose the format for images output to the HDMI device. If Auto is selected, the camera will automatically select the appropriate format.
-
Advanced: Adjust the settings below.
- Output range: Auto is recommended in most situations. If the camera is unable to determine the correct RGB video signal output range for the HDMI device, you can choose Limited range for devices with an RGB video signal input range of 16 to 235 or Full range for devices with an RGB video signal input range of 0 to 255. Choose Limited range if you notice a loss of detail in shadows, Full range if shadows are “washed out” or too bright.
- External recording control: Enabling external recording control allows camera controls to be used to start and stop recording when the camera is connected via HDMI to a third-party recorder that supports the Atomos Open Protocol (Atomos SHOGUN, NINJA, or SUMO-series Monitor recorders). An icon will be displayed in the camera monitor: A is displayed in movie live view, while B is displayed during movie recording. During recording, check the recorder and recorder display to ensure that footage is being saved to the device (note that the footage output to the device may be disrupted while external recording control is in effect). The camera display will turn off automatically when the standby timer expires, ending HDMI output; when recording movies to an external device, select Standby timer for Custom Setting c3 (Power off delay) and choose No limit or a time longer than the anticipated recording time. See the manual provided with the recorder for more information on device features and operation.
- Output data depth: Choose from 8 bit and 10 bit.
- N-Log setting: Select On (cannot record to card) to preserve details in highlights and shadows and avoid over-saturated colors when recording movies. Choose this option (available only when 10 bit is selected for Output data depth) when recording footage that will later be color-corrected. The footage will be recorded directly to the external device and cannot be saved to the camera memory card. The ISO sensitivity settings > Maximum sensitivity and ISO sensitivity (Mode M) options in the movie shooting menu can be set respectively to values of from ISO 1600 to 25600 (Z 7) or 51200 (Z 6) and ISO 800 to 25600 (Z 7) or 51200 (Z 6).
- View assist: Choose On for a live preview of video footage recorded with On (cannot record to card) selected for N-Log setting. The colors in the preview will differ from those of the final movie, but this has no effect on the footage actually recorded.
HDMI Output
HDMI output is not available while movies are being recorded at movie frame sizes of 1920 × 1080 120p, 1920 × 1080 100p, or 1920 × 1080 slow-motion or when the camera is connected to a computer running Camera Control Pro 2.
10-Bit Output Data Depth
10 bit can be used only with compatible recorders. Regardless of the display mode selected, the camera monitor will turn on and the viewfinder will remain blank. No photos can be taken; during movie recording, the following additional restrictions apply when 3840 × 2160 is selected for frame size:
- Movies are not recorded to memory cards inserted in the camera.
- Icons and characters in the monitor will display at low resolution.
- Selecting the DX image area on the Z 7 reduces the angle of view to about 90%. The angle of view on the Z 6 is always about 90%.
Zoom
Movies filmed at a frame size of 3840 × 2160 are displayed at a size of 1920 × 1080 when zoomed in.