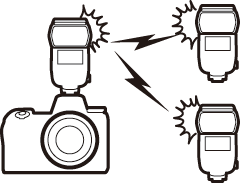
Optical AWL
Remote flash units can be controlled via optical signals from an optional flash unit mounted on the camera accessory shoe and functioning as a master flash (optical AWL; for information on compatible flash units, see “The Nikon Creative Lighting System”, 0 The Nikon Creative Lighting System). If the flash unit in question is an SB-5000 or SB-500, settings can be adjusted from the camera (see below); otherwise settings must be adjusted using flash unit controls as described in the documentation provided with the unit. For information on flash placement and other topics, see the documentation provided with the flash units.
Using Optical AWL with the SB-5000 or SB-500
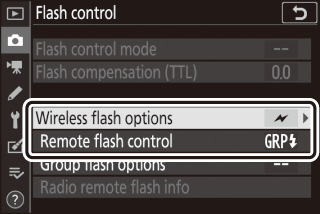
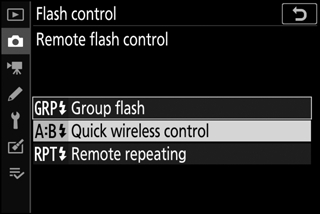
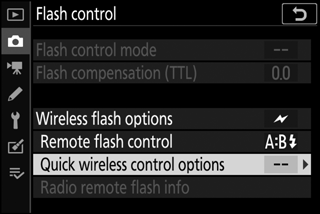
Mount the flash unit on the camera accessory shoe and select Optical AWL for Flash control > Wireless flash options in the photo shooting menu. Group flash settings can be adjusted using Flash control > Remote flash control; the Remote flash control item for the SB-5000 also offers Quick wireless control and Remote repeating settings.
The SB-5000
When an SB-5000 is mounted on the camera accessory shoe, Flash control settings can also be changed using the controls on the flash unit.
Group Flash
Select this option to adjust settings separately for each group.
-
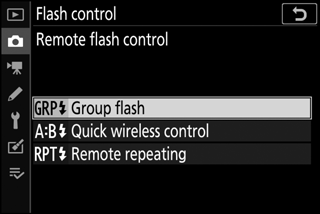
C: Select Group flash.
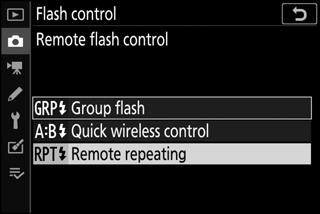
Select Group flash for Flash control > Remote flash control in the photo shooting menu.
-
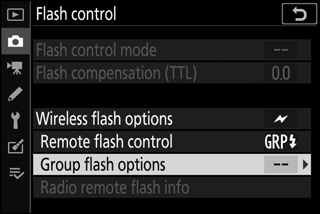
C: Select Group flash options.
Highlight Group flash options in the flash control display and press 2.
-
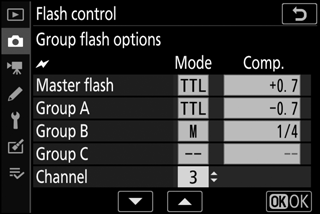
C: Adjust settings for the master flash.
Choose the flash control mode and flash level for the master flash and the flash units in each group:

- TTL: i-TTL flash control
- qA: Auto aperture (available only with compatible flash units)
- M: Choose the flash level manually
- – – (off): The units do not fire and the flash level cannot be adjusted
Choose a channel for the master flash. If the remote flash units include an SB-500, you must choose channel 3, but otherwise you can choose any channel between 1 and 4.
-
f: Set the remote flash units to the same channel as the master flash.
Set the remote flash units to the channel selected in Step 3.
-
f: Group the remote flash units.
Choose a group (A, B, or C, or if you are using an SB-500 master flash, A or B) for each remote flash unit. Although there is no limit on the number of remote flash units that may be used, the practical maximum is three per group. With more than this number, the light emitted by the remote flash units will interfere with performance.
-
C/f: Compose the shot.
Compose the shot and arrange the flash units. See the documentation provided with the flash units for more information. After arranging the units, press the test button on the master flash to test-fire the flash and confirm that the units are functioning normally. Flash units can also be test-fired by pressing the i button in the flash info display (0 Changing Flash Settings) and selecting c Test flash.
-
C/f: Take the photograph.
Take the photograph after confirming that the flash-ready lights for all flash units are lit.
Quick Wireless Control (SB-5000 Only)
Select this option to control overall flash compensation for, and the relative balance between, groups A and B, while setting output for group C manually.
-
C: Select Quick wireless control.
Select Quick wireless control for Flash control > Remote flash control in the photo shooting menu.
-
C: Select Quick wireless control options.
Highlight Quick wireless control options in the flash control display and press 2.
-
C: Adjust flash settings.
Choose the balance between groups A and B.
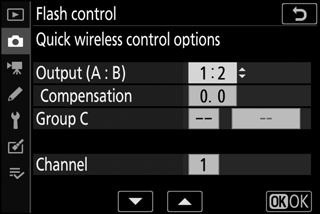
Adjust flash compensation for groups A and B.
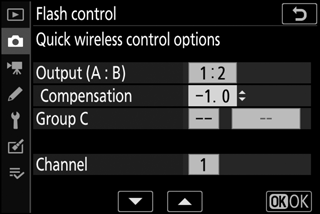
Choose a flash control mode and flash level for the units in group C:
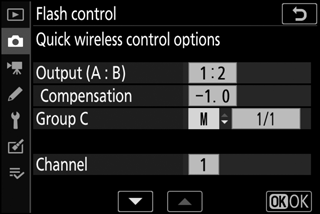
- M: Choose the flash level manually.
- – –: The units in group C do not fire.
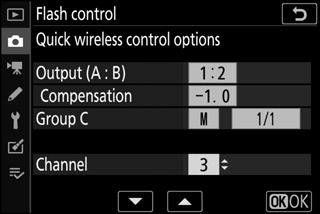
Choose a channel for the master flash. If the remote flash units include an SB-500, you must choose channel 3, but otherwise you can choose any channel between 1 and 4.
-
f: Set the remote flash units to the same channel as the master flash.
Set the remote flash units to the channel selected in Step 3.
-
f: Group the remote flash units.
Choose a group (A, B, or C). Although there is no limit on the number of remote flash units that may be used, the practical maximum is three per group. With more than this number, the light emitted by the remote flash units will interfere with performance.
-
C/f: Compose the shot.
Compose the shot and arrange the flash units. See the documentation provided with the flash units for more information. After arranging the units, press the test button on the master flash to test-fire the flash and confirm that the units are functioning normally. Flash units can also be test-fired by pressing the i button in the flash info display (0 Changing Flash Settings) and selecting c Test flash.
-
C/f: Take the photograph.
Take the photograph after confirming that the flash-ready lights for all flash units are lit.
Remote Repeating (SB-5000 Only)
When this option is selected, the flash units fire repeatedly while the shutter is open, producing a multiple-exposure effect.
-
C: Select Remote repeating.
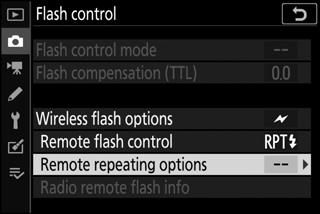
Select Remote repeating for Flash control > Remote flash control in the photo shooting menu.
-
C: Select Remote repeating options.
Highlight Remote repeating options in the flash control display and press 2.
-
C: Adjust flash settings.
Choose the flash level (Output), the maximum number of times the flash units fire (Times), and the number of times the flash units fire per second (Frequency).
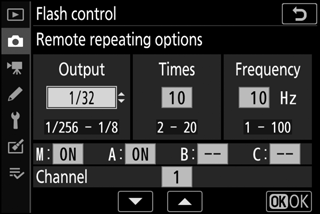
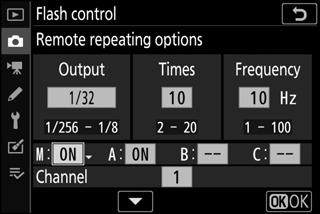
Enable or disable selected groups. Select ON to enable the selected group, – – to disable the selected group.
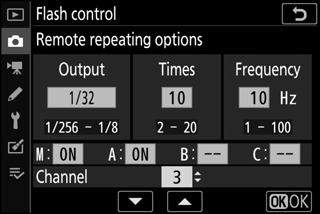
Choose a channel for the master flash. If the remote flash units include an SB-500, you must choose channel 3, but otherwise you can choose any channel between 1 and 4.
-
f: Set the remote flash units to the same channel as the master flash.
Set the remote flash units to the channel selected in Step 3.
-
f: Group the remote flash units.
Choose a group (A, B, or C) for each remote flash unit. Although there is no limit on the number of remote flash units that may be used, the practical maximum is three per group. With more than this number, the light emitted by the remote flash units will interfere with performance.
-
C/f: Compose the shot.
Compose the shot and arrange the flash units. See the documentation provided with the flash units for more information. After arranging the units, press the test button on the master flash to test-fire the flash and confirm that the units are functioning normally. Flash units can also be test-fired by pressing the i button in the flash info display (0 Changing Flash Settings) and selecting c Test flash.
-
C/f: Take the photograph.
Take the photograph after confirming that the flash-ready lights for all flash units are lit.
Optical AWL
Position the sensor windows on the remote flash units to pick up the light from the master flash (particular care is required if the camera is not mounted on a tripod). Be sure that direct light or strong reflections from the remote flash units do not enter the camera lens (in TTL mode) or the photocells on the remote flash units (qA mode), as this may interfere with exposure. To prevent low-intensity timing flashes emitted by the master flash from appearing in photographs taken at short range, choose low ISO sensitivities or small apertures (high f-numbers). After positioning the remote flash units, take a test shot and view the results in the camera display.