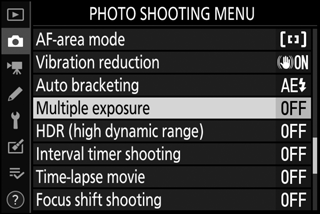
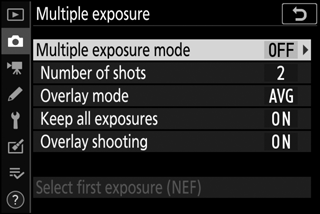
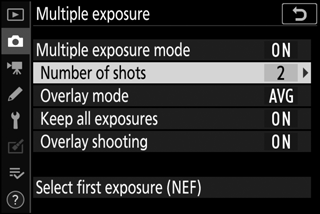
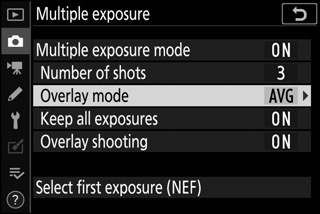
Record two to ten NEF (RAW) exposures as a single photograph. The following options are available:
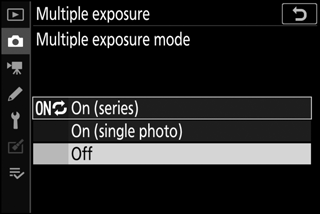
- Multiple exposure mode: Choose from On (series) (take a series of multiple exposures, ending when Off is selected), On (single photo) (take one multiple exposure), or Off (exit without creating additional multiple exposures).
- Number of shots: Choose the number of exposures that will be combined to form a single photograph.
-
Overlay mode: Choose from the options below.
- Add: The exposures are overlaid without modification; gain is not adjusted.
- Average: Before the exposures are overlaid, the gain for each is divided by the total number of exposures (the gain for each exposure is set to 1/2 for 2 exposures, 1/3 for 3 exposures, etc).
- Lighten: The camera compares the pixels in each exposure and uses only the brightest.

+

- Darken: The camera compares the pixels in each exposure and uses only the darkest.
+
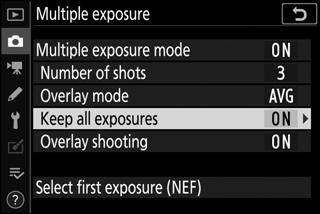
- Keep all exposures: Choose On to save the individual shots that make up each multiple exposure, Off to discard the individual shots and save only the multiple exposure.
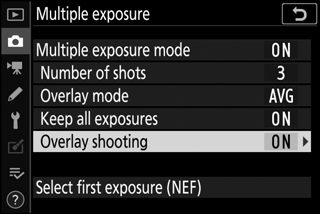
- Overlay shooting: If On is selected, earlier exposures will be superimposed on the view through the lens during shooting.
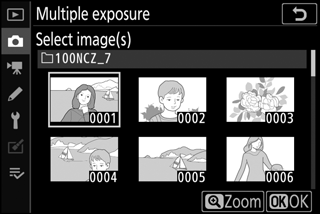
- Select first exposure (NEF): Choose the first exposure from the NEF (RAW) images on the memory card.
Creating a Multiple Exposure
Follow the steps below to shoot a multiple exposure.
-
Select Multiple exposure.
Highlight Multiple exposure in the photo shooting menu and press 2.
-
Select a mode.
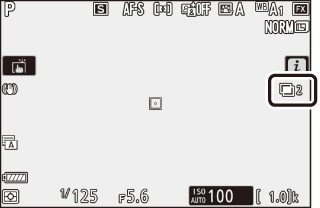
Highlight Multiple exposure mode and press 2, then press 1 or 3 to choose the desired mode and press J to select.
If On (series) or On (single photo) is selected, an icon will appear in the display.
-
Choose the number of shots.
Highlight Number of shots and press 2. Press 1 or 3 to choose the number of exposures that will be combined to form a single photograph and press J.
-
Choose the overlay mode.
Highlight Overlay mode and press 2, then press 1 or 3 to choose the desired mode and press J to select.
-
Choose whether to keep individual exposures.
To choose whether to keep or delete the individual shots that make up the multiple exposure, highlight Keep all exposures and press 2, then press 1 or 3 to choose the desired option and press J to select.
-
Choose whether to view progress in the display.
To choose whether earlier exposures are superimposed over the view through the lens as shooting progresses, highlight Overlay shooting and press 2, then press 1 or 3 to choose the desired option and press J to select.
-
Choose the first exposure.
To choose the first exposure from existing photos taken with Large selected for Image size > NEF (RAW) in the photo shooting menu, highlight Select first exposure (NEF) and press 2. Use the multi selector to highlight the desired image and press J to select (to view the highlighted image full screen, press and hold the X button).
-
Frame a photograph, focus, and shoot.
Continue shooting until all exposures have been taken and the final photograph has been recorded (if you selected an existing NEF (RAW) image as the first exposure in Step 7, shooting will start from the second exposure). If On (single photo) was selected in Step 2, multiple exposure shooting will end when the photo is recorded; otherwise, you can continue taking multiple exposures until multiple exposure shooting is turned off.
Release Mode
In continuous release modes, the camera records all exposures in a single burst. If On (series) is selected, a new multiple exposure will start as each previous multiple exposure ends; if On (single photo) is selected, multiple exposure shooting will end after the first multiple exposure is recorded. In self-timer mode, the camera will automatically record the number of exposures selected in Step 3, regardless of the option selected for Custom Setting c2 (Self-timer) > Number of shots; the interval between shots is however controlled by Custom Setting c2 (Self-timer) > Interval between shots. In other release modes, one photograph will be taken each time the shutter-release button is pressed; continue shooting until all exposures have been recorded.
Image Quality
Multiple exposures shot with an NEF (RAW) option selected for image quality will be recorded in JPEG finem format.
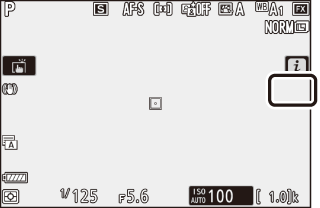
The i Menu
The options listed below can be accessed during multiple exposure shooting by pressing the K button followed by the i button. Highlight items and press J to select.

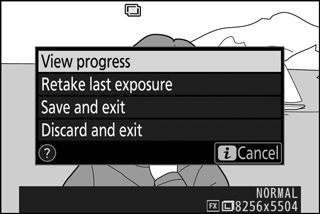
- View progress: View a preview created from the exposures recorded to the current point.
- Retake last exposure: Retake the most recent exposure.
- Save and exit: Create a multiple exposure from the exposures taken to current point.
- Discard and exit: Exit without recording a multiple exposure. If On is selected for Keep all exposures, the individual exposures will be kept.
Multiple Exposure
Shooting may also end if camera settings are changed before the exposure is complete. The shooting settings and photo info for multiple exposure photographs are those for the first exposure.
Do not remove or replace the memory card while recording a multiple exposure.
Multiple exposures may be affected by noise (randomly-spaced bright pixels, fog, or lines).
Other Settings
While a multiple exposure is being shot, memory cards cannot be formatted and some menu items are grayed out and cannot be changed.
Ending Multiple Exposures
To end a multiple exposure before the specified number of exposures have been taken, select Off for Multiple exposure mode or press the K button followed by the i button and select either Save and exit or Discard and exit. If shooting ends or you select Save and exit before the specified number of exposures have been taken, a multiple exposure will be created from the exposures that have been recorded to that point. If Average is selected for Overlay mode, gain will be adjusted to reflect the number of exposures actually recorded. Note that shooting will end automatically if the standby timer expires.
The Standby Timer
Menus and playback can be used between exposures, but note that if no operations are performed for about 40 seconds during playback or 90 seconds while menus are displayed, shooting will end and a multiple exposure will be created from the exposures recorded to that point. The time available to record the next exposure can be extended by choosing longer times for Custom Setting c3 (Power off delay) > Playback and Menus.