Choose the options displayed in the i menu for photo mode. The following options can be assigned to any position in the menu by highlighting the desired position, pressing J, and choosing the desired option.
| Option | |
|---|---|
| J | Choose image area |
| 8 | Image quality |
| o | Image size |
| E | Exposure compensation |
| 9 | ISO sensitivity settings |
| m | White balance |
| h | Set Picture Control |
| p | Color space |
| y | Active D-Lighting |
| q | Long exposure NR |
| r | High ISO NR |
| w | Metering |
| c | Flash mode |
| Y | Flash compensation |
| s | Focus mode |
| t | AF-area mode |
| u | Vibration reduction |
| t | Auto bracketing |
| $ | Multiple exposure |
| 2 | HDR (high dynamic range) |
| L | Silent photography |
| v | Release mode |
| w | Custom control assignment |
| z | Exposure delay mode |
| O | Shutter type |
| y | Apply settings to live view |
| z | Split-screen display zoom |
| W | Peaking highlights |
| 3 | Monitor/viewfinder brightness |
| Z | Bluetooth connection |
| U | Wi-Fi connection |
Split-Screen Display Zoom
When assigned to the i menu, Split-screen display zoom can be used to split the display into two boxes showing separate areas of the frame side-by-side at a high zoom ratio. The positions of the magnified areas are shown in the navigation window, making it easier to check focus at two different locations when photographing a building or other wide object situated at right angles to the camera.
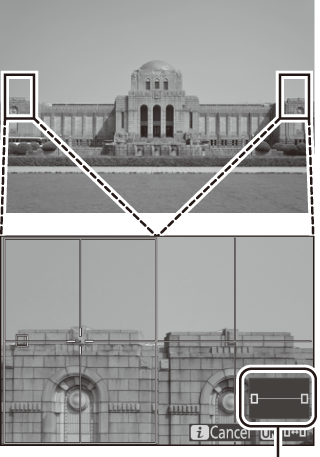
Navigation window
Use the X and W (Q) buttons to zoom in and out, or use the J button to select a box and press 4 or 2 to scroll the selected area left or right. Pressing 1 or 3 scrolls both areas up or down simultaneously. To focus on the subject at the center of the selected area, press the shutter-release button halfway. To exit the split-screen display, press the i button.
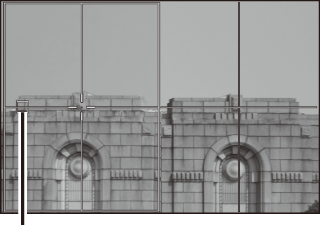
Area in focus