Recording Movies
Movies can be recorded in live view mode.
-
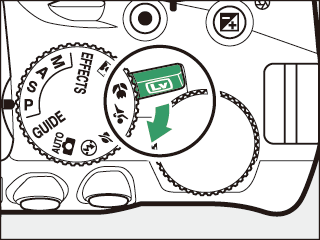
Rotate the live view switch.
The view through the lens will be displayed in the monitor.
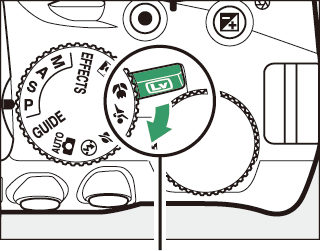
Live view switch
The 0 Icon
A 0 icon indicates that movies cannot be recorded.
Before Recording
If you are using a type E or PC-E NIKKOR lens (0 Compatible CPU Lenses, Identifying CPU and Type G, E, and D Lenses), you can choose the aperture for modes A and M during live view (0 Mode A (Aperture-Priority Auto), Mode M (Manual)). Other lenses do not allow changes to aperture while live view is in effect; adjust aperture before starting live view.
-
Focus.
Frame the opening shot and focus. Note that the number of subjects that can be detected in face-priority AF drops during movie recording.

-
Start recording.
Press the movie-record button to start recording. A recording indicator and the time available are displayed in the monitor. Sound is recorded via the built-in microphone; be careful not to obstruct the microphone during recording. Except in i and j modes, exposure can be locked by pressing the A (L) button (0 Autoexposure Lock) or (in scene, P, S, A, and % modes) altered by up to ±3 EV in steps of 1/3 EV by pressing the E (N) button and rotating the command dial (0 Exposure Compensation; note that depending on the brightness of the subject, changes to exposure may have no visible effect).
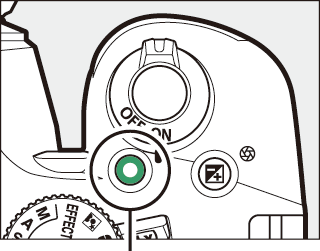
Movie-record button
Time remaining
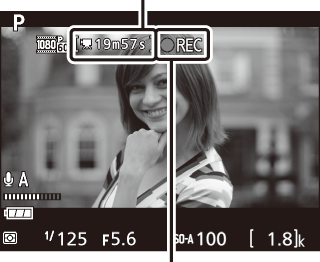
Recording indicator
-
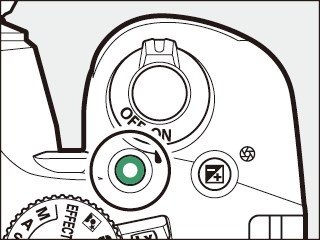
End recording.
Press the movie-record button again to end recording. Recording will end automatically when the maximum length is reached, the memory card is full, or another mode is selected.
-
End live view.
Rotate the live view switch to end live view.
Viewing the Movie Crop
To view the movie crop in live view, press R to select the “show movie indicators”, “hide movie indicators”, or “framing grid” display (0 Live View and Movie Mode).
Taking Photographs During Movie Recording
To end movie recording, take a photograph, and exit to live view, press the shutter-release button all the way down and hold it in this position until the shutter is released.
Maximum Length
The maximum length for individual movie files is 4 GB (for maximum recording times, see “Movie Settings” (0 Movie Settings)); note that depending on memory card write speed, shooting may end before this length is reached (0 Approved Memory Cards).
Recording Movies
Flicker, banding, or distortion may be visible in the monitor and in the final movie under fluorescent, mercury vapor, or sodium lamps or with subjects that are in motion, particularly if the camera is panned horizontally or an object moves horizontally at high speed through frame (for information on reducing flicker and banding, see Flicker reduction; 0 Flicker Reduction). Jagged edges, color fringing, moire, and bright spots may also appear. Bright regions or bands may appear in some areas of the frame with flashing signs and other intermittent light sources or if the subject is briefly illuminated by a strobe or other bright, momentary light source. Avoid pointing the camera at the sun or other strong light sources. Failure to observe this precaution could result in damage to the camera’s internal circuitry. Note that noise (randomly-spaced bright pixels, fog, or lines) and unexpected colors may appear if you zoom in on the view through the lens (0 Live View Zoom Preview) in movie mode.
The camera can record both video and sound; do not cover the microphone during recording. Note that the built-in microphone may record lens noise during autofocus and vibration reduction.
Flash lighting cannot be used during movie recording.
Matrix metering is used regardless of the metering method selected. Shutter speed and ISO sensitivity are adjusted automatically unless On is selected for Manual movie settings (0 Movie Settings) and the camera is in mode M.
The P Button
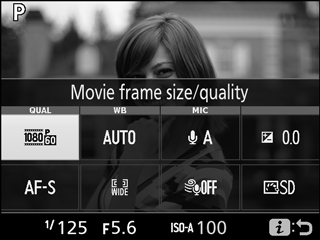
When movie indicators are displayed by pressing the R button in live view mode, the following settings can be accessed by pressing the P button:
- Movie frame size/quality (0 Frame size/frame rate and Movie quality)
- White balance (0 White Balance)
- Microphone (0 Microphone)
- Exposure compensation (0 Exposure Compensation) *
- Focus mode (0 Focus Mode)
- AF-area mode (0 AF-Area Mode)
- Wind noise reduction (0 Wind noise reduction)
- Picture Control (0 Picture Controls)
ISO sensitivity will be displayed in place of exposure compensation if On is selected for Movie settings > Manual movie settings (0 Movie Settings) in mode M.
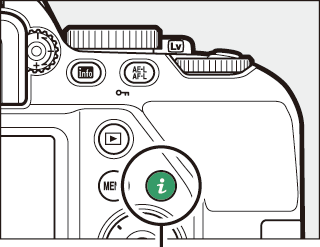
P button
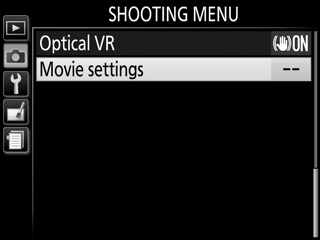
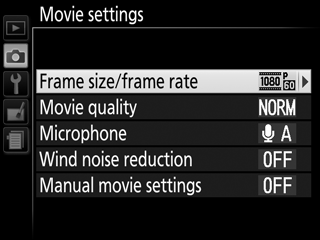
Movie Settings
Use the Movie settings option in the shooting menu (0 Movie settings) to adjust the following settings.
-
Frame size/frame rate and Movie quality: The maximum length varies with the options selected.
Movie quality Frame size/frame rate 1 Maximum length 2 High quality L 1920×1080; 60p 10 min. M 1920×1080; 50p N 1920×1080; 30p 20 min. O 1920×1080; 25p P 1920×1080; 24p Q 1280× 720; 60p R 1280× 720; 50p Normal t 1920×1080; 60p 20 min. u 1920×1080; 50p r 1920×1080; 30p 29 min. 59 s s 1920×1080; 25p k 1920×1080; 24p l 1280× 720; 60p o 1280× 720; 50p Listed value. Actual frame rates for 60p, 50p, 30p, 25p, and 24p are 59.94, 50, 29.97, 25, and 23.976 fps respectively.
Movies recorded in miniature effect mode are up to three minutes long when played back.
- Microphone: Turn the built-in microphone on or off or adjust microphone sensitivity. Choose Auto sensitivity to adjust sensitivity automatically, Microphone off to turn sound recording off; to select microphone sensitivity manually, select Manual sensitivity and choose a sensitivity.
- Wind noise reduction: Select On to enable the low-cut filter for the built-in microphone, reducing noise produced by wind blowing over the microphone (note that other sounds may also be affected).
- Manual movie settings: Choose On to allow manual adjustments to shutter speed and ISO sensitivity when the camera is in mode M. Shutter speed can be set to values as fast as 1/4000 s; the slowest speed available varies with the frame rate: 1/30 s for frame rates of 24p, 25p, and 30p, 1/50 s for 50p, and 1/60 s for 60p. If shutter speed is not in this range when live view starts, it will automatically be set to a supported value, and remain at this value when live view ends. Note that ISO sensitivity is fixed at the value selected; the camera does not adjust ISO sensitivity automatically when On is selected for ISO sensitivity settings > Auto ISO sensitivity control in the shooting menu (0 Auto ISO Sensitivity control).
-
Select Movie settings.
Highlight Movie settings in the shooting menu and press 2.
-
Choose movie options.
Highlight the desired item and press 2, then highlight an option and press J.
HDMI
When the camera is attached to an HDMI video device, the video device will display the view through the lens. If the device supports HDMI-CEC, select Off for the HDMI > Device control option in the setup menu (0 Controlling the Camera with the TV Remote) before shooting in live view.