Connecting Using SnapBridge
This section describes how to use the SnapBridge app for wireless connections between your camera and smart device. Use the latest version of the SnapBridge app. The dialogs and messages displayed by the camera and smart device may differ from those shown here, and operations may differ depending on the OS, camera firmware, and version of SnapBridge used. The instructions that follow refer to version 2.5 of the SnapBridge app.
What SnapBridge Can Do for You
Use the SnapBridge app to:
- Download pictures as they are taken or select earlier photos for download
- Take pictures remotely using the controls in the SnapBridge app; the pictures can be downloaded to the smart device as they are taken (before taking pictures remotely, mount the camera on a tripod or take other steps to secure it in place)
- Upload smart device location data to the camera
- Synchronize the camera clock to the time reported by the smart device
- Imprint pictures with comments, the time of recording, and other information as they are taken
More on SnapBridge
SnapBridge users are referred to the app’s online help, which can be viewed by selecting Help in the app menu after connecting.
Preparing for Pairing
Before connecting, ready your smart device by installing the SnapBridge app and enabling Bluetooth.
-
Search for “snapbridge” on the Apple App Store® (iOS) or Google Play™ (Android™) and install the SnapBridge app.


Information on supported operating systems is available from the download site. This camera is not compatible with the SnapBridge 360/170 app.
-
Enable Bluetooth on the smart device.
For more information, see the documentation for the smart device.
Connecting to the Camera
Connect to the camera using the SnapBridge app, not the Settings app on your device.
Security
Although one of the benefits of this product is that it allows others to freely connect for the wireless exchange of data anywhere within its range, the following may occur if security is not enabled:
- Data theft: Malicious third-parties may intercept wireless transmissions to steal user IDs, passwords, and other personal information.
- Unauthorized access: Unauthorized users may gain access to the network and alter data or perform other malicious actions. Note that due to the design of wireless networks, specialized attacks may allow unauthorized access even when security is enabled.
Android Devices
Follow the steps below to pair the camera with Android devices (for information on iOS devices, see “iOS Devices”, 0 iOS Devices). Before pairing, confirm that there is space available on the camera memory card. To prevent unexpected interruptions, you should also check that the camera battery is fully charged.
-
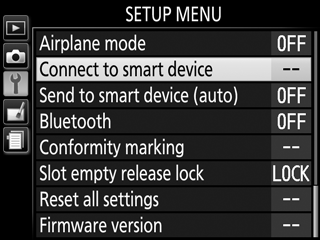
Camera: Highlight Connect to smart device in the setup menu and press 2.
After confirming that camera displays the app and camera name, ready the smart device.

-
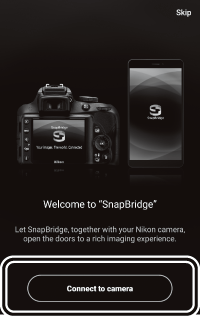
Smart device: Launch SnapBridge on the smart device and tap Connect to camera.
Pairing After Launch
If you tapped Skip at the top right corner of the welcome dialog to skip pairing when launching SnapBridge for the first time, tap Connect to camera in the
 tab and proceed to Step 3.
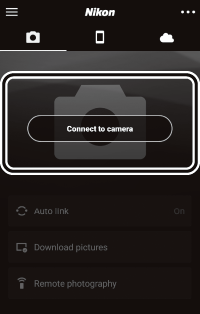
Launching SnapBridge Early
If you launched SnapBridge before being prompted by the camera, SnapBridge will direct you to choose a camera type in Step 2. Tapping the desired camera type displays a dialog instructing you to display the launch prompt on the camera; display the launch prompt and proceed to Step 3.
-
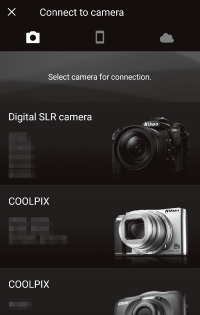
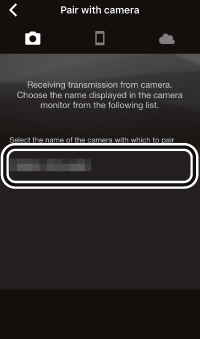
Smart device: Tap the camera name.
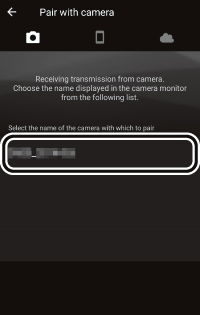
Camera Name Not Displayed
SnapBridge may not show the camera name if launched before the camera displays the launch prompt (Step 1). Exit SnapBridge and confirm that it is not running in the background (the procedure varies with the smart device; see the documentation provided with your device for details) before tapping the SnapBridge icon to launch SnapBridge again.
-
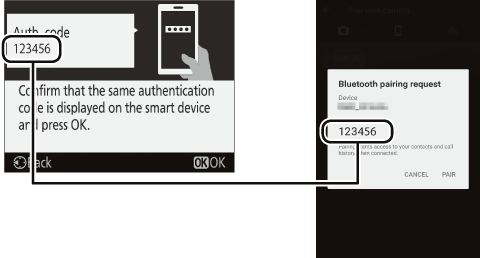
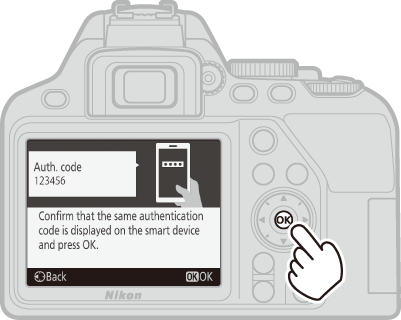
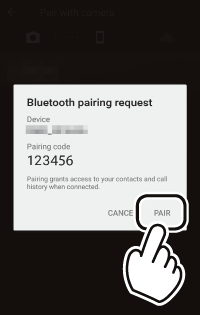
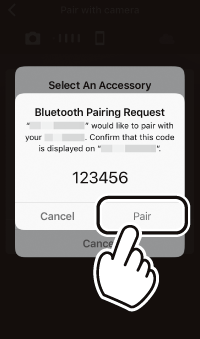
Camera/smart device: Confirm that the camera and smart device display the same authentication code (the code is circled in the illustrations below).
-
Camera/smart device: Initiate pairing.
- Camera: Press J.
- Smart device: Tap PAIR (the button circled in the illustration below, which may be labelled differently in different versions of the operation system).
Pairing Error
If you wait too long between pressing the button on the camera and tapping the button in SnapBridge, pairing will fail and an error will be displayed.
- Camera: Press J and return to Step 1.
- Smart device: Tap OK and return to Step 2.
Pairing for the First Time
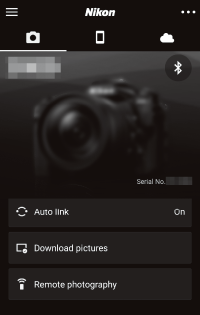
After completing pairing for the first time using the SnapBridge app, you will be prompted to choose auto link (auto upload and auto clock and location synchronization) options. This prompt will not appear again, but auto link settings can be accessed at any time using Auto link in the
tab. -
Camera/smart device: Follow the on-screen instructions.
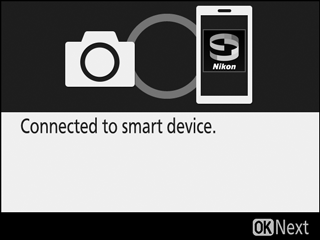
Camera: Press J. When pairing is complete, the camera will display a message stating the camera and smart device are connected. Press J and follow the on-screen instructions.
-
Smart device: Pairing is complete. Tap OK to exit to the
tab.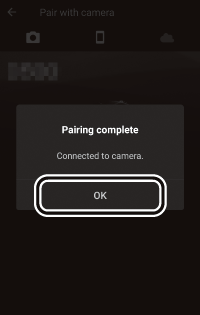
Pairing with Multiple Cameras
To pair with additional cameras, tap
 , select Add camera, and repeat Steps 3–6. SnapBridge can be used to pair with up to 5 cameras.
-
iOS Devices
Follow the steps below to pair the camera with iOS devices (for information on Android devices, see “Android Devices”, 0 Android Devices). Before pairing, confirm that there is space available on the camera memory card. To prevent unexpected interruptions, you should also check that the camera battery is fully charged.
-
Camera: Highlight Connect to smart device in the setup menu and press 2.
After confirming that camera displays the app and camera name, ready the smart device.
-
iOS device: Launch SnapBridge on the iOS device and tap Connect to camera.
Pairing After Launch
If you tapped Skip at the top right corner of the welcome dialog to skip pairing when launching SnapBridge for the first time, tap Connect to camera in the
tab and proceed to Step 3.Launching SnapBridge Early
If you launched SnapBridge before being prompted by the camera, SnapBridge will direct you to choose a camera type in Step 2. Tapping the desired camera type displays a dialog instructing you to display the launch prompt on the camera; display the launch prompt and proceed to Step 3.

-
iOS device: Tap the camera name.
Camera Name Not Displayed
SnapBridge may not show the camera name if launched before the camera displays the launch prompt (Step 1). Exit SnapBridge and confirm that it is not running in the background (if your device is equipped with a Home button, you can do this by double-clicking the Home button and swiping up to dismiss SnapBridge; otherwise, swipe slowly up from the bottom of the screen to open the multitasking window, then tap and hold the SnapBridge preview and tap the
 icon). After confirming that SnapBridge is not running in the background, tap the SnapBridge icon to launch SnapBridge again.
 -
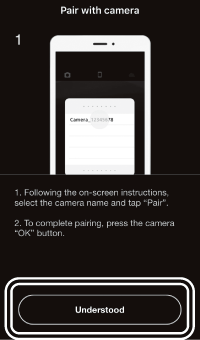
iOS device: A confirmation dialog will be displayed; read the pairing instructions carefully and tap Understood.
-
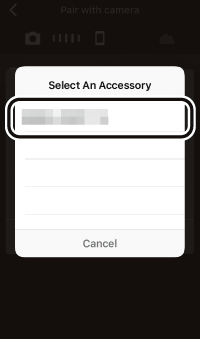
iOS device: Tap the camera name when prompted.
-
Camera/iOS device: Initiate pairing.
- Camera: Press J.
- iOS device: Tap Pair (the button circled in the illustration below, which may be labelled differently in different versions of the operation system).
Pairing Error
If you wait too long between pressing the button on the camera and tapping the button in SnapBridge, pairing will fail and an error will be displayed.
- Camera: Press J and return to Step 1.
-
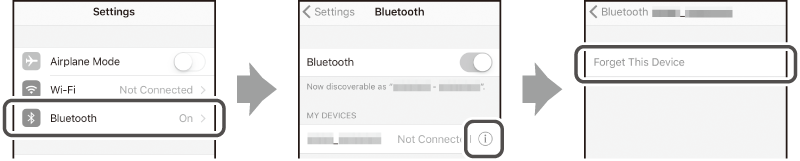
iOS device: Exit SnapBridge and confirm that it is not running in the background (for more information, see “Camera Name Not Displayed”, 0 Camera Name Not Displayed). Next, open the iOS “Settings” app and request iOS to “forget” the camera (if applicable) before returning to Step 1.
Pairing for the First Time
After completing pairing for the first time using the SnapBridge app, you will be prompted to choose auto link (auto upload and auto clock and location synchronization) options. This prompt will not appear again, but auto link settings can be accessed at any time using Auto link in the
tab. -
Camera/iOS device: Follow the on-screen instructions.
Camera: Press J. When pairing is complete, the camera will display a message stating the camera and smart device are connected. Press J and follow the on-screen instructions.
-
iOS device: Pairing is complete. Tap OK to exit to the
tab.
Pairing with Multiple Cameras
To pair with additional cameras, tap
, select Add camera, and repeat Steps 3–7. SnapBridge can be used to pair with up to 5 cameras.Launching SnapBridge for the First Time
If the message ‘“SnapBridge” would like to access your photos’ is displayed when you launch the app for the first time, click OK.
-