Getting to Know the Camera
Take a few moments to familiarize yourself with camera controls and displays. You may find it helpful to bookmark this section and refer to it as you read through the rest of the manual.
The Camera Body
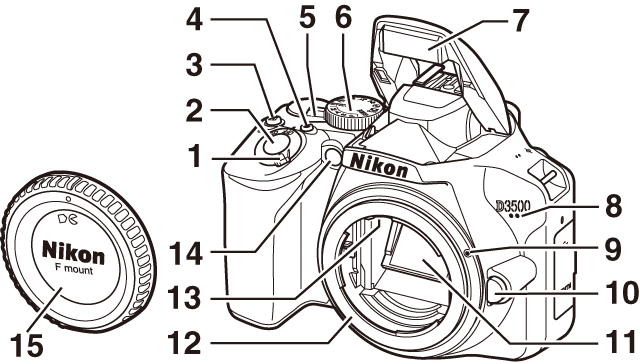
| 1 | Power switch |
|---|---|
| 2 | Shutter-release button |
| 3 |
E/N button |
| 4 | Movie-record button |
| 5 | Live view switch |
| 6 | Mode dial |
| 7 | Built-in flash |
| 8 | Microphone (monaural) |
| 9 | Mounting mark |
|---|---|
| 10 | Lens release button |
| 11 | Mirror |
| 12 | Lens mount |
| 13 | CPU contacts |
| 14 |
AF-assist illuminator Self-timer lamp Red-eye reduction lamp |
| 15 | Body cap |
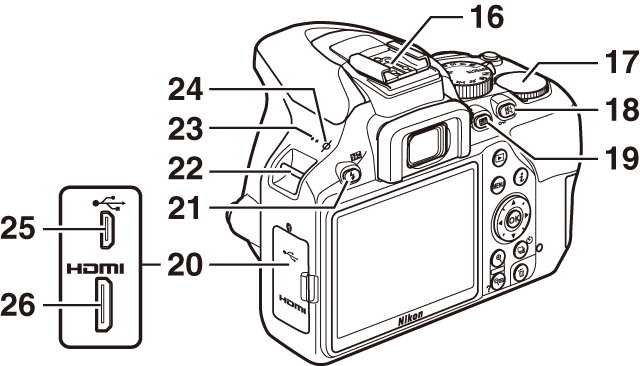
| 16 | Accessory shoe (for optional flash units) |
|---|---|
| 17 | Command dial |
| 18 |
A/L button |
| 19 |
R (information) button |
| 20 | Connector cover |
| 21 |
M/ Y button |
| 22 | Eyelets for camera strap |
|---|---|
| 23 | Speaker |
| 24 | Focal plane mark (E) |
| 25 | USB connector |
| 26 | HDMI connector |
Close the Connector Cover
Close the connector cover when the connectors are not in use. Foreign matter in the connectors can interfere with data transfer.
The Speaker
Do not place the speaker in close proximity to magnetic devices. Failure to observe this precaution could affect the data recorded on the magnetic devices.
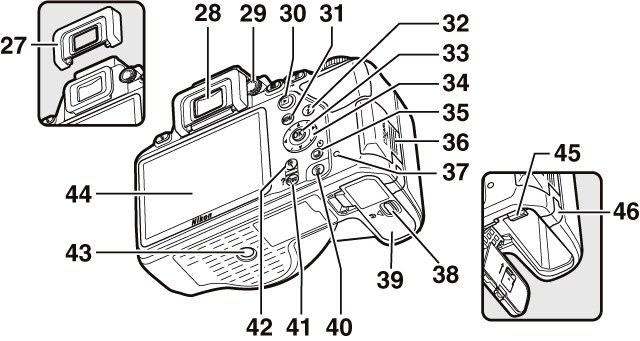
| 27 | Rubber eyecup (comes attached to camera) |
|---|---|
| 28 | Viewfinder eyepiece |
| 29 | Diopter adjustment control |
| 30 |
K button |
| 31 |
G button |
| 32 |
P button |
| 33 | J (OK) button |
| 34 | Multi selector |
| 35 |
s/E button |
| 36 | Memory card slot cover |
| 37 | Memory card access lamp |
| 38 | Battery-chamber cover latch |
|---|---|
| 39 | Battery-chamber cover |
| 40 |
O button |
| 41 |
W/Q button |
| 42 |
X button |
| 43 | Tripod socket |
| 44 | Monitor |
| 45 | Battery latch |
| 46 | Power connector cover for optional power connector |
The Viewfinder
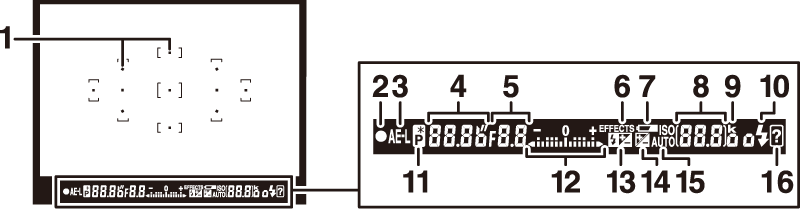
| 1 | Focus points |
|---|---|
| 2 | Focus indicator |
| 3 | Autoexposure (AE) lock indicator |
| 4 | Shutter speed |
| 5 | Aperture (f-number) |
| 6 | Special effects mode indicator |
| 7 | Low battery warning |
| 8 |
Number of exposures remaining Number of shots remaining before memory buffer fills White balance recording indicator Exposure compensation value Flash compensation value ISO sensitivity |
| 9 | “k” (appears when memory remains for over 1000 exposures) |
|---|---|
| 10 | Flash-ready indicator |
| 11 | Flexible program indicator |
| 12 |
Exposure indicator Exposure compensation display Electronic rangefinder |
| 13 | Flash compensation indicator |
| 14 | Exposure compensation indicator |
| 15 | Auto ISO sensitivity indicator |
| 16 | Warning indicator |
Note: Display shown with all indicators lit for illustrative purposes.
The Mode Dial
The camera offers a choice of the following shooting modes and g mode:
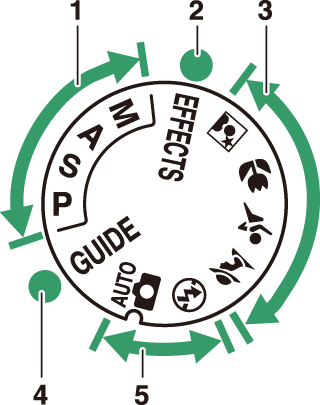
| 1 |
P, S, A, and M Modes
|
|---|---|
| 2 | Special Effects Modes (0 Special Effects) |
| 3 |
Scene Modes
|
| 4 | g Mode (0 The Guide) |
| 5 |
Auto Modes
|
The R (Info) Button
Press the R button to view the information display or cycle through display options.
Viewfinder Photography
To view shutter speed, aperture, the number of exposures remaining, AF-area mode, and other shooting information in the monitor, press the R button.
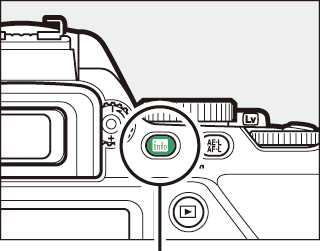
R button
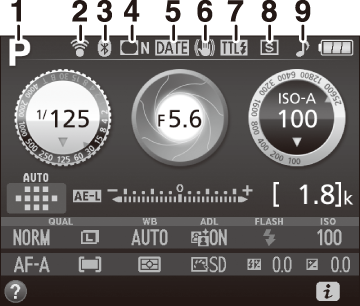
| 1 |
Shooting mode |
|---|---|
| 2 | Eye-Fi connection indicator |
| 3 |
Bluetooth connection indicator Airplane mode |
| 4 | Vignette control indicator |
|---|---|
| 5 | Date stamp indicator |
| 6 | Vibration reduction indicator |
| 7 |
Flash control indicator Flash compensation indicator for optional flash units |
| 8 | Release mode |
| 9 | “Beep” indicator |
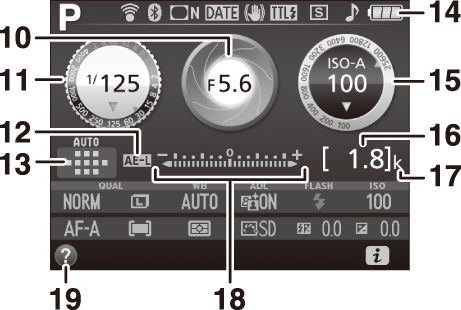
| 10 |
Aperture (f-number) Aperture display |
|---|---|
| 11 |
Shutter speed Shutter-speed display |
| 12 | Autoexposure (AE) lock indicator |
| 13 |
AF-area mode indicator Focus point |
| 14 | Battery indicator |
| 15 |
ISO sensitivity ISO sensitivity display Auto ISO sensitivity indicator |
| 16 |
Number of exposures remaining White balance recording indicator |
|---|---|
| 17 | “k” (appears when memory remains for over 1000 exposures) |
| 18 |
Exposure indicator Exposure compensation indicator |
| 19 | Help icon |
Note: Display shown with all indicators lit for illustrative purposes.
Turning the Monitor Off
To clear shooting information from the monitor, press the R button or press the shutter-release button halfway. The monitor will turn off automatically if no operations are performed for about 8 seconds. For information on choosing how long the monitor remains on before turning off automatically, see Auto off timers (0 Auto off Timers).
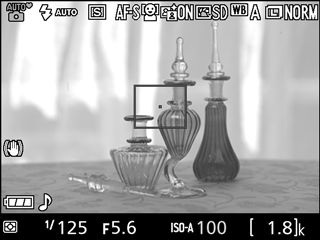
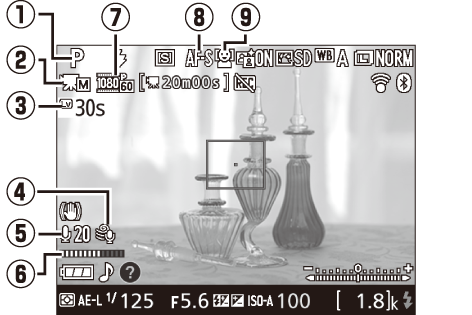
Live View and Movie Mode
To start live view, rotate the live view switch during viewfinder photography (0 “Point-and-Shoot” Modes (i and j)). You can then press the R button to cycle through display options as shown below.
R button
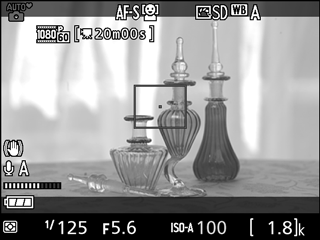
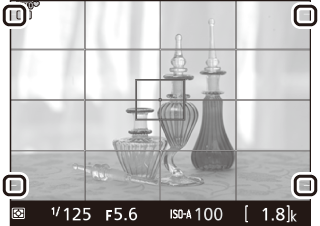
Framing grid *
Hide indicators *
A crop showing the area recorded is displayed during movie recording; circled areas indicate the edges of the movie frame crop (the area outside the movie frame crop is grayed out when movie indicators are displayed).
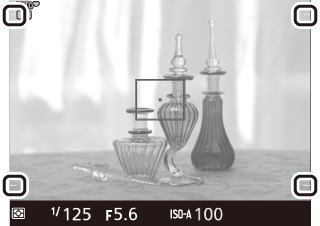
The Live View Display
| Item | Description | |
|---|---|---|
| q | Shooting mode | The mode currently selected with the mode dial (0 “Point-and-Shoot” Modes (i and j), Scene Mode, Special Effects, Shutter Speed and Aperture). |
| w | Manual movie settings indicator | Displayed when On is selected for Manual movie settings in mode M (0 Movie Settings). |
| e | Time remaining | The amount of time remaining before live view ends automatically. Displayed if shooting will end in 30 s or less (0 The Count Down Display). |
| r | Wind noise reduction | Displayed when On is selected for Movie settings > Wind noise reduction in the shooting menu (0 Movie Settings). |
| t | Microphone sensitivity | Microphone sensitivity for movie recording (0 Movie Settings). |
| y | Sound level | Sound level for audio recording. Displayed in red if level is too high; adjust microphone sensitivity accordingly (0 Movie Settings). |
| u | Movie frame size | The frame size of movies recorded in movie mode (0 Movie Settings). |
| i | Focus mode | The current focus mode (0 Focus Mode). |
| o | AF-area mode | The current AF-area mode (0 AF-Area Mode). |
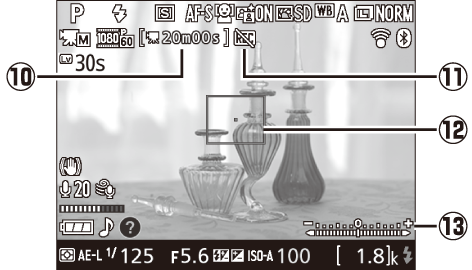
| Item | Description | |
|---|---|---|
| !0 | Time remaining (movie mode) | The recording time remaining in movie mode (0 Time remaining). |
| !1 | “No movie” icon | Indicates that movies cannot be recorded. |
| !2 | Focus point | The current focus point. The display varies with the option selected for AF-area mode (0 AF-Area Mode). |
| !3 | Exposure indicator | Indicates whether the photograph would be under- or over-exposed at current settings (mode M only; 0 The Exposure Indicator). |
Note: Display shown with all indicators lit for illustrative purposes.
The Count Down Display
A count down will be displayed 30 s before live view ends automatically (0 Time remaining); the timer turns red 5 s before the auto off timer expires (0 Auto off Timers) or if live view is about to end to protect the internal circuits. Depending on shooting conditions, the timer may appear immediately when live view is selected. Movie recording will end automatically when the timer expires, regardless of the amount of recording time available.
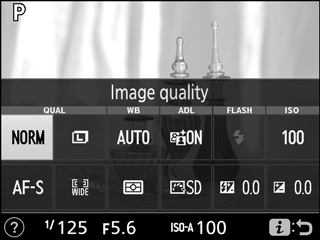
The P Button
To change the settings at the bottom of the information display, press the P button, then highlight items using the multi selector and press J to view options for the highlighted item. You can also change settings by pressing the P button during live view.
P button
- Image quality (0 Image Quality)
- Image size (0 Image Size)
- White balance (0 White Balance)
- Active D-Lighting (0 Active D-Lighting)
- Flash mode (0 Flash Modes, Flash Modes)
- ISO sensitivity (0 ISO Sensitivity)
- Focus mode (0 Focus Mode)
- AF-area mode (0 AF-Area Mode)
- Metering (0 Metering)
- Set Picture Control (0 Picture Controls)
- Flash compensation (0 Flash Compensation)
- Exposure compensation (0 Exposure Compensation)

Viewfinder photography
Live view