Printing Photographs
Selected JPEG images can be printed on a PictBridge printer (0 PictBridge) connected directly to the camera.
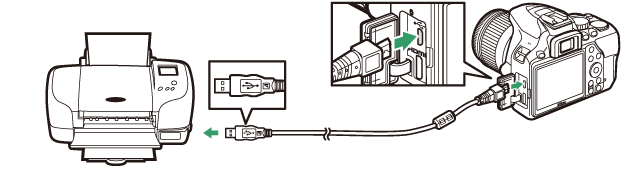
Connecting the Printer
Connect the camera using a USB cable (available separately). Do not use force or attempt to insert the connectors at an angle.
When the camera and printer are turned on, a welcome screen will be displayed in the monitor, followed by a PictBridge playback display.
Selecting Photographs for Printing
NEF (RAW) photographs (0 NEF (RAW)) cannot be selected for printing. JPEG copies of NEF (RAW) images can be created using the NEF (RAW) processing option in the retouch menu (0 NEF (RAW) Processing).
Printing Via Direct USB Connection
Be sure the battery is fully charged or use an optional AC adapter and power connector. When taking photographs to be printed via direct USB connection, set Color space to sRGB (0 Color Space).
Date Imprint
If you select On for Print date in the PictBridge menu when printing photographs containing date information recorded using Date stamp in the setup menu (0 Date Stamp), the date will appear twice. The imprinted date may however be cropped out if the photographs are cropped or printed without a border.
Printing Pictures One at a Time
-
Display the desired picture.
Press 4 or 2 to view additional pictures. Press the X button to zoom in on the current frame (0 Zoom in or out/view other areas of image; press K to exit zoom). To view six pictures at a time, press the W (Q) button. Use the multi selector to highlight pictures, or press X to display the highlighted picture full frame.
-
Adjust printer settings.
Press J to display the following items, then press 1 or 3 to highlight an item and press 2 to view options (only options supported by the current printer are listed; to use the default option, select Printer default). After selecting an option, press J to return to the printer settings menu.
Option Description Page size Choose a page size. No. of copies This option is listed only when pictures are printed one at a time. Press 1 or 3 to choose number of copies (maximum 99). Border Choose whether to frame photos in white borders. Print date Choose whether to print the times and dates of recordings on photos. Cropping This option is listed only when pictures are printed one at a time. To exit without cropping, highlight No cropping and press J. To crop the current picture, highlight Crop and press 2. A crop selection dialog will be displayed; press X to increase the size of the crop, W (Q) to decrease, and use the multi selector to position the crop. Note that print quality may drop if small crops are printed at large sizes. -
Start printing.
Select Start printing and press J to start printing. To cancel before all copies have been printed, press J.
Printing Multiple Pictures
-
Display the PictBridge menu.
Press the G button in the PictBridge playback display.
-
Choose an option.
Highlight one of the following options and press 2.
- Print select: Select pictures for printing. Press 4 or 2 to scroll through pictures (to view the highlighted picture full frame, press and hold the X button) and press 1 or 3 to choose the number of prints. To deselect a picture, set the number of prints to zero.
- Select date: Print one copy of all the pictures taken on selected dates. Press 1 or 3 to highlight dates and press 2 to select or deselect. To view the pictures taken on the selected date, press W (Q). Use the multi selector to scroll through the pictures, or press and hold X to view the current picture full frame. Press W (Q) again to return to the date selection dialog.
- Index print: To create an index print of all JPEG pictures on the memory card, proceed to Step 3. Note that if the memory card contains more than 256 pictures, only the first 256 images will be printed. A warning will be displayed if the page size selected in Step 3 is too small for an index print.
-
Adjust printer settings.
Adjust printer settings as described in Step 2 of “Printing Pictures One at a Time” (0 Printing Pictures One at a Time).
-
Start printing.
Select Start printing and press J to start printing. To cancel before all copies have been printed, press J.