Computers: Connecting via Ethernet or Wireless LAN
The camera can connect to computers either directly or via existing networks using Wi-Fi (built-in wireless LAN) or a third-party Ethernet cable inserted in the camera’s Ethernet connector.
- What Ethernet and Wireless LAN Can Do for You
- The Wireless Transmitter Utility
- Wireless LAN
- Ethernet Connections
- Uploading Pictures
- Camera Control
- Ending the Connection to the Computer
What Ethernet and Wireless LAN Can Do for You
Ethernet and wireless LAN connections can be used for the following tasks:
Uploading Pictures
Existing pictures can be uploaded to the computer. They can also be uploaded automatically
as they are taken.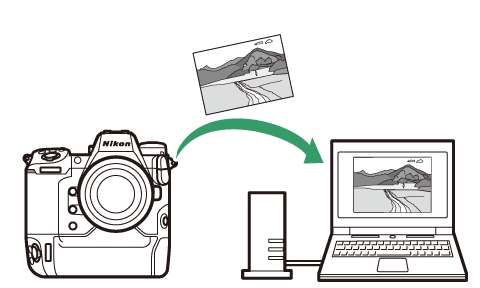
Controlling Cameras Remotely
Installing Camera Control Pro 2 (available separately) or free NX Tether software
on a networked computer gives you control over the details of exposure and other camera
settings while taking pictures remotely (Camera Control).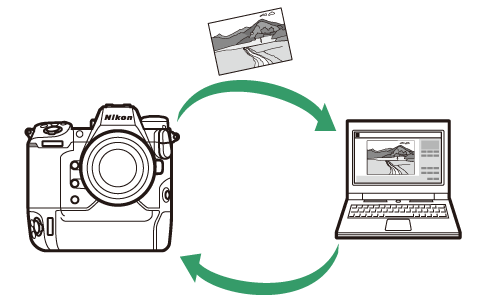
The Wireless Transmitter Utility
Before you will be able to connect to a wireless or Ethernet LAN, you will need to pair the camera with the computer using Nikon’s Wireless Transmitter Utility software.
-
Once the devices are paired, you will be able to connect to the computer from the camera.
-
The Wireless Transmitter Utility is available for download from the Nikon Download Center. Check the version and system requirements and be sure to download the latest version.
https://downloadcenter.nikonimglib.com/
Wireless LAN
The camera can connect to computers either by direct wireless link (access-point mode) or via a wireless router on an existing network, including home networks (infrastructure mode).
Direct Wireless Connection (Access-Point Mode)
The camera and computer connect via direct wireless link. The camera acts as a wireless
LAN access point, letting you connect when working outdoors and in other situations
in which the computer is not already connected to a wireless network and eliminating
the need for complicated adjustments to settings. The computer cannot connect to the
Internet while connected to the camera.
-
Before proceeding, check that the Wireless Transmitter Utility (The Wireless Transmitter Utility) is installed on the computer.
-
Confirm that [] is selected for [] in the network menu.
-
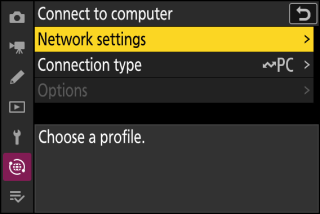
Select [] in the network menu, then highlight [] and press 2.
-
Highlight [] and press J.

-
Name the new profile.

-
To proceed to the next step without changing the default name, press X.
-
Whatever name you choose will appear in the network menu [] > [] list.
-
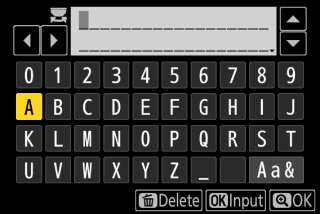
To rename the profile, press J. For information on text entry, see “Text Entry” (Text Entry). Press X to proceed after entering a name.
-
-
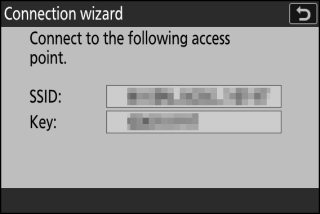
Highlight [] and press J.
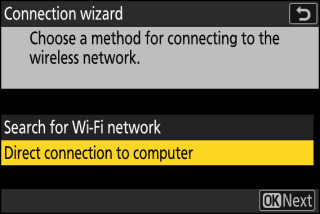
The camera SSID and encryption key will be displayed.
-
Establish a connection to the camera.
Windows:
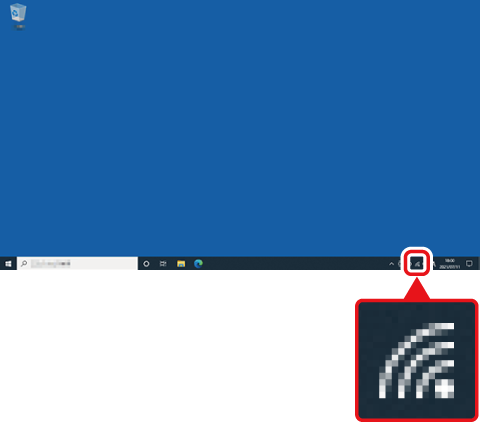
-
Click the wireless LAN icon in the taskbar.
-
Select the SSID displayed by the camera in Step 4.
-
When prompted to enter the network security key, enter the encryption key displayed by the camera in Step 4. The computer will initiate a connection to the camera.
macOS:
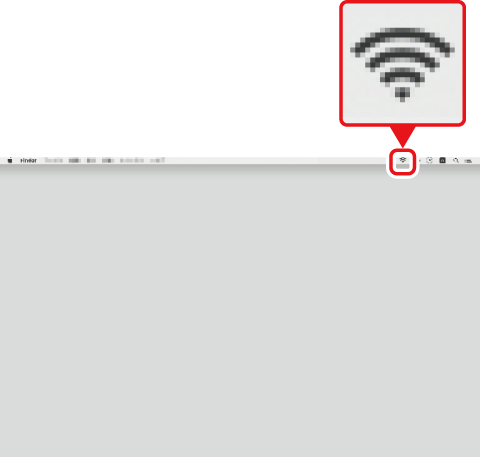
-
Click the wireless LAN icon in the menu bar.
-
Select the SSID displayed by the camera in Step 4.
-
When prompted to enter the network security key, enter the encryption key displayed by the camera in Step 4. The computer will initiate a connection to the camera.
-
-
Start pairing.

When prompted, launch the Wireless Transmitter Utility on the computer.
-
Select the camera in the Wireless Transmitter Utility.
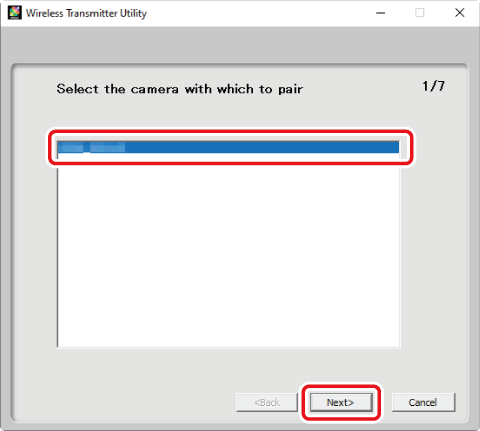
Select the name displayed by the camera in Step 6 and click [].
-
In the Wireless Transmitter Utility, enter the authentication code displayed by the camera.
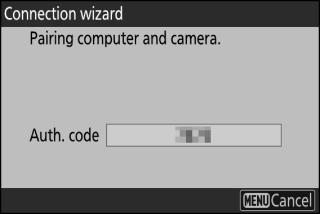
-
The camera will display an authentication code.
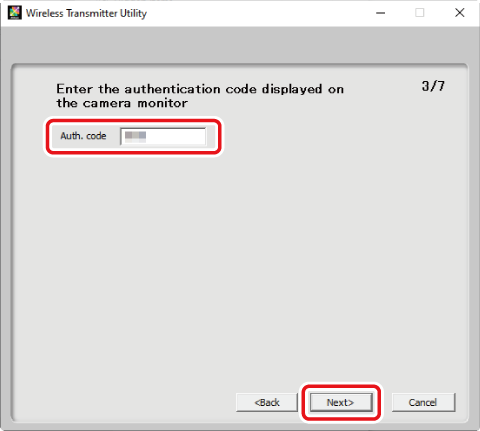
-
Enter the authentication code in the dialog displayed by the Wireless Transmitter Utility and click [].
-
-
Complete the pairing process.
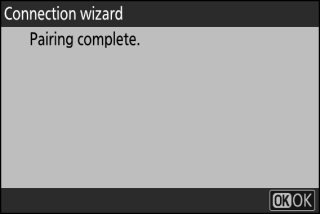
-
When the camera displays a message stating that pairing is complete, press J.
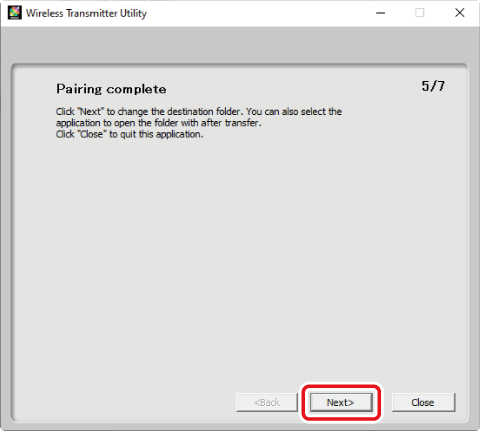
-
In the Wireless Transmitter Utility, click []; you will be prompted to choose a destination folder. For more information, see online help for the Wireless Transmitter Utility.
-
A wireless connection will be established between the camera and computer when pairing is complete.
-
-
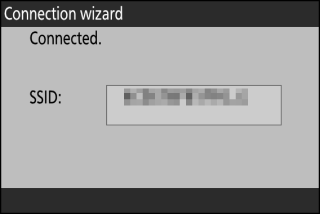
Check the connection.
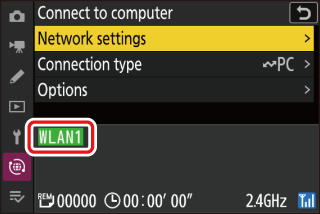
When a connection is established, the profile name will be displayed in green in the camera [] menu.
-
If the profile name is not displayed in green, connect to the camera via the wireless network list on your computer.
-
A wireless connection has now been established between the camera and the computer.
Pictures taken with the camera can be uploaded to the computer as described in“Uploading Pictures” (Uploading Pictures).
For information on controlling the camera from a computer using Camera Control Pro 2 or NX Tether, see “Camera Control” (Camera Control).
Connecting in Infrastructure Mode
The camera connects to a computer on an existing network (including home networks)
via a wireless router. The computer can still connect to the Internet while connected
to the camera.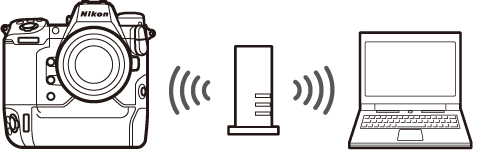
-
Before proceeding, check that the Wireless Transmitter Utility (The Wireless Transmitter Utility) is installed on the computer.
-
Confirm that [] is selected for [] in the network menu.
Connection to computers beyond the local area network is not supported. You can connect only to computers on the same network.
-
Select [] in the network menu, then highlight [] and press 2.
-
Highlight [] and press J.
-
Name the new profile.
-
To proceed to the next step without changing the default name, press X.
-
Whatever name you choose will appear in the network menu [] > [] list.
-
To rename the profile, press J. For information on text entry, see “Text Entry” (Text Entry). Press X to proceed after entering a name.
-
-
Highlight [] and press J.
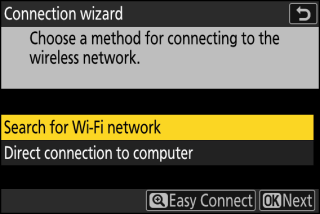
The camera will search for networks currently active in the vicinity and list them by name (SSID).
[]-
To connect without entering an SSID or encryption key, press X in Step 4. Next, press J and choose from the following options:

Option
Description
[]
For routers that support push-button WPS. Press the WPS button on the router and then press the camera J button to connect.
[]
The camera will display a PIN. Using a computer, enter the PIN on the router. For more information, see the documentation provided with the router.
-
After connecting, proceed to Step 7.
-
-
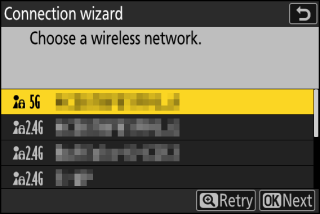
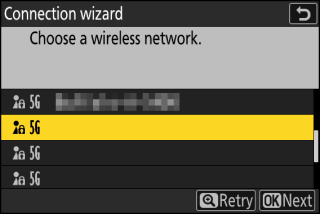
Choose a network.
-
Highlight a network SSID and press J.
-
The band on which each SSID operates is indicated by an icon.
-
Encrypted networks are indicated by a h icon. If the selected network is encrypted (h), you will be prompted to enter the encryption key. If the network is not encrypted, proceed to Step 7.
-
If the desired network is not displayed, press X to search again.
Networks with hidden SSIDs are indicated by blank entries in the network list.
-
To connect to a network with a hidden SSID, highlight a blank entry and press J. Next, press J; the camera will prompt you to provide an SSID.
-
Enter the network name and press X. Press X again; the camera will now prompt you to enter the encryption key.
-
-
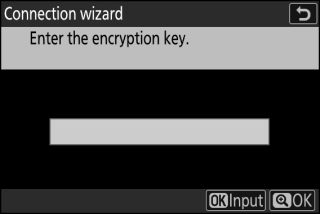
Enter the encryption key.
-
Press J and enter the encryption key for the wireless router.
-
For more information, see the documentation for the wireless router.
-
Press X when entry is complete.
-
Press X again to initiate the connection. A message will be displayed for a few seconds when the connection is established.
-
-
Obtain or select an IP address.

-
Highlight one of the following options and press J.
Option
Description
[]
Select this option if the network is configured to supply the IP address automatically. A “configuration complete” message will be displayed once an IP address has been assigned.
[]
Enter the IP address and sub-net mask manually.
-
Press J; you will be prompted to enter the IP address.
-
Rotate the main command dial to highlight segments.
-
Press 4 or 2 to change the highlighted segment and press J to save changes.
-
Next, press X; a “configuration complete” message will be displayed. Press X again to display the sub-net mask.
-
Press 1 or 3 to edit the sub-net mask and press J; a “configuration complete” message will be displayed.
-
-
Press J to proceed when the “configuration complete” message is displayed.
-
-
Start pairing.
When prompted, launch the Wireless Transmitter Utility on the computer.
-
Select the camera in the Wireless Transmitter Utility.
Select the name displayed by the camera in Step 8 and click [].
-
In the Wireless Transmitter Utility, enter the authentication code displayed by the camera.
-
The camera will display an authentication code.
-
Enter the authentication code in the dialog displayed by the Wireless Transmitter Utility and click [].
-
-
Complete the pairing process.
-
When the camera displays a message stating that pairing is complete, press J.
-
In the Wireless Transmitter Utility, click []; you will be prompted to choose a destination folder. For more information, see online help for the Wireless Transmitter Utility.
-
A wireless connection will be established between the camera and computer when pairing is complete.
-
-
Check the connection.
When a connection is established, the profile name will be displayed in green in the camera [] menu.
A wireless connection has now been established between the camera and the computer.
Pictures taken with the camera can be uploaded to the computer as described in“Uploading Pictures” (Uploading Pictures).
For information on controlling the camera from a computer using Camera Control Pro 2 or NX Tether, see “Camera Control” (Camera Control).
Ethernet Connections
The camera can connect to computers either directly or via existing networks using a third-party Ethernet cable inserted in the camera’s Ethernet connector.
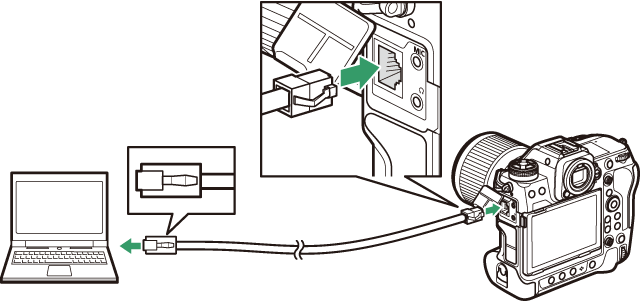
Connecting an Ethernet Cable
Connect an Ethernet cable to the camera’s Ethernet connector. Do not use force or attempt to insert the connectors at an angle. Connect the other end of the cable to a computer or router.
Ethernet Network Profiles
Before proceeding, check that an Ethernet cable is connected to the camera and the Wireless Transmitter Utility (The Wireless Transmitter Utility) is installed on the computer.
-
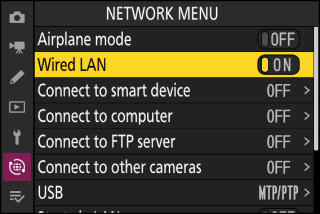
Select [] for [] in the network menu.
-
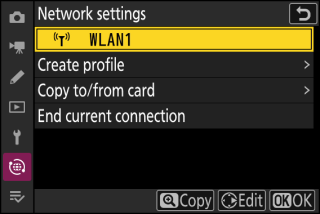
Select [] in the network menu, then highlight [] and press 2.
-
Highlight [] and press J.
-
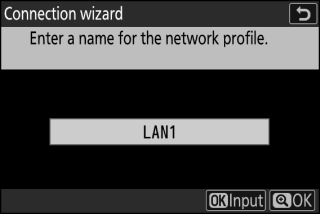
Name the new profile.
-
To proceed to the next step without changing the default name, press X.
-
Whatever name you choose will appear in the network menu [] > [] list.
-
To rename the profile, press J. For information on text entry, see “Text Entry” (Text Entry). Press X to proceed after entering a name.
-
-
Obtain or select an IP address.
-
Highlight one of the following options and press J.
Option
Description
[]
Select this option if the network is configured to supply the IP address automatically. A “configuration complete” message will be displayed once an IP address has been assigned.
[]
Enter the IP address and sub-net mask manually.
-
Press J; you will be prompted to enter the IP address.
-
Rotate the main command dial to highlight segments.
-
Press 4 or 2 to change the highlighted segment and press J to save changes.
-
Next, press X; a “configuration complete” message will be displayed. Press X again to display the sub-net mask.
-
Press 1 or 3 to edit the sub-net mask and press J; a “configuration complete” message will be displayed.
-
-
Press J to proceed when the “configuration complete” message is displayed.
-
-
Start pairing.
When prompted, launch the Wireless Transmitter Utility on the computer.
-
Select the camera in the Wireless Transmitter Utility.
Select the name displayed by the camera in Step 6 and click [].
-
In the Wireless Transmitter Utility, enter the authentication code displayed by the camera.
-
The camera will display an authentication code.
-
Enter the authentication code in the dialog displayed by the Wireless Transmitter Utility and click [].
-
-
Complete the pairing process.
-
When the camera displays a message stating that pairing is complete, press J.
-
In the Wireless Transmitter Utility, click []; you will be prompted to choose a destination folder. For more information, see online help for the Wireless Transmitter Utility.
-
A connection will be established between the camera and computer when pairing is complete.
-
-
Check the connection.

When a connection is established, the profile name will be displayed in green in the camera [] menu.
A connection has now been established between the camera and the computer.
Pictures taken with the camera can be uploaded to the computer as described in“Uploading Pictures” (Uploading Pictures).
For information on controlling the camera from a computer using Camera Control Pro 2 or NX Tether, see “Camera Control” (Camera Control).
Uploading Pictures
Pictures can be selected for upload during playback. They can also be uploaded automatically as they are taken.
-
Before uploading pictures, connect the camera and computer via Ethernet or a wireless network. Connect using a host profile selected via the network menu [] > [] list.
-
When a connection is established, the profile name will be displayed in green in the camera [] menu.
By default, pictures are uploaded to the following folders:
-
Windows: \Users\(user name)\Pictures\Wireless Transmitter Utility
-
macOS: /Users/(user name)/Pictures/Wireless Transmitter Utility
The destination folder can be selected using the Wireless Transmitter Utility. For more information, see online help for the Wireless Transmitter Utility.
Select a host profile and enable camera Wi-Fi before connecting.
TCP port 15740 and UDP port 5353 are used for connections to computers. File transfer may be blocked if the server firewall is not configured to allow access to these ports.
Selecting Pictures for Upload
-
Select [] for [] > [] in the network menu.
-
Press the K button on the camera and select full-frame or thumbnail playback.
-
Select a picture and press the i button.
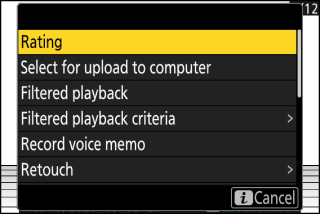
-
Highlight [] and press J.
-
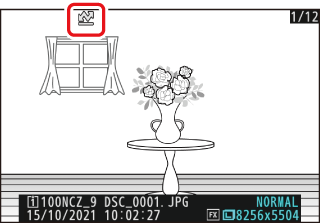
A white “priority upload” icon will appear on the picture. If the camera is currently connected to a network, upload will begin immediately and the icon will turn green.
-
Otherwise, upload will begin when a connection is established.
-
Repeat Steps 3–4 to upload additional pictures.
-
-
Repeat Steps 3–4 to remove upload marking from selected pictures.
-
To remove upload marking from all pictures, select [] > [] > [] in the network menu.
The [] item in the playback i menu can be used to display only pictures that meet chosen criteria (Filtered Playback). The pictures can then all be selected for upload by highlighting [] in the i menu and pressing J.
Uploading Photos as They Are Taken
To upload new photos as they are taken, select [] for [] > [] > [] in the network menu.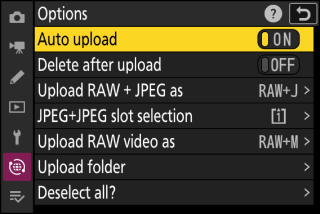
-
Upload begins only after the photo has been recorded to the memory card. Be sure a memory card is inserted in the camera.
-
Videos are not uploaded automatically. They must instead be uploaded manually from the playback display.
The Upload Icon
Upload status is indicated by the upload icon.
s (white): Priority upload
The picture has been manually selected for upload. Pictures marked with this icon will be uploaded before pictures marked W (“upload”).
W (white): Upload
The picture has been selected for upload but upload has not yet begun.
X (green): Uploading
Upload in progress.
Y (blue): Uploaded
Upload complete.
The [Connect to Computer] Upload Status Display
The [] display shows the following:
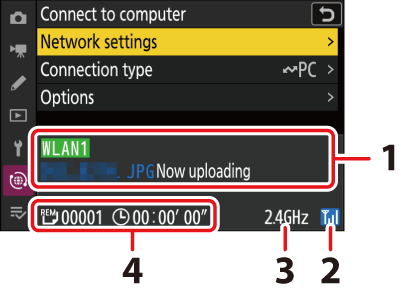
| 1 |
Status: The status of the connection to the host. The profile name is displayed in green when a connection is established. While files are being transferred, the status display shows “Now uploading” preceded by the name of the file being sent. Errors are also displayed here. |
|---|---|
| 2 |
Signal strength: Ethernet connections are shown by d. When the camera is connected to a wireless network, the icon instead shows the wireless signal strength. |
| 3 |
Band: The band used by the wireless network to which the camera is connected in infrastructure mode. |
|---|---|
| 4 |
Pictures/time remaining: The number of pictures remaining and the time needed to send them. The time remaining is an estimate only. |
Wireless transmission may be interrupted if the signal is lost. Upload of pictures with upload marking can be resumed by turning the camera off and then on again once the signal has been re-established.
Do not remove the memory card or disconnect the Ethernet cable during upload.
Voice memos will be included when the associated pictures are transmitted. They cannot, however, be uploaded separately.
The camera saves transfer marking when turned off and resumes upload when next turned on.
Connection status is shown by the camera network indicator.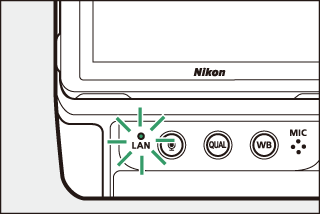
|
Network indicator |
Status |
|---|---|
|
I (off) |
No connection. |
|
K (green) |
Waiting to connect. |
|
H (flashes green) |
Connected. |
|
H (flashes amber) |
Error. |
Camera Control
The camera can be controlled from a computer running Camera Control Pro 2 (available separately) or free NX Tether software. Photos can be saved directly to the computer instead of to the memory card and can consequently be taken even when no memory card is inserted in the camera.
-
You will still need to insert a memory card when filming videos.
-
Note that the camera standby timer does not expire in camera control mode.
-
Before using Camera Control Pro 2 or NX Tether, connect the camera and computer via Ethernet or a wireless LAN. Connect using a host profile selected via the network menu [] > [] list.
-
When a connection is established, the profile name will be displayed in green in the camera [] menu.
-
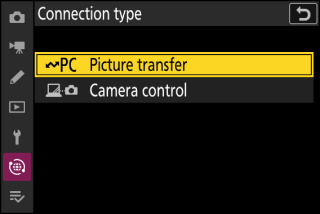
Select [] for [] > [] in the network menu.

-
Launch the copy of Camera Control Pro 2 or NX Tether installed on the host computer.
-
Control the camera using Camera Control Pro 2 or NX Tether.
For information on taking pictures using Camera Control Pro 2 or NX Tether, see the online help or other documentation for the software in question.
The [Connect to Computer] Camera Control Display
The [] display shows the following:
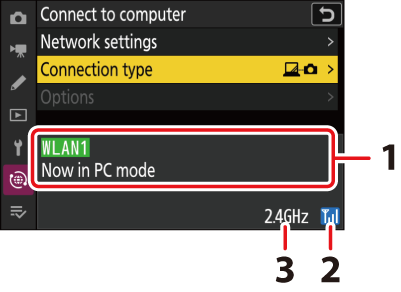
| 1 |
Status: The status of the connection to the host. The profile name is displayed in green when a connection is established. Errors are also displayed here (Troubleshooting Wireless LAN and Ethernet Connections). |
|---|---|
| 2 |
Signal strength: Ethernet connections are shown by d. When the camera is connected to a wireless network, the icon instead shows the wireless signal strength. |
| 3 |
Band: The band used by the wireless network to which the camera is connected in infrastructure mode. |
|---|
Loss of signal while the camera is connected to a wireless network may disrupt the connection to the computer. If the camera network indicator flashes amber, select [] for [] > [] in the network menu before connecting to the network again. When the signal is re-established, the camera will reconnect to the computer and resume upload of any pictures that have yet to be transferred. Note that upload cannot be resumed if you turn the camera off before transfer is complete.
Do not disconnect the Ethernet cable during upload or while the camera is on.
Response may slow on wireless networks.
TCP port 15740 and UDP port 5353 are used for connections to computers. File transfer may be blocked if the server firewall is not configured to allow access to these ports.
Connection status is shown by the camera network indicator.
|
Network indicator |
Status |
|---|---|
|
I (off) |
No connection. |
|
K (green) |
Waiting to connect. |
|
H (flashes green) |
Connected. |
|
H (flashes amber) |
Error. |
Ending the Connection to the Computer
You can end the connection by:
-
turning the camera off,
-
selecting [] for [] > [] in the network menu, or
-
connecting to a smart device via Wi-Fi or Bluetooth.
An error will occur if the computer’s wireless connection is disabled before the camera’s. Disable camera’s connection first.