Synchronizing Camera Clocks
When the cameras are connected to the network using [] in the network menu, the clocks on all cameras in the current group connected can be set to the time and date reported by the master camera. Synchronization applies to all options in the setup menu [] display.
-
Connect the cameras to the network using [] > [] in the network menu.
For more information, see “Synchronized Release” (Synchronized Release).
-
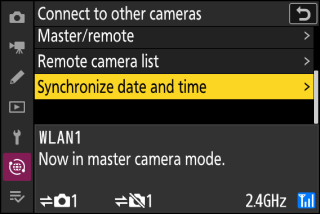
On the master camera, select [], then highlight [] and press 2.
-
Master camera clock settings will be displayed.
-
[] is not available on the remote cameras.
-
[] will not be available if no camera is connected to the network.
-
-
Press J.
-
The clocks on the remote cameras will be set to the date and time reported by the master camera.
-
A message will be displayed when the process is complete.
-
Press J again to return to the [] display.
-