Readying the Camera
- Attaching the Strap
- Charging the Battery
- Inserting the Battery
- Attaching a Lens
- Inserting Memory Cards
- Camera Setup
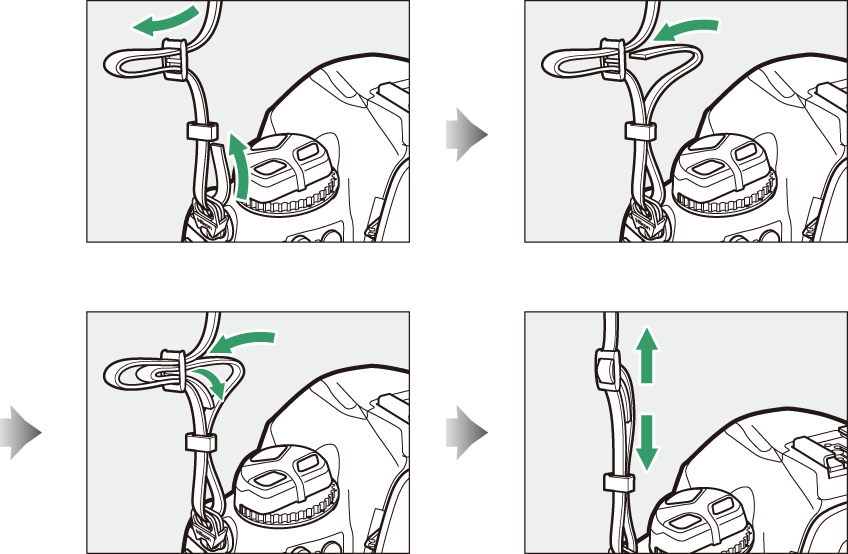
Attaching the Strap
To attach a strap (whether the supplied strap or one that has been purchased separately):
Charging the Battery
Charge the supplied EN‑EL18c battery in the supplied MH-26a battery charger before use. An exhausted battery will fully charge in about two hours and 35 minutes.
Read and follow the warnings and cautions in “For Your Safety” (For Your Safety) and “Caring for the Camera and Battery: Cautions” (Caring for the Camera and Battery: Cautions).
-
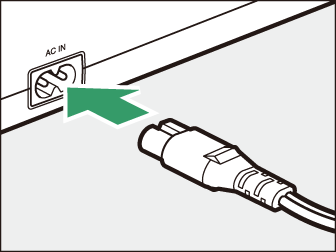
Connect the power cable to the charger.
-
Plug the charger in.
-
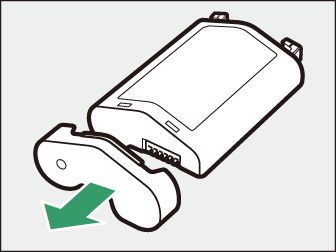
Remove the battery terminal cover.
-
Remove the contact protector.
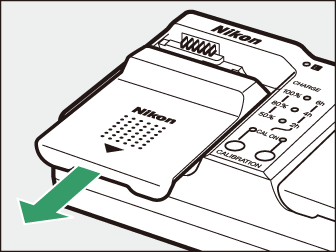
Slide the contact protector from the charger as shown.
-
Charge the battery.
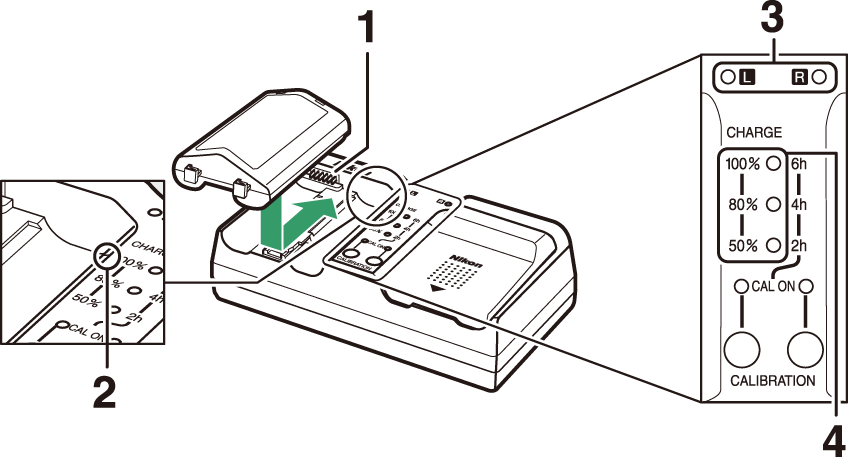
1 Contacts
2 Guide
3 Chamber lamps
4 Charge lamps (green)
-
Insert the battery (terminals first), aligning the end of the battery with the guide and then sliding the battery in the direction indicated until it clicks into place.
-
The lamp for the chamber containing the battery (“L” or “R”) will start to flash as charging begins.
-
Charging is complete when the chamber lamp stops flashing and the charge lamps turn off.
-
Battery status is shown by the chamber and charge lamps:
Charge state
<50%
≥50%, <80%
≥80%, <100%
100%
Chamber lamp
H (flashes)
H (flashes)
H (flashes)
K (on)
Charge lamps
100%
I (off)
I (off)
H (flashes)
I (off)
80%
I (off)
H (flashes)
K (on)
I (off)
50%
H (flashes)
K (on)
K (on)
I (off)
-
-
Remove the battery and unplug the charger when charging is complete.
For information on calibrating batteries to ensure the accuracy of the battery level displays, see “Calibrating Batteries” ( Calibrating Batteries ).
If the MH-26a chamber and charge lamps flash on and off in sequence, take the steps described below.
-
If no battery inserted: There is a problem with the charger. Unplug the charger and consult a Nikon-authorized service representative.
-
If a battery is inserted: A problem has occurred with the battery or charger during charging. Remove the battery, unplug the charger, and consult a Nikon-authorized service representative.
Inserting the Battery
Turn the camera off before inserting or removing the battery.
-
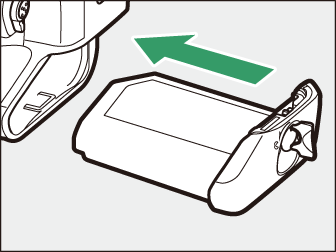
Remove the BL-6 battery-chamber cover.
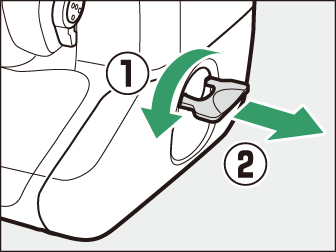
Lift the battery-chamber cover latch, turn it to the open (A) position (q) and remove the battery-chamber cover (w).
-
Attach the cover to the battery.
-
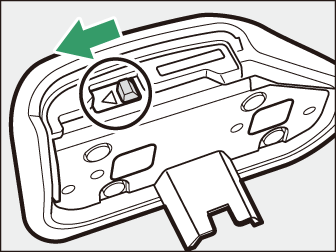
If the battery release is positioned so that the arrow (H) is visible, slide the battery release to cover the arrow (H).
-
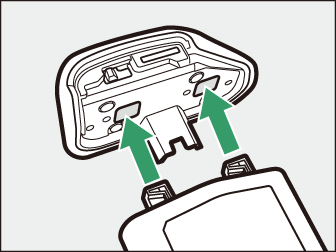
Insert the two projections on the battery into the matching slots in the cover as shown. The battery release will slide aside to completely reveal the arrow (H).
-
-
Insert the battery.
Insert the battery fully and securely as shown.
-
Latch the cover.
-
Rotate the latch to the closed position (q) and fold it down as shown (w).
-
Be sure the cover is securely latched to prevent the battery from becoming dislodged during operation.
-
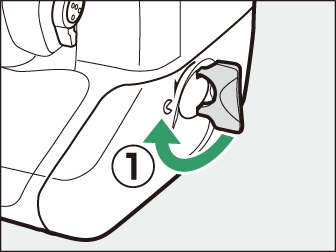
Removing the Battery
Before removing the battery, turn the camera off, lift the battery-chamber cover latch,
and turn it to the open (A) position.
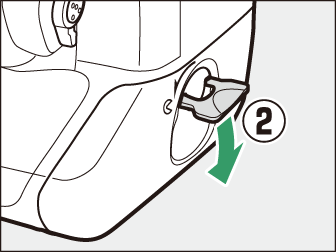
To unlatch the battery-chamber cover so that it can be removed from the battery, slide the battery release in the direction indicated by the arrow (H) until it stops.
-
Use BL-6 battery-chamber covers only; other battery-chamber covers cannot be used with this camera.
-
The battery can be charged with the cover attached.
-
To prevent dust accumulating inside the battery chamber, replace the battery-chamber cover on the camera when the battery is not inserted.
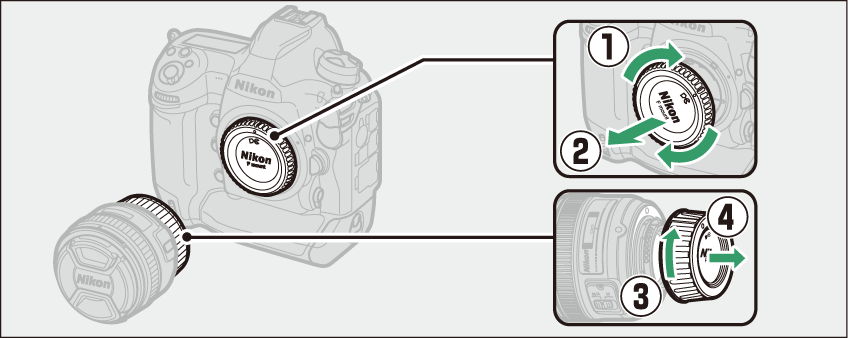
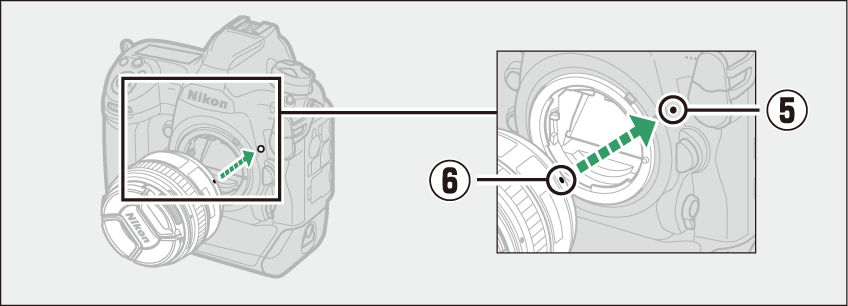
Attaching a Lens
-
The lens generally used in this manual for illustrative purposes is an AF-S NIKKOR 50mm f/1.4G.
-
Be careful to prevent dust entering the camera.
-
Confirm that the camera is off before attaching the lens.
-
Remove the camera body cap (q, w) and rear lens cap (e, r).
-
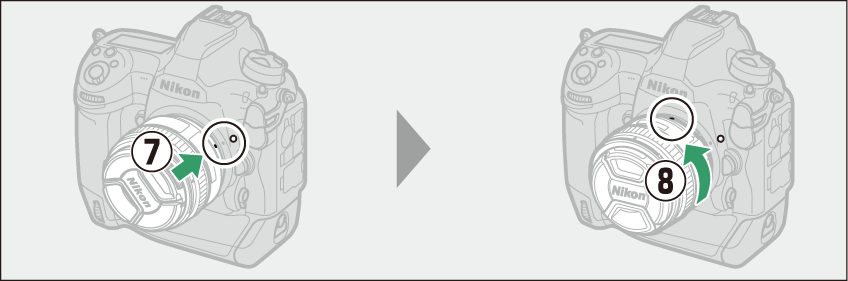
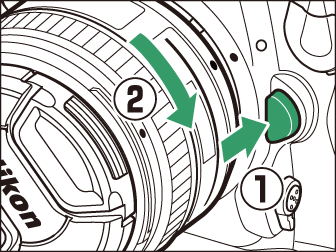
Align the mounting marks on the camera (t) and lens (y).
-
Rotate the lens as shown until it clicks into place (u, i).
-
-
Remove the lens cap before taking pictures.
When using a CPU lens equipped with an aperture ring ( Recognizing CPU and Type G, E, and D Lenses ), lock aperture at the minimum setting (highest f-number).
If the lens is equipped with a focus mode switch, select autofocus mode (A, M/A, or A/M).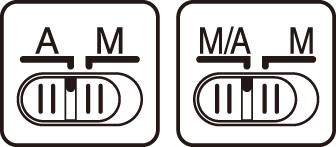
The DX format image area is automatically selected when a DX lens is attached.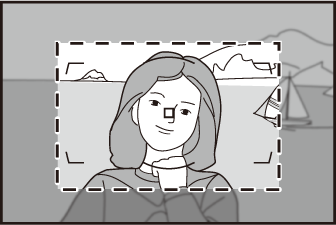
Detaching Lenses
-
After turning the camera off, press and hold the lens release button (q) while turning the lens in the direction shown (w).
-
After removing the lens, replace the lens caps and camera body cap.
Inserting Memory Cards
The camera is equipped with two memory card slots: Slot 1 (q) and Slot 2 (w), allowing simultaneous use of two memory cards.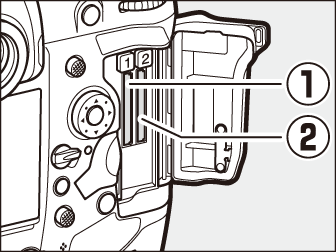
-
Turn the camera off before inserting or removing memory cards.
-
Do not push on the memory card while pressing the eject button. Failure to observe this precaution could damage the camera or memory card.
-
Open the card slot cover.
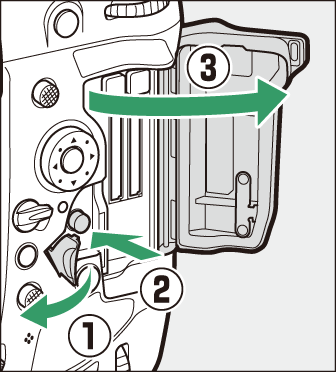
Open the door protecting the card-slot cover release button (q) and press the release button (w) to open the card slot (e).
-
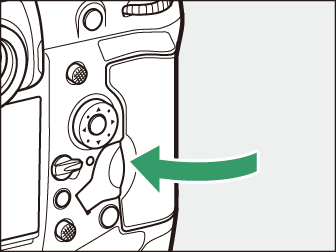
Insert the memory card.
Inserting a card upside down or backwards could damage the camera or the card. Check to be sure that the card is in the correct orientation.
Holding the card with the rear label toward the monitor, slide it all the way into the slot. When the memory card is fully inserted, the eject button (q) will pop up and the green memory card access lamp (w) will light briefly.

-
Close the card slot cover.
If this is the first time the memory card will be used after being used or formatted in another device, format the card in the camera before proceeding.
When two memory cards are inserted (one in each of Slots 1 and 2), the role played by the card in Slot 2 can be selected using [] in the photo shooting menu.
-
[]: Pictures will be recorded to the card in Slot 2 only when the card in Slot 1 is full.
-
[]: Two identical copies are recorded, one to each memory card and each with the same image quality and size.
-
[]: The NEF (RAW) copies of photos taken at settings of NEF (RAW) + JPEG are recorded only to the card in Slot 1, the JPEG copies only to the card in Slot 2.
-
[]: Two JPEG copies are recorded, one to each memory card, but at different sizes.
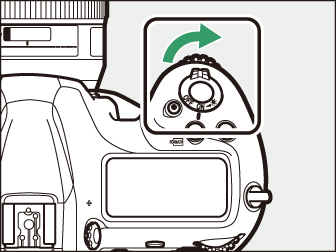
Removing Memory Cards
After confirming that the memory card access lamp is off, turn the camera off and
open the memory card slot cover. Press the eject button (q) to partially eject the card (w); the memory card can then be removed by hand.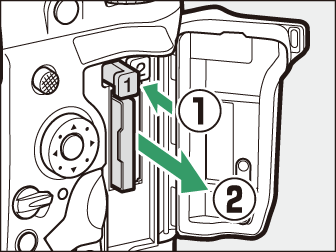
-
Memory cards may be hot after use. Observe due caution when removing memory cards from the camera.
-
Do not perform the following operations during formatting or while data are being recorded, deleted, or copied to a computer or other device. Failure to observe these precautions could result in loss of data or in damage to the camera or card.
-
Do not remove or insert memory cards
-
Do not turn the camera off
-
Do not remove the battery
-
Do not disconnect AC adapters
-
-
Do not touch the card terminals with your fingers or metal objects.
-
Do not use excessive force when handling memory cards. Failure to observe this precaution could damage the card.
-
Do not bend or drop memory cards or subject them to strong physical shocks.
-
Do not expose memory cards to water, heat, or direct sunlight.
-
Do not format memory cards in a computer.
The memory card icons in the top control panel light when memory cards are inserted
(the example in the illustration shows the display when two memory cards are inserted).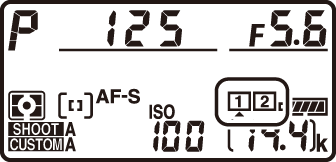
If the memory card is full or an error has occurred, the icon for the affected card will flash.
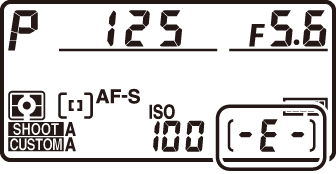
If no memory card is inserted, the exposure count displays in the viewfinder and top control panel will show S. If the camera is turned off with a battery and no memory card inserted, S will be displayed in the top control panel.
|
|
|

Camera Setup
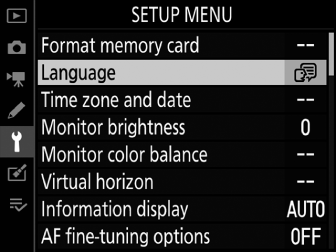
The language option in the setup menu is automatically highlighted the first time menus are displayed. Choose a language and set the camera clock.
-
Turn the camera on.
-
Highlight [] in the setup menu and press 2.
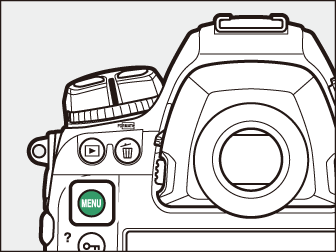
-
The [] item is automatically highlighted in the setup menu the first time the G button is pressed after purchase.
-
For information on using the menus, see “Using the Menus” (Using the Menus).
-
-
Select a language.
Press 1 or 3 to highlight the desired language and press J (the languages available vary with the country or region in which the camera was originally purchased).
-
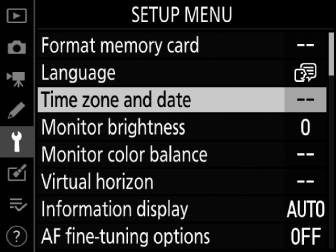
Highlight [] and press 2.
-
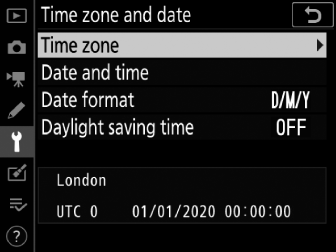
Choose a time zone.
-
Select [] in the [] display.
-
Highlight a time zone in the [] display and press J.
-
The display shows a time zone map listing the selected cities in the chosen zone and the difference between the time in the chosen zone and UTC.
-
-
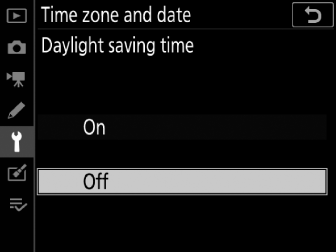
Turn daylight saving time on or off.
-
Select [] in the [] display.
-
Highlight [] (daylight saving time on) or [] (daylight saving time off) and press J.
-
Selecting [] advances the clock one hour; to undo the effect, select [].
-
-
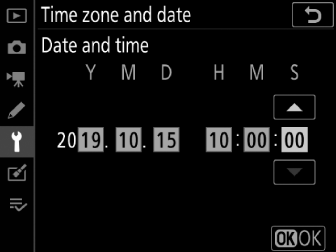
Set the clock.
-
Select [] in the [] display.
-
Press J after using the multi selector to set the clock to the date and time in the selected time zone (note that the camera uses a 24-hour clock).
-
-
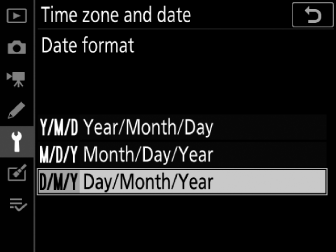
Choose a date format.
-
Select [] in the [] display.
-
Highlight the desired date (year, month, and day) display order and press J.
-
-
Exit the menus.
Lightly press the shutter-release button halfway to exit to shooting mode.
The camera clock is powered by a separate, non-rechargeable CR1616 lithium battery with a life of about two years. When this battery is low, a B icon will be displayed in the top control panel while the standby timer is on, indicating that it is time to purchase a replacement. For information on replacing the clock battery, see “Replacing the Clock Battery” ( Replacing the Clock Battery ).
To record your location and the current UTC (Universal Coordinated Time), select [] for [] > []. To set the camera clock to the time supplied by the built-in GNSS receiver, select [] for [] > [].
Use the SnapBridge app to synchronize the camera clock with the clock on a smartphone
or tablet (smart device). See SnapBridge online help for details.![]()