HTTP Server
View the pictures on the camera memory card or take photographs from the web browser on a computer or smart device.
-
For more information on system requirements, see “HTTP Server System Requirements” (HTTP Server System Requirements).
-
Up to five users can access the camera at one time. Only one, however, can take photographs or edit text.
-
Note that the standby timer will not expire automatically when the camera is in http server mode.
-
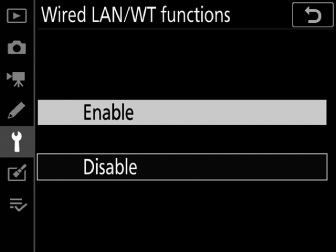
Select [] for [] > [] in the setup menu.
-
When you press J, the camera will connect using the most recently-used network profile. To connect using a different profile, proceed to Step 2. Otherwise, proceed to Step 3.
-
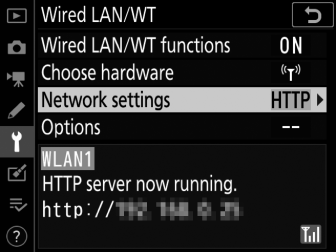
When a connection is established, the URL to be used for connection to the camera will appear in the [] display.
-
-
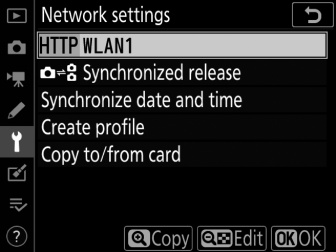
Choose an http server profile in the [] display.
-
HTTP server profiles are indicated by an M icon.
-
When you press J, the camera will exit to the [] display and initiate the connection. The network name will be shown in green in the [] display once a connection is established.
-
-
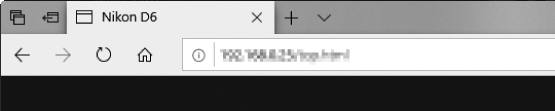
Launch the web browser on the computer or smart device.
-
Enter the camera URL (“http://” followed by the camera IP address) in the browser window address field.
-
Enter the URL shown in the camera [] display.
-
A login dialog will be displayed.
-
-
Enter your user name and password in the web browser login dialog.
-
The server home page will be displayed.
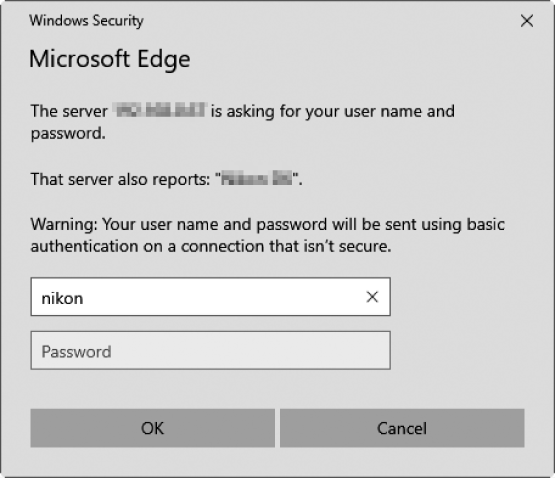 User Name and Password
The user name and password used for login from web browsers can be selected using [] > [] > [] in the setup menu.
-
-
Click [] and choose the desired option.
Choose the desired language.

-
Choose [], [], or [].
Option
Description
[]
Control the camera and take pictures remotely from a web browser on a computer or smart device. You can also view pictures (Computer, Android, and iPad Web Browsers, iPhone Web Browsers).
-
Only one user can connect at a time. This option is not displayed if another user is currently connected using [] or [].
[]
View the pictures on the camera memory card from a web browser on a computer or smart device (The Viewer Window, The Viewer Window).
-
Up to five users can connect at a time. Note, however, that only four users will be able to connect at a time if another user is currently connected using [] or [].
[]
Use a web browser on a computer or smart device to edit image comments and copyright and IPTC information stored on the camera (The Text Edit Window, The Text Edit Window).
-
Only one user can connect at a time. This option is not displayed if another user is currently connected using [] or [].
-
The [Wired LAN/WT] Status Display
The [] display shows the following:
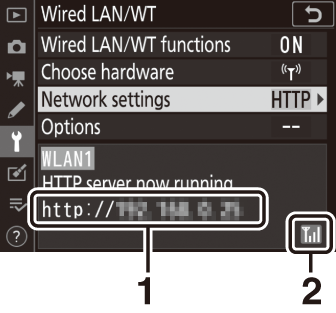
| 1 |
Status: The status of the connection to the host. The camera URL is displayed when a connection is established. Errors and error codes are also displayed here (Ethernet/Wireless Transmitter Troubleshooting). |
|---|
| 2 |
Signal strength: Ethernet connections are shown by %. When the camera is connected to a wireless network, the icon instead shows the wireless signal strength. |
|---|
Operation has been confirmed with the following systems:
|
Windows |
|
|---|---|
|
OS |
Windows 10, Windows 8.1 |
|
Browser |
|
|
macOS |
|
|---|---|
|
OS |
macOS version 10.14, 10.13, or 10.12 |
|
Browser |
|
|
Android OS |
|
|---|---|
|
OS |
Android version 9.0 or 8.1 |
|
Browser |
Chrome |
|
iOS |
|
|---|---|
|
OS |
iOS version 12 or 11 |
|
Browser |
The version of Safari included with the operating system |
Connection status is shown by the camera network indicator.
|
Network indicator |
Status |
|---|---|
|
I (off) |
|
|
K (green) |
Waiting to connect. |
|
H (flashes green) |
Connected. |
|
H (flashes amber) |
Error. |
Connection status is also shown in the camera viewfinder. T is displayed when the camera is connected via Ethernet, U when it is connected to a wireless network. The icon will flash if an error occurs.
Computer, Android, and iPad Web Browsers
Click or tap to adjust camera settings.
-
For information on the displays for iPhones, see “iPhone Web Browsers” (iPhone Web Browsers).
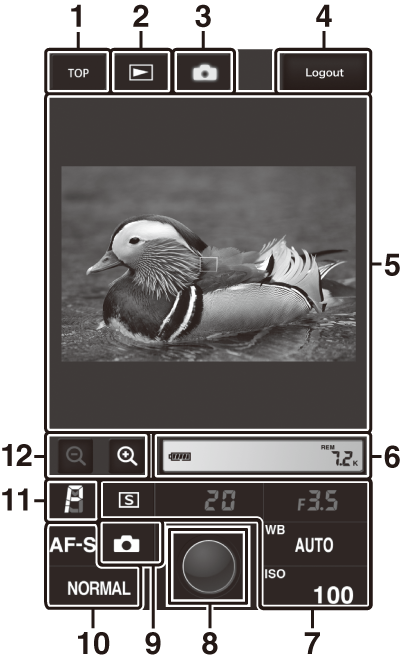
The Shooting Window
The following controls can be accessed by selecting [] on the server home page. To display the view through the camera lens in the viewfinder area, tap or click the “live view” button.
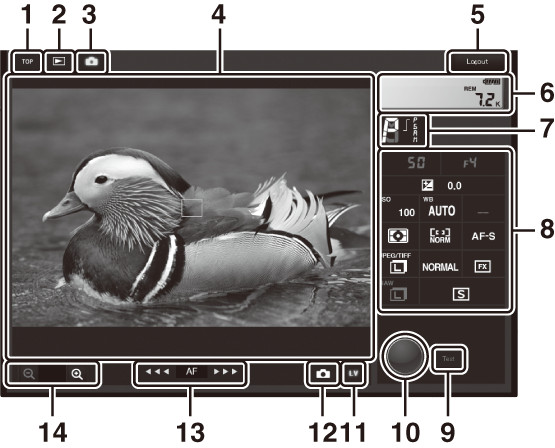
| 1 |
Home button |
|---|---|
| 2 |
View button |
| 3 |
Shoot button |
| 4 |
Viewfinder |
| 5 |
Logout button |
| 6 |
Display panel |
| 7 |
Exposure mode |
| 8 |
Camera settings |
|---|---|
| 9 |
Test button |
| 10 |
Shutter-release button |
| 11 |
Live view button |
| 12 |
Still photography/movie button |
| 13 |
Focus buttons |
| 14 |
Zoom buttons |
|
Option |
Description |
|---|---|
|
Display panel |
View the exposure indicator, the battery level, and number of exposures remaining. |
|
Camera settings |
Adjust settings for photography or movie recording. Adjustments are made by clicking or tapping the icons. |
|
Shutter-release button |
|
|
Test button |
Take a test photo and display it in the viewfinder. The picture is not recorded to the camera memory card. |
When the view through the camera lens is displayed in the viewfinder area, pressing the camera a button will display the view through the lens in the camera monitor. Press the a button again to end live view on the camera.
Rotating the camera release mode dial to S (quick release-mode selection) enables the browser-window release-mode button, which
can be used to choose from single-frame, high-speed continuous, and low-speed continuous
release modes. In high- and low-speed continuous release modes, the camera takes photographs
while the browser shutter-release button is pressed.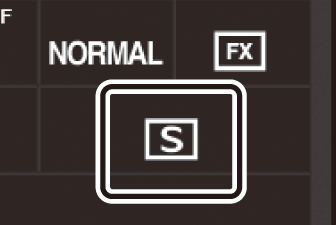
The size of the focus adjustment increases with the distance of the button from the
center of the display. Use q for smaller increases, w for larger increases.
To focus, click or tap your subject in the viewfinder area.
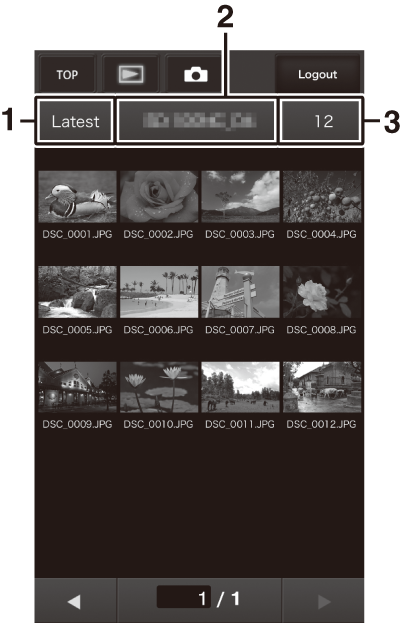
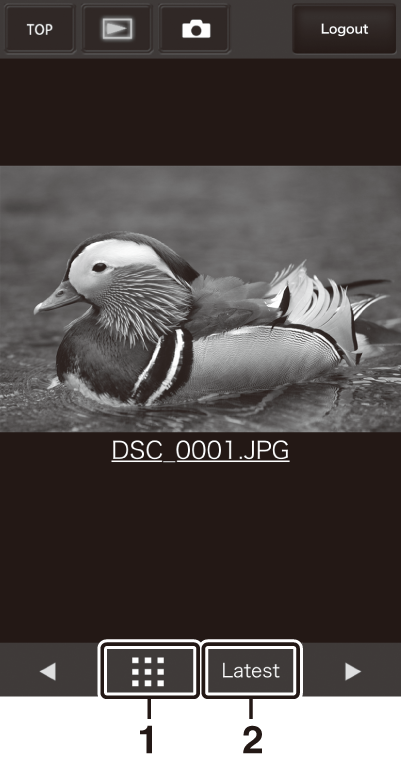
The Viewer Window
The viewer window can be accessed by selecting [] on the server home page or by clicking or tapping the “view” button in the shooting window. The viewer window offers a choice of thumbnail, film-strip, and full-frame views.
Thumbnail View
View multiple small (“thumbnail”) images per page.
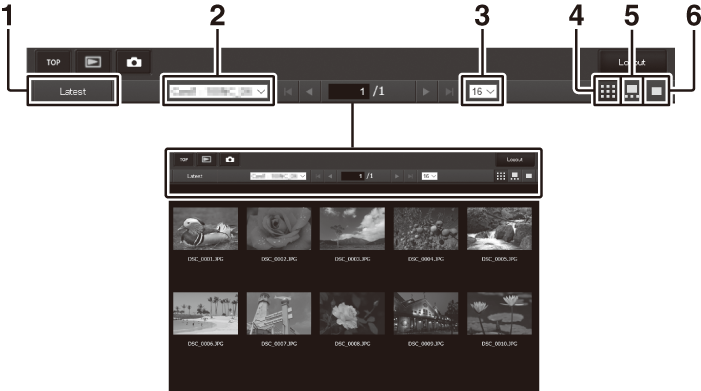
| 1 |
View most recent picture in folder |
|---|---|
| 2 |
Folder selection |
| 3 |
Thumbnails per page |
| 4 |
Thumbnail view |
|---|---|
| 5 |
Film-strip view |
| 6 |
Full-frame view |
Film-Strip View
Choose the picture displayed from the thumbnails at the bottom of the window.
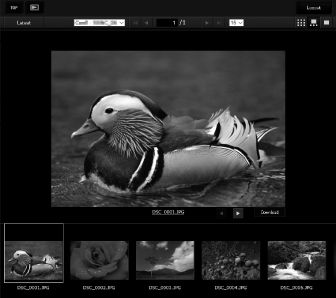
Full-Frame View
Click or tap thumbnails to display pictures full frame.
Click or tap the [] button to save the current picture to the computer or smart device.
Voice memos are listed as separate files.
Movies are indicated by 1 icons.
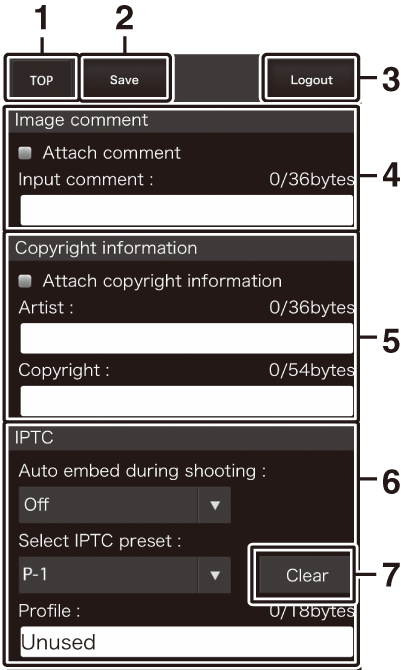
The Text Edit Window
Selecting [] on the server home page displays the text edit window. The text edit window is used to edit the image comments and the copyright and IPTC information stored on the camera.
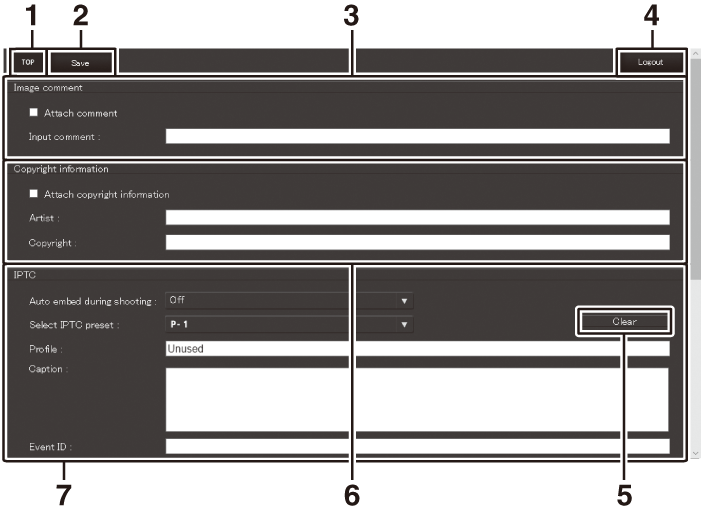
| 1 |
Home button |
|---|---|
| 2 |
Save button |
| 3 |
Image comment |
| 4 |
Logout button |
| 5 |
Clear button |
|---|---|
| 6 |
Copyright information |
| 7 |
IPTC information |
Changes are not saved automatically. Click or tap the “save” button to save changes.
Clicking or tapping the “clear” button immediately deletes the displayed text. The text will be deleted even if you exit without clicking the “save” button.
[]
Add a comment to new photographs as they are taken. Comments can be viewed in the NX Studio [] tab.
|
Option |
Description |
|---|---|
|
[] |
Select (M) this option to enable comments. The current comment will be added to all pictures taken after you click the “save” button. |
|
[] |
Input a comment up to 36 characters long. |
[]
Add copyright information to new photographs as they are taken. Copyright information can be viewed in the NX Studio [] tab.
|
Option |
Description |
|---|---|
|
[] |
Select (M) this option to enable copyright information. The current copyright information will be added to all pictures taken after you click the “save” button. |
|
[]/[] |
Enter a photographer name up to 36 characters long and a copyright holder name up to 54 characters long. |
-
To prevent unauthorized use of the artist or copyright holder names, disable [] before lending or transferring the camera to another person. You will also need to make sure that the artist and copyright fields are blank.
-
Nikon does not accept liability for any damages or disputes arising from the use of the [] option.
-
Image comments can be viewed on the [] page of the camera photo information display.
-
To display the [] page, select (M) both [] and [] for [] in the playback menu.
-
Copyright information can be viewed on the [] page of the camera photo information display.
-
To display the [] page, select (M) both [] and [] for [] in the playback menu.
[]
Embed IPTC presets in photographs as they are taken.
|
Option |
Description |
|---|---|
|
[] |
Selecting [] displays a list of IPTC presets. Highlight a preset and click or tap the “save” button to embed the selected preset in all subsequent photos. Select [] to take photos with no IPTC presets. |
|
[] |
Choosing [] displays a list of IPTC presets. Choose a preset to copy to the camera. |
Embedded IPTC information can be viewed by selecting the IPTC page in the photo information display during full-frame playback.
iPhone Web Browsers
Tap to adjust camera settings.
-
For information on computer, Android, or iPad displays, see “Computer, Android, and iPad Web Browsers” (Computer, Android, and iPad Web Browsers).
The Shooting Window
The following controls can be accessed by selecting [] on the server home page. Use the “live view” button to initiate live view photography (C) or ready the camera for filming (1). To exit live view, use the “live view” button to turn live view off.
| 1 |
Home button |
|---|---|
| 2 |
View button |
| 3 |
Shoot button |
| 4 |
Logout button |
| 5 |
Viewfinder |
| 6 |
Display panel |
| 7 |
Camera settings |
|---|---|
| 8 |
Shutter-release button |
| 9 |
Live view button |
| 10 |
Camera settings |
| 11 |
Exposure mode |
| 12 |
Zoom buttons |
When the view through the camera lens is displayed in the viewfinder area, pressing the camera a button will display the view through the lens in the camera monitor. Press the a button again to end live view on the camera.
Rotating the camera release mode dial to S (quick release-mode selection) enables the browser-window release-mode button, which
can be used to choose from single-frame, high-speed continuous, and low-speed continuous
release modes. In high- and low-speed continuous release modes, the camera takes photographs
while the browser shutter-release button is pressed.
To focus, tap your subject in the viewfinder area.
The Viewer Window
The viewer window can be accessed by selecting [] on the server home page or by tapping the “view” button in the shooting window. The iPhone viewer window offers a choice of thumbnail and full-frame views.
Thumbnail View
View multiple small (“thumbnail”) images per page. Tap thumbnails to view pictures full frame.
| 1 |
View most recent picture in folder |
|---|---|
| 2 |
Folder selection |
| 3 |
Thumbnails per page |
|---|
Voice memos are listed as separate files.
Movies are indicated by 1 icons.
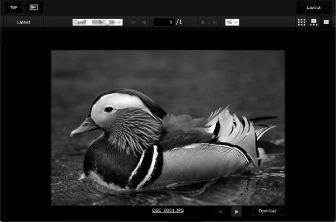
Full-Frame View
Tap thumbnails to display pictures full frame.
| 1 |
Thumbnail view |
|---|
| 2 |
View most recent picture in folder |
|---|
The Text Edit Window
Selecting [] on the server home page displays the text edit window. The text edit window is used to edit the image comments and the copyright and IPTC information stored on the camera.
| 1 |
Home button |
|---|---|
| 2 |
Save button |
| 3 |
Logout button |
| 4 |
Image comment (The Text Edit Window) |
| 5 |
Copyright information (The Text Edit Window) |
|---|---|
| 6 |
IPTC information (The Text Edit Window) |
| 7 |
Clear button |
Changes are not saved automatically. Tap the “save” button to save changes.