Caring for the Camera
Storage
When the camera will not be used for an extended period, remove the battery. Before removing the battery, confirm that the camera is off.
Do not store the camera in locations that:
-
are poorly ventilated or subject to humidities of over 60%
-
are next to equipment that produces strong electromagnetic fields, such as televisions or radios
-
are exposed to temperatures above 50 °C (122 °F) or below −10 °C (14 °F)
Cleaning
The procedure varies with the part that requires cleaning. The procedures are detailed below.
-
Do not use alcohol, thinner, or other volatile chemicals.
Camera Body
Use a blower to remove dust and lint, then wipe gently with a soft, dry cloth. After using the camera at the beach or seaside, wipe off sand or salt with a cloth lightly dampened in distilled water and dry the camera thoroughly.
Important: Dust or other foreign matter inside the camera may cause product malfunction. Damage due to the presence of foreign matter inside the camera is not covered under warranty.
Lens, Mirror, and Viewfinder
These glass elements are easily damaged: remove dust and lint with a blower. If using an aerosol blower, keep the can vertical to prevent the discharge of liquid that could damage glass elements. To remove fingerprints and other stains, apply a small amount of lens cleaner to a soft cloth and clean with care.
Monitor
Remove dust and lint with a blower. When removing fingerprints and other stains, wipe the surface lightly with a soft cloth or chamois leather. Do not apply pressure, as this could result in damage or malfunction.
The Low-Pass Filter
Dirt or dust entering the camera when lenses are exchanged or the body cap is removed may adhere to the low-pass filter and affect your photographs. The “clean image sensor” option vibrates the filter to remove dust.
The filter can be cleaned at any time from the menus, or cleaning can be performed automatically when the camera is turned on or off.
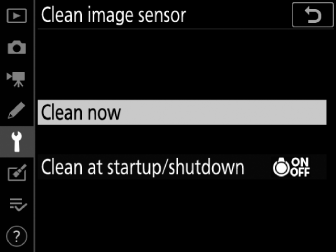
Using the Menus
-
For maximum effect, hold the camera in normal orientation (base down).
-
Select [] in the setup menu, then highlight [] and press J to begin cleaning.
-
Camera controls cannot be used while cleaning is in progress. Do not remove or disconnect the power source.
-
The setup menu will be displayed when cleaning is complete.
Cleaning the Image Sensor at Startup and/or Shutdown
|
Option |
Description |
|
|---|---|---|
|
5 |
[] |
The image sensor is automatically cleaned each time the camera is turned on. |
|
6 |
[] |
The image sensor is automatically cleaned during shutdown each time the camera is turned off. |
|
7 |
[] |
The image sensor is cleaned automatically at startup and at shutdown. |
|
[] |
Automatic image sensor cleaning off. |
|
-
Select [] for [].
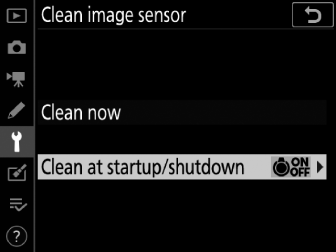
Pressing 2 when [] is highlighted displays [] options.
-
Highlight an option.
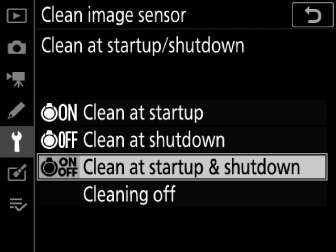
Press J to select the highlighted option.
-
Using camera controls interrupts any image sensor cleaning begun in response to the operation of the power switch.
-
Image sensor cleaning may not fully remove all foreign matter from the filter. Clean the filter manually ( Manual Cleaning ) or consult a Nikon-authorized service representative.
-
If image sensor cleaning is performed several times in succession, image sensor cleaning may be temporarily disabled to protect the camera’s internal circuitry. Cleaning can be performed again after a short wait.
Manual Cleaning
If foreign matter cannot be removed from the low-pass filter using the “clean image sensor” option ( The Low-Pass Filter ), the filter can be cleaned manually as described below. Note, however, that because the filter is extremely delicate and easily damaged, we recommend that manual cleaning be performed only by a Nikon-authorized service representative.
-
To prevent loss of power during the operation, use a fully-charged battery or connect an optional AC adapter and power connector.
-
Manual cleaning requires use of the [] item in the setup menu. The [] item is not available at battery levels of J or below or if the camera is connected to a smart device via Bluetooth or other devices via USB.
-
Turn the camera off and remove the lens.
After removing the lens, turn the camera on.
-
Highlight [] in the setup menu and press 2.
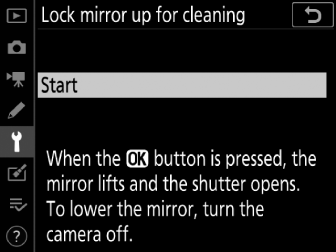
The camera will prepare to lock the mirror up.
-
Press J.
-
The mirror will be raised and the shutter curtain will open.
-
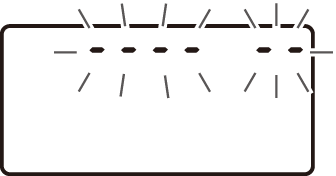
The display in the top control panel will flash. The displays in the viewfinder and rear control panel will turn off.
-
To restore normal operation without inspecting the low-pass filter, turn the camera off.
-
-
Holding the camera so that light can enter the camera, examine the filter for dust or lint.
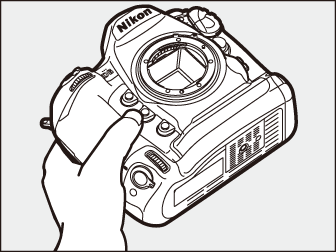
If no foreign objects are present, proceed to Step 6.
-
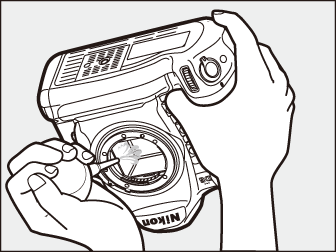
Remove any dust and lint from the low-pass filter with a blower.
-
Do not use a blower-brush. The bristles could damage the filter.
-
Dirt that cannot be removed with a blower can only be removed by Nikon-authorized service personnel. Under no circumstances should you touch or wipe the filter.
-
-
Turn the camera off and replace the lens.
The mirror will return to the down position and the shutter curtain will close.
The shutter curtain is delicate and easily damaged. If the camera powers off while the mirror is raised, the curtain will close automatically. To prevent damage to the curtain caused by the shutter closing inadvertently during the operation, observe the following precautions:
-
Do not turn the camera off while the mirror is raised.
-
Do not remove or disconnect the power source while the mirror is raised.
-
If the battery runs low while the mirror is raised, a beep will sound and the self-timer lamp will flash. The shutter curtain will close and the mirror will be lowered after about two minutes; end cleaning or inspection immediately.
Foreign matter entering the camera when lenses or body caps are removed or exchanged (or in rare circumstances lubricant or fine particles from the camera itself) may adhere to the low-pass filter, where it may appear in photographs taken under certain conditions. To prevent entry of foreign matter when attaching the body cap or exchanging lenses, avoid dusty environments and be sure to remove all dust and other foreign matter that may be adhering to the camera mount, lens mount, or body cap. To protect the camera when no lens is in place, be sure to replace the supplied body cap. Should you encounter foreign matter that cannot be removed using the image sensor cleaning option ( The Low-Pass Filter ), clean the low-pass filter as described in “Manual Cleaning” ( Manual Cleaning ), or have the filter cleaned by authorized Nikon service personnel. Photographs affected by the presence of foreign matter on the sensor can be retouched using the clean image options available in some imaging applications.
The camera is a precision device and requires regular servicing; Nikon recommends that the camera be inspected once every one to two years, and that it be serviced once every three to five years (note that fees apply to these services).
-
Frequent inspection and servicing are particularly recommended if the camera is used professionally.
-
Any accessories regularly used with the camera, such as lenses or optional flash units, should be included when the camera is inspected or serviced.
Replacing the Clock Battery
The camera clock is powered by a CR1616 lithium battery. CR1616 batteries have a life of about two years. If the B icon is displayed in the top control panel while the standby timer is on, the battery is running low and needs to be replaced. When the battery is exhausted, the B icon will flash while the standby timer is on, indicating that although photographs can still be taken, they will not be stamped with the correct time and date.
Replacing the Clock Battery
-
Turn the camera off and remove the main battery.
-
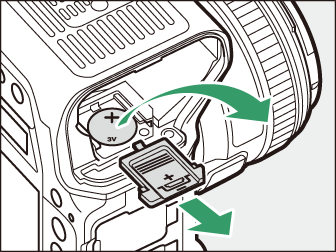
Slide the clock battery chamber cover, which is located on the roof of the main battery chamber, toward the front of the main battery chamber.
-
Remove the clock battery.
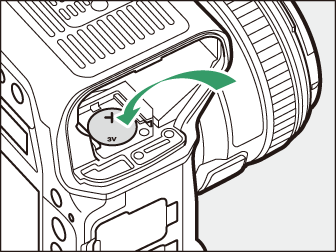
-
Insert a new CR1616 lithium battery so that the positive side (the side marked with “+” and the battery name) is visible.
-
Slide the clock battery chamber cover towards the back of the main battery chamber.
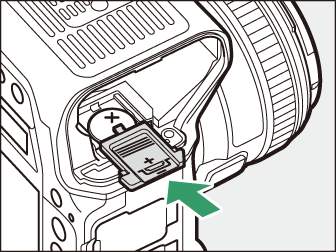
Stop when the cover clicks into place.
-
Reinsert the main battery.
-
Set the camera clock.
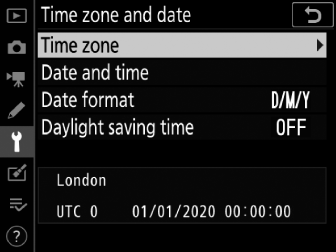
The B icon will flash in the top control panel until the clock is set.
Insert the clock battery in the correct orientation. Inserting the battery incorrectly could not only prevent the clock from functioning but could damage the camera.