Upload to Computers and FTP Servers
Pictures can be selected for upload to a computer or ftp server during playback. They can also be uploaded automatically as they are taken.
Connecting to a Computer or FTP Server
Connect to a computer or a ftp server via Ethernet or using a wireless transmitter.
-
Select [] for [].
-
When you press J, the camera will connect using the most recently-used network profile. To connect using a different profile, proceed to Step 2.
-
When a connection is established, the network name will be shown in green in the [] display.
-
If the network name is not displayed in green, connect using the computer’s wireless network settings.
-
-
Choose an image transfer or ftp server profile in the [] display.
-
Image transfer profiles are indicated by K, ftp server profiles by N.
-
When you press J, the camera will exit to the [] display and initiate the connection. The network name will be shown in green in the [] display once a connection is established.
-
If the network name is not displayed in green, connect using the computer’s wireless network settings.
-
The default folders for pictures uploaded in image transfer mode are as follows:
-
Windows: \Users\(user name)\Pictures\Wireless Transmitter Utility
-
macOS: /Users/(user name)/Pictures/Wireless Transmitter Utility
The destination folder can be selected using the Wireless Transmitter Utility. For more information, see the utility’s online help.
Selecting Pictures for Upload
-
Press the K button on the camera and select full-frame or thumbnail playback.
-
Display or highlight a picture you want to upload.

-
Hold the J button and press the center of the multi selector.

-
A white “send” (priority upload) icon will appear on the picture. If the camera is currently connected to a network, upload will begin immediately.
-
Otherwise, upload will begin when a connection is established.
-
Repeat Steps 2–3 to upload additional pictures.
-
-
To deselect a picture, hold the J button and press the center of the multi selector again.
-
Transfer marking can also be removed using [] in the playback i menu.
-
To remove transfer marking from all pictures, use [] > [] > [] in the setup menu.
You can also mark the current picture for upload by choosing [] in the playback i menu.
Uploading Photos as They Are Taken
To upload new photos as they are taken, select [] for [] > [] > [] in the setup menu.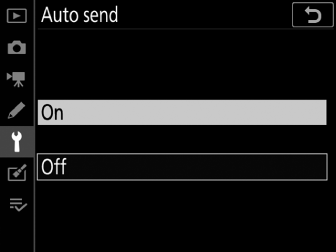
-
Upload begins only after the photo has been recorded to the memory card. Be sure a memory card is inserted in the camera.
-
Movies and photographs taken during filming are not uploaded automatically when recording is complete. They must instead be uploaded from the playback display.
The Transfer Icon
Upload status is indicated by the transfer icon.
u (white): Send (priority upload)
The picture has been manually selected for upload. Pictures marked with this icon will be uploaded before pictures marked W (“send”).
W (white): Send
The picture has been selected for automatic upload but upload has not yet begun.
X (green): Sending
Upload in progress.
Y (blue): Sent
Upload complete.
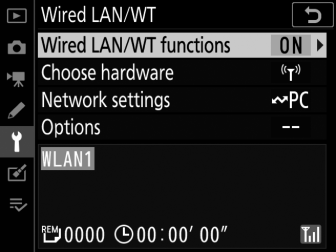
The [Wired LAN/WT] Status Display
The [] display shows the following:
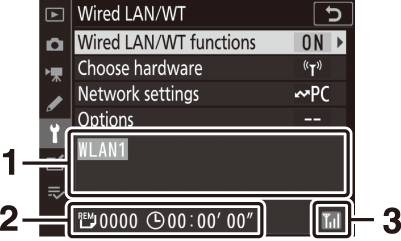
| 1 |
Status: The status of the connection to the host. The profile name is displayed in green when a connection is established. While files are being transferred, the status display shows “Now sending” preceded by the name of the file being sent. Errors and error codes are also displayed here (Ethernet/Wireless Transmitter Troubleshooting). |
|---|---|
| 2 |
Pictures/time remaining: The number of pictures remaining and the time needed to send them. The time remaining is an estimate only. |
| 3 |
Signal strength: Ethernet connections are shown by T. When the camera is connected to a wireless network, the icon instead shows the wireless signal strength. |
|---|
Wireless transmission may be interrupted if the signal is lost. Upload of pictures with “send” marking can be resumed by turning the camera off and then on again once the signal has been re-established.
Do not remove the memory card or disconnect the Ethernet cable or wireless transmitter during upload.
Connection status is shown by the camera network indicator.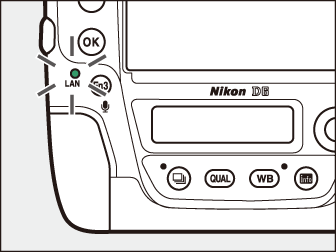
|
Network indicator |
Status |
|---|---|
|
I (off) |
|
|
K (green) |
Waiting to connect. |
|
H (flashes green) |
Connected. |
|
H (flashes amber) |
Error. |
Connection status is also shown in the camera viewfinder. T is displayed when the camera is connected via Ethernet, U when it is connected to a wireless network. The icon will flash if an error occurs.
TCP port 15740 and UDP port 5353 are used for connections to computers. File transfer may be blocked if the server firewall is not configured to allow access to these ports.
Voice memos will be included when the associated pictures are transmitted. They cannot, however, be uploaded separately.
Choose a long standby time before starting the interval timer, as upload will be interrupted if the standby timer expires while interval-timer photography is in progress.
The camera saves transfer marking when turned off and resumes upload when next turned on.