Creating Network Profiles (WT-6)
Before connecting the camera to a computer or ftp server in [], [], [], or [] mode, you will need to create a network profile.
-
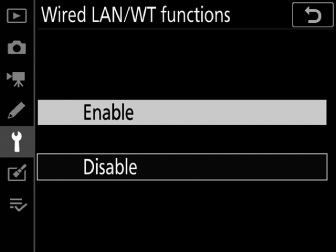
Before creating a network profile, select [] for [] > [] in the setup menu.
-
Select [] for [] > [] in the setup menu.

-
For information on creating network profiles for use when connecting via Ethernet, see “Creating Network Profiles (Ethernet)” ( Creating a Network Profile (Ethernet) ).
- WT-6 Wireless Connection Options
- Image Transfer and Camera Control Modes
- HTTP Server Mode
- FTP Upload Mode
WT-6 Wireless Connection Options
With a WT-6 attached, the camera can connect to computers or ftp servers using any of the following four options.
|
Option |
Description |
|---|---|
|
[] |
Connect to computers on existing home networks or the like via a wireless router. The computer can still connect to the Internet while connected to the camera. |
|
[] |
If the wireless router is equipped with a WPS button, you can connect the camera to the router just by pressing the button. |
|
[] |
Connect by using the computer to enter a PIN displayed on the camera into a wireless router. |
|
[] |
Connect the camera to the computer or ftp server via a direct wireless link. The camera acts as a wireless LAN access point, letting you connect when working outdoors and in other situations in which the computer is not already connected to a wireless network and eliminating the need for complicated adjustments to settings. The computer cannot connect to the Internet while connected to the camera. |
-
Each option can be configured in the connection wizard when you create a network profile.
Image Transfer and Camera Control Modes
Follow the on-screen instructions to create a network profile.
-
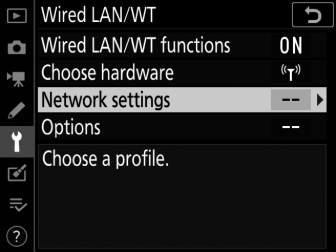
In the setup menu, select [], then highlight [] and press 2.
The camera will display a list of network profiles.
-
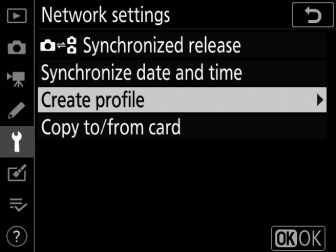
Highlight [] and press 2.
-
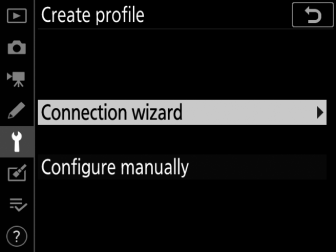
You will be prompted to choose between the connection wizard and manual setup.
-
Note that [] will not be available if the profile list already contains nine profiles. Before creating a new profile, you must first delete an existing profile using the O (Q) button.
-
-
Highlight [] and press 2.
The connection wizard will start.
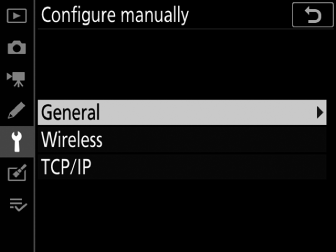
Manual ConfigurationChoose [] to configure [] and [] settings manually. Choose [] to create network profiles for use with [] and [].
-
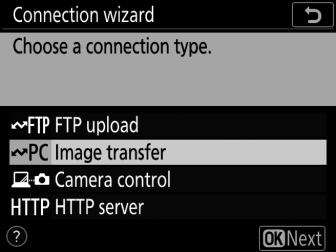
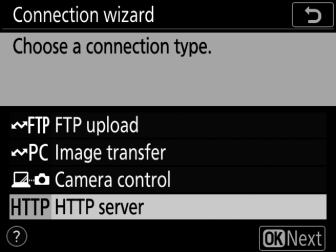
Choose a connection type.
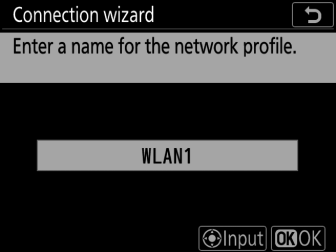
Highlight [] or [] and press J to display the default profile name.
-
Rename the new network profile.
-
To proceed to IP address selection without renaming the profile, press J.
-
The profile name will appear in the [] > [] list in the camera setup menu.
-
To rename the profile, press the center of the multi selector.
-
-
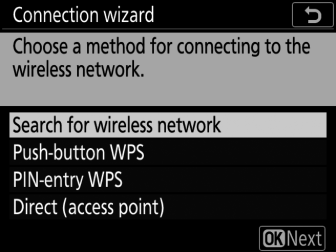
Choose a connection option.
-
Highlight one of the following options and press J.
-
[]: Proceed to Step 7.
-
[]: Proceed to Step 9.
-
[]: Proceed to Step 10.
-
[]: Proceed to Step 11.
-
-
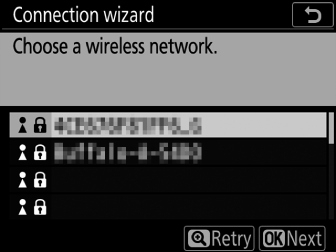
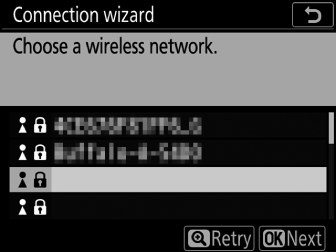
Choose a network.
-
When [] is selected, the camera will search for networks currently active in the vicinity and list them by name (SSID).
-
Highlight a network SSID and press J. Encrypted networks are indicated by a u icon. If the selected network is encrypted (u), you will be prompted to enter the encryption key. If the network is not encrypted, proceed to Step 12.
-
If the desired network is not displayed, press X to search again.
Hidden SSIDsNetworks with hidden SSIDs are indicated by blank entries in the network list.
-
To connect to a network with a hidden SSID, highlight a blank entry and press J. Next, press the center of the multi selector; the camera will prompt you to provide an SSID.
-
Enter the network name and press J. Press J again; the camera will now prompt you to enter the encryption key.
-
-
-
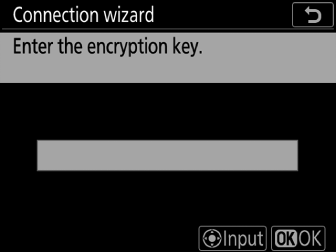
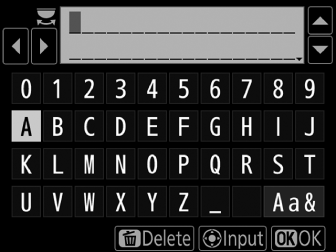
Enter the encryption key.
-
Press the center of the multi selector and enter the encryption key for the wireless router.
-
For more information, see the documentation for the wireless router.
-
Press J when entry is complete.
-
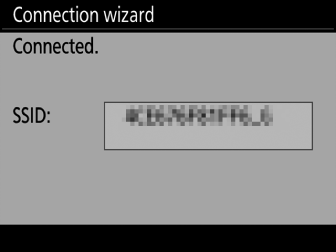
Press J again to initiate the connection. A message will be displayed for a few seconds when the connection is established.
-
You will next be prompted to supply an IP address. Proceed to Step 12.
-
-
Press the WPS button on the router.
-
Selecting [] displays a WPS dialog.
-
Press the WPS button on the router and then press the camera J button to connect.
-
For more information, see the documentation provided with the router.
-
A confirmation dialog will be displayed when a connection is established. Press J and proceed to Step 12.
-
-
Enter a PIN code into the router.
-
Selecting [] displays a PIN.
-
Using a computer, enter the PIN on the router. For more information, see the documentation provided with the router.
-
A confirmation dialog will be displayed when a connection is established. Press J and proceed to Step 12.
-
-
Establish a connection to the camera.
When [] is selected, the camera will display an SSID and encryption key.
Windows:
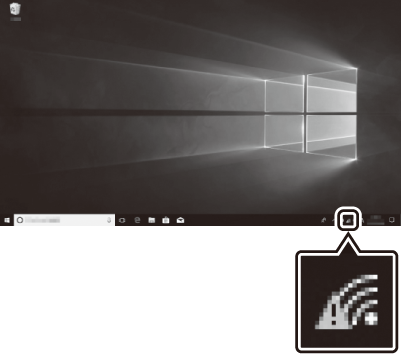
-
Click the wireless LAN icon in the taskbar.
-
Select the camera SSID.
-
Enter the camera encryption key when prompted. The computer will initiate a connection to the camera. A pairing dialog will be displayed when a connection is established. Proceed to Step 13.
macOS:
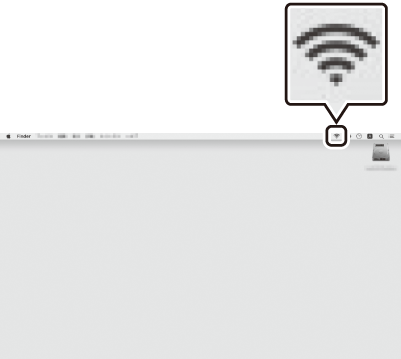
-
Click the wireless LAN icon in the menu bar.
-
Select the camera SSID.
-
Enter the camera encryption key when prompted. The computer will initiate a connection to the camera. A pairing dialog will be displayed when a connection is established. Proceed to Step 13.
-
-
Obtain or select an IP address.
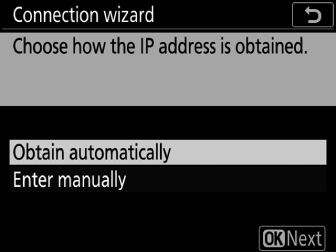
-
Highlight one of the following options and press J:
Option
Description
[]
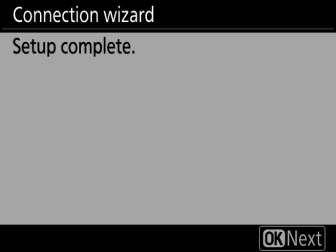
Select this option if the network is configured to supply the IP address automatically. A “configuration complete” message will be displayed once an IP address has been assigned.
[]
Enter the IP address and sub-net mask manually.
-
Press the center of the multi selector to display a dialog where you can manually enter an IP address.
-
Rotate the main command dial to highlight segments.
-
Press 4 or 2 to change the highlighted segment and press the center of the multi selector when entry is complete.
-
Next, press J; a “configuration complete” message will be displayed. Press J again to display the sub-net mask.
-
Press 1 or 3 to edit the sub-net mask and press J; a “configuration complete” message will be displayed.
-
-
Press J to proceed when the “configuration complete” message is displayed.
-
-
Start pairing.
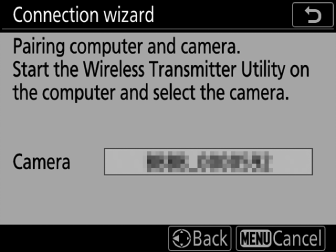
When prompted, launch the Wireless Transmitter Utility on the computer.
-
Select the camera in the Wireless Transmitter Utility.

Select the name displayed by the camera in Step 13 and click [].
-
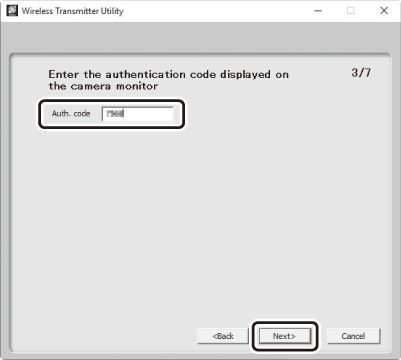
In the Wireless Transmitter Utility, enter the authentication code displayed by the camera.
-
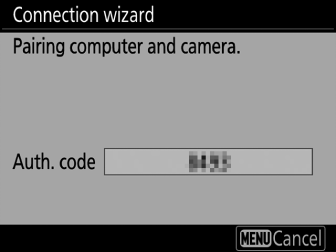
The camera will display an authentication code.
-
Enter the authentication code in the dialog displayed by the Wireless Transmitter Utility and click [].
-
-
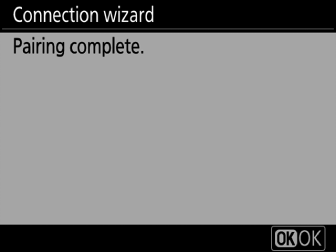
Complete the pairing process.
-
When the camera displays a message stating that pairing is complete, press J.
-
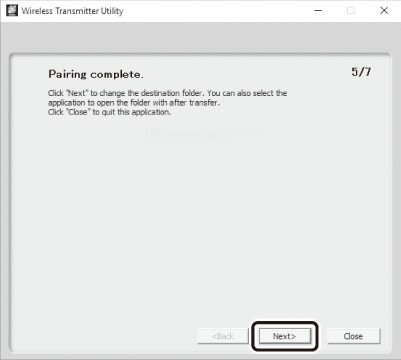
In the Wireless Transmitter Utility, click []; you will be prompted to choose a destination folder. For more information, see online help for the Wireless Transmitter Utility.
-
-
Exit the wizard.
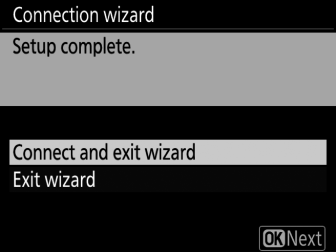
Highlight one of the following options and press J.
|
Option |
Description |
|---|---|
|
[] |
Save the new network profile and connect to the host. |
|
[] |
Save the new network profile and exit. |
Wireless network profiles have now been created on both the camera and the computer.
Pictures taken with the camera can be uploaded to the computer as described in “Upload to Computers and FTP Servers” ( Upload to Computers and FTP Servers ).
For information on controlling the camera from a computer using Camera Control Pro 2, see “Camera Control” ( Camera Control ).
HTTP Server Mode
Follow the on-screen instructions to create a network profile.
-
In the setup menu, select [], then highlight [] and press 2.
The camera will display a list of network profiles.
-
Highlight [] and press 2.
-
You will be prompted to choose between the connection wizard and manual setup.
-
Note that [] will not be available if the profile list already contains nine profiles. Before creating a new profile, you must first delete an existing profile using the O (Q) button.
-
-
Highlight [] and press 2.
The connection wizard will start.
Manual ConfigurationChoose [] to adjust settings manually.
-
Choose a connection type.
Highlight [] and press J to display the default profile name.
-
Rename the new network profile.
-
To proceed to IP address selection without renaming the profile, press J.
-
The profile name will appear in the [] > [] list in the camera setup menu.
-
To rename the profile, press the center of the multi selector.
-
-
Choose a connection option.
-
Highlight one of the following options and press J.
-
[]: Proceed to Step 7.
-
[]: Proceed to Step 9.
-
[]: Proceed to Step 10.
-
[]: Proceed to Step 11.
-
-
Choose a network.
-
When [] is selected, the camera will search for networks currently active in the vicinity and list them by name (SSID).
-
Highlight a network SSID and press J. Encrypted networks are indicated by a u icon. If the selected network is encrypted (u), you will be prompted to enter the encryption key. If the network is not encrypted, proceed to Step 12.
-
If the desired network is not displayed, press X to search again.
Hidden SSIDsNetworks with hidden SSIDs are indicated by blank entries in the network list.
-
To connect to a network with a hidden SSID, highlight a blank entry and press J. Next, press the center of the multi selector; the camera will prompt you to provide an SSID.
-
Enter the network name and press J. Press J again; the camera will now prompt you to enter the encryption key.
-
-
-
Enter the encryption key.
-
Press the center of the multi selector and enter the encryption key for the wireless router.
-
For more information, see the documentation for the wireless router.
-
Press J when entry is complete.
-
Press J again to initiate the connection. A message will be displayed for a few seconds when the connection is established.
-
You will next be prompted to supply an IP address. Proceed to Step 12.
-
-
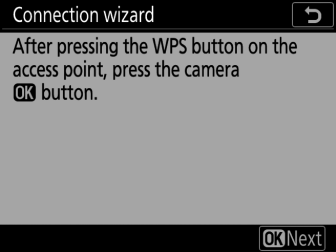
Press the WPS button on the router.
-
Selecting [] displays a WPS dialog.
-
Press the WPS button on the router and then press the camera J button to connect.
-
For more information, see the documentation provided with the router.
-
A confirmation dialog will be displayed when a connection is established. Press J and proceed to Step 12.
-
-
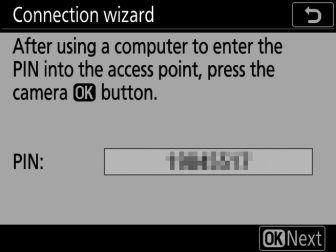
Enter a PIN code into the router.
-
Selecting [] displays a PIN.
-
Using a computer, enter the PIN on the router. For more information, see the documentation provided with the router.
-
A confirmation dialog will be displayed when a connection is established. Press J and proceed to Step 12.
-
-
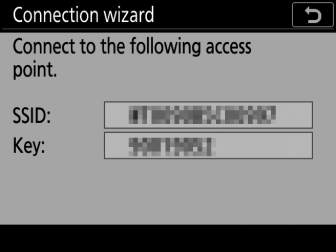
Establish a connection to the camera.
When [] is selected, the camera will display an SSID and encryption key.
Windows:
-
Click the wireless LAN icon in the taskbar.
-
Select the camera SSID.
-
Enter the camera encryption key when prompted. The computer will initiate a connection to the camera. A pairing dialog will be displayed when a connection is established. Proceed to Step 13.
macOS:
-
Click the wireless LAN icon in the menu bar.
-
Select the camera SSID.
-
Enter the camera encryption key when prompted. The computer will initiate a connection to the camera. A pairing dialog will be displayed when a connection is established. Proceed to Step 13.
-
-
Obtain or select an IP address.
-
Highlight one of the following options and press J:
Option
Description
[]
Select this option if the network is configured to supply the IP address automatically. A “configuration complete” message will be displayed once an IP address has been assigned.
[]
Enter the IP address and sub-net mask manually.
-
Press the center of the multi selector to display a dialog where you can manually enter an IP address.
-
Rotate the main command dial to highlight segments.
-
Press 4 or 2 to change the highlighted segment and press the center of the multi selector when entry is complete.
-
Next, press J; a “configuration complete” message will be displayed. Press J again to display the sub-net mask.
-
Press 1 or 3 to edit the sub-net mask and press J; a “configuration complete” message will be displayed.
-
-
Press J to proceed when the “configuration complete” message is displayed.
-
-
Exit the wizard.
Highlight one of the following options and press J.
Option
Description
[]
Save the new network profile and connect to the host.
[]
Save the new network profile and exit.
Wireless network profiles have now been created on both the camera and the computer.
You can now access and control the camera from a computer or smart device as described in “HTTP Server” ( HTTP Server ).
FTP Upload Mode
Follow the on-screen instructions to create a network profile.
-
In the setup menu, select [], then highlight [] and press 2.
The camera will display a list of network profiles.
-
Highlight [] and press 2.
-
You will be prompted to choose between the connection wizard and manual setup.
-
Note that [] will not be available if the profile list already contains nine profiles. Before creating a new profile, you must first delete an existing profile using the O (Q) button.
-
-
Highlight [] and press 2.
The connection wizard will start.
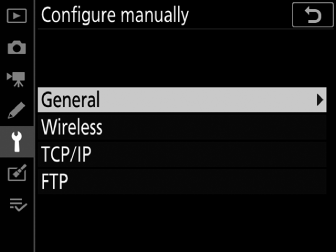
Manual ConfigurationChoose [] to adjust settings manually.
-
Select [].

The default profile name will be displayed when you press J.
-
Rename the new network profile.
-
To proceed to IP address selection without renaming the profile, press J.
-
The profile name will appear in the [] > [] list in the camera setup menu.
-
To rename the profile, press the center of the multi selector.
-
-
Choose a connection option.
-
Highlight one of the following options and press J.
-
[]: Proceed to Step 7.
-
[]: Proceed to Step 9.
-
[]: Proceed to Step 10.
-
[]: Proceed to Step 11.
-
-
Choose a network.
-
When [] is selected, the camera will search for networks currently active in the vicinity and list them by name (SSID).
-
Highlight a network SSID and press J. Encrypted networks are indicated by a u icon. If the selected network is encrypted (u), you will be prompted to enter the encryption key. If the network is not encrypted, proceed to Step 12.
-
If the desired network is not displayed, press X to search again.
Hidden SSIDsNetworks with hidden SSIDs are indicated by blank entries in the network list.
-
To connect to a network with a hidden SSID, highlight a blank entry and press J. Next, press the center of the multi selector; the camera will prompt you to provide an SSID.
-
Enter the network name and press J. Press J again; the camera will now prompt you to enter the encryption key.
-
-
-
Enter the encryption key.
-
Press the center of the multi selector and enter the encryption key for the wireless router.
-
For more information, see the documentation for the wireless router.
-
Press J when entry is complete.
-
Press J again to initiate the connection. A message will be displayed for a few seconds when the connection is established.
-
You will next be prompted to supply an IP address. Proceed to Step 12.
-
-
Press the WPS button on the router.
-
Selecting [] displays a WPS dialog.
-
Press the WPS button on the router and then press the camera J button to connect.
-
For more information, see the documentation provided with the router.
-
A confirmation dialog will be displayed when a connection is established. Press J and proceed to Step 12.
-
-
Enter a PIN code into the router.
-
Selecting [] displays a PIN.
-
Using a computer, enter the PIN on the router. For more information, see the documentation provided with the router.
-
A confirmation dialog will be displayed when a connection is established. Press J and proceed to Step 12.
-
-
Establish a connection to the camera.
When [] is selected, the camera will display an SSID and encryption key.
Windows:
-
Click the wireless LAN icon in the taskbar.
-
Select the camera SSID.
-
Enter the camera encryption key when prompted. The computer will initiate a connection to the camera. A pairing dialog will be displayed when a connection is established. Proceed to Step 13.
macOS:
-
Click the wireless LAN icon in the menu bar.
-
Select the camera SSID.
-
Enter the camera encryption key when prompted. The computer will initiate a connection to the camera. A pairing dialog will be displayed when a connection is established. Proceed to Step 13.
-
-
Obtain or select an IP address.
-
Highlight one of the following options and press J:
Option
Description
[]
Select this option if the network is configured to supply the IP address automatically. A “configuration complete” message will be displayed once an IP address has been assigned.
[]
Enter the IP address and sub-net mask manually.
-
Press the center of the multi selector to display a dialog where you can manually enter an IP address.
-
Rotate the main command dial to highlight segments.
-
Press 4 or 2 to change the highlighted segment and press the center of the multi selector when entry is complete.
-
Next, press J; a “configuration complete” message will be displayed. Press J again to display the sub-net mask.
-
Press 1 or 3 to edit the sub-net mask and press J; a “configuration complete” message will be displayed.
-
-
Press J to proceed when the “configuration complete” message is displayed.
-
-
Choose the server type.

-
Highlight [] or [] (secure ftp) and press J.
-
If you selected [] in Step 6, proceed to Step 15.
-
-
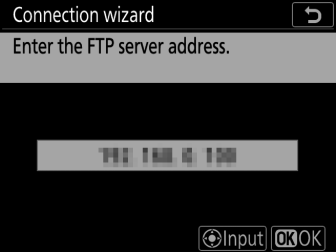
Enter the IP address.
-
Press the center of the multi selector and enter the server URL or IP address.
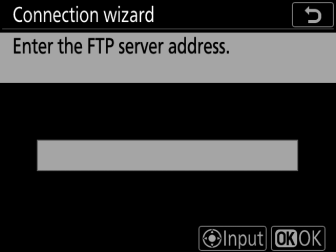
-
Press J when entry is complete.
-
Press J again to connect to the ftp server. You will be prompted to choose a login method.
-
-
Log in.
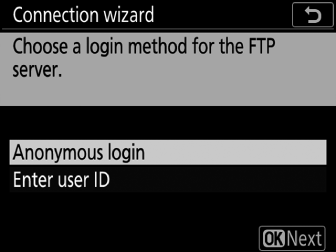
Highlight one of the following options and press J.
Option
Description
[]
Select this option if the server does not require a user ID or password. This option can only be used with servers that are configured for anonymous login. If login is successful, the camera will prompt you to choose a destination.
[]
Enter a user ID and password. Press J to log in when entry is complete. If login is successful, the camera will prompt you to choose a destination.
Firewall SettingsTCP ports 21 and 32768 through 61000 are used for [], TCP ports 22 and 32768 through 61000 for []. File transfer may be blocked if the server firewall is not configured to allow access to these ports.
-
Choose a destination folder.
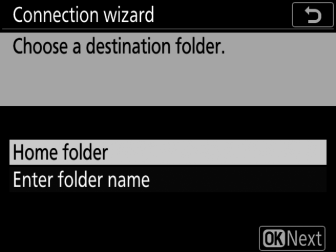
Highlight one of the following options and press J.
Option
Description
[]
Select this option to select the server’s home folder as the destination for pictures uploaded from the camera. A “setup complete” dialog will be displayed if the operation is successful.
[]
Enter the destination folder name manually. The folder must already exist on the server. Enter the folder name and path when prompted and press J to display the “setup complete” dialog.
-
Exit the wizard.
Highlight one of the following options and press J.
Option
Description
[]
Save the new network profile and connect to the ftp server.
[]
Save the new network profile and exit.
Wireless network profiles have now been created on both the camera and the ftp server.
You can now upload pictures as described in “Upload to Computers and FTP Servers” ( Upload to Computers and FTP Servers ).