The g (h/Q) Button
Use the g (h/Q) button to choose image processing (“Picture Control”) options for new photos according to the scene or your creative intent.
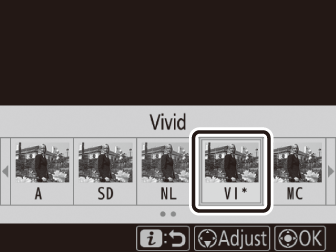
Choosing a Picture Control
Pressing the g (h/Q) button displays Picture Control options. Highlight an option using 4 or 2 and press J to select.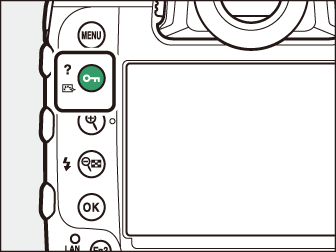
|
Option |
Description |
|
|---|---|---|
|
n |
[] |
The camera automatically adjusts hues and tones based on the [] Picture Control. |
|
Q |
[] |
Standard processing for balanced results. Recommended for most situations. |
|
R |
[] |
Minimal processing for natural results. Choose for photographs that will later be processed or retouched. |
|
S |
[] |
Pictures are enhanced for a vivid, photoprint effect. Choose for photographs that emphasize primary colors. |
|
T |
[] |
Take monochrome photographs. |
|
o |
[] |
Smooth complexions for natural-looking portraits. |
|
p |
[] |
Shoot vibrant landscapes and cityscapes. |
|
q |
[] |
Details are preserved over a wide tone range, from highlights to shadows. Choose for photographs that will later be extensively processed or retouched. |
|
l01 - l20 |
Creative Picture Control |
Creative Picture Controls offer unique combinations of hue, tone, saturation, and other settings tuned for particular effects. Choose from a total of 20 options, including [] and []. |
Modifying Picture Controls
To modify Picture Control settings, highlight a Picture Control and press 3.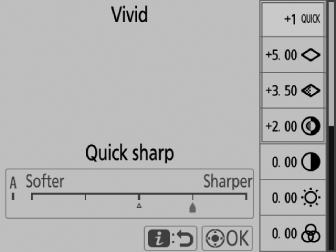
-
Press 1 or 3 to highlight settings. Press 4 or 2 to choose a value in increments of 1, or rotate the sub-command dial to choose a value in increments of 0.25.
-
The options available vary with the Picture Control selected.
-
Default settings can be restored by pressing the O (Q) button.
-
Press J to save changes.
-
Picture Controls that have been modified from default settings are indicated by an asterisk (“U”).
Picture Control Settings
|
Option |
Description |
|
|---|---|---|
|
[] |
Mute or heighten the effect of Creative Picture Controls. |
|
|
[] |
Quickly adjust levels for balanced [], [], and []. These parameters can also be adjusted individually. |
|
|
[] |
Control the sharpness of details and outlines. |
|
|
[] |
Adjust the sharpness of patterns and lines in the range between [] and []. |
|
|
[] |
Adjust overall sharpness and the sharpness of thicker outlines without affecting brightness or dynamic range. |
|
|
[] |
Adjust contrast. |
|
|
[] |
Raise or lower brightness without loss of detail in highlights or shadows. |
|
|
[] |
Control the vividness of colors. |
|
|
[] |
Adjust hue. |
|
|
[] |
Simulate the effect of color filters on monochrome pictures. |
|
|
[] |
Choose the tint used in monochrome pictures. Pressing 2 when an option other than [] (black-and-white) is selected displays saturation options. |
|
|
[] (Creative Picture Control) |
Choose the shade of color used for Creative Picture Controls. |
|
The j indicator under the value display in the Picture Control setting menu indicates the
previous value for the setting.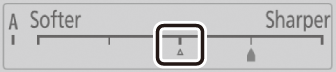
-
Selecting the [] (auto) option available for some settings lets the camera adjust the setting automatically.
-
Results vary with exposure and the position of the subject in the frame.
Choose from the following []:
|
Option |
Description |
|---|---|
|
[] (yellow) * |
These options enhance contrast and can be used to tone down the brightness of the sky in landscape photographs. Orange [] produces more contrast than yellow [], red [] more contrast than orange. |
|
[] (orange) * |
|
|
[] (red) * |
|
|
[] (green) * |
Green softens skin tones. Use for portraits and the like. |
-
The term in parentheses is the name of the corresponding third-party color filter for black-and-white photography.
Settings can be adjusted in the range [] to [].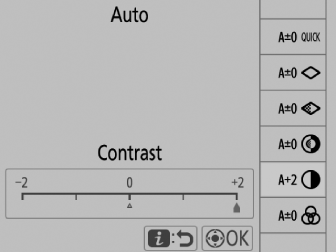
During playback, the g (h/Q) button can be used to protect pictures. Protecting pictures helps prevent accidental
deletion.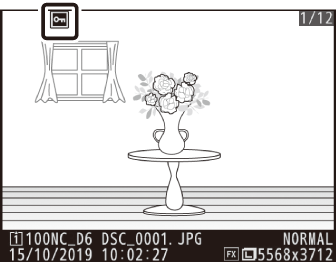
Press the g (h/Q) button to view help for the current item, where available ( The d (Help) Icon ).