Achieving Natural Colors with Different Light Sources (White Balance)
White Balance
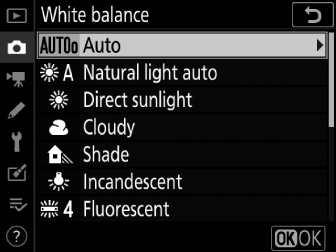
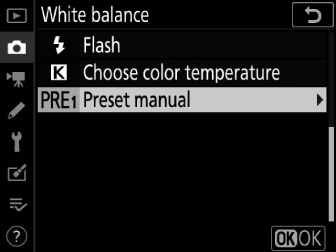
Adjusting settings for natural colors under different light sources is referred to as “matching white balance to the light source”. The default setting (v) is suitable for use with most light sources, but if it fails to produce the desired results, other settings can be selected according to the weather or light source.
|
Option |
Color temperature * |
Description |
|
|---|---|---|---|
|
v [] |
The camera adjusts white balance for optimal results with most light sources. If an optional flash unit is used, white balance will be adjusted in accord with the conditions in effect when the flash fires. |
||
|
v0 [] |
Approx. 3500–8000 K |
Eliminate the warm color cast produced by incandescent lighting. |
|
|
v1 [] |
Approx. 3500–8000 K |
Partially preserve the warm color cast produced by incandescent lighting. |
|
|
v2 [] |
Approx. 3500–8000 K |
Preserve the warm color cast produced by incandescent lighting. |
|
|
D [] |
Approx. 4500–8000 K |
White balance is adjusted for non-artificial light sources, producing more life-like colors than does [] when used under natural light. |
|
|
H [] |
Approx. 5200 K |
Use with subjects lit by direct sunlight. |
|
|
G [] |
Approx. 6000 K |
Use in daylight under overcast skies. |
|
|
M [] |
Approx. 8000 K |
Use in daylight with subjects in shade. |
|
|
J [] |
Approx. 3000 K |
Use under incandescent lighting. |
|
|
I [] |
Use under fluorescent lighting; choose bulb type according to light source. |
||
|
[] |
Approx. 2700 K |
||
|
[] |
Approx. 3000 K |
||
|
[] |
Approx. 3700 K |
||
|
[] |
Approx. 4200 K |
||
|
[] |
Approx. 5000 K |
||
|
[] |
Approx. 6500 K |
||
|
[] |
Approx. 7200 K |
||
|
N [] |
Approx. 5400 K |
Use with studio strobe lighting and other large flash units. |
|
|
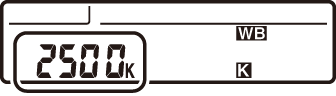
K [] |
Approx. 2500–10,000 K |
Direct color-temperature selection.
|
|
|
L [] |
Measure white balance directly from a subject or light source or copy white balance from an existing photograph.
|
||
-
Values when fine-tuning is set to 0.
-
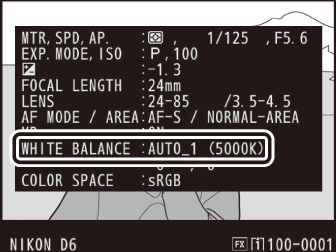
The photo info [] page for pictures shot with [] or [] selected for white balance lists the color temperature selected by the camera at the time the picture was taken (Basic Shooting Data). You can use this as reference when choosing a value for [].
-
To view the [] page during playback, go to [] in the playback menu and place checks (M) next to [] and [].
Choosing a White Balance Option
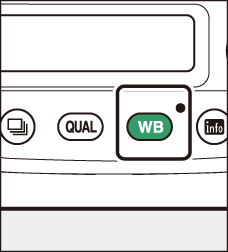
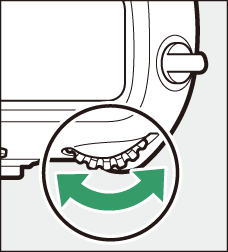
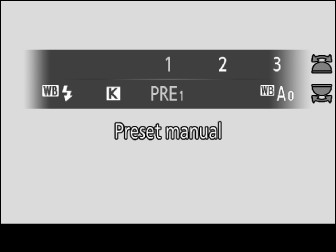
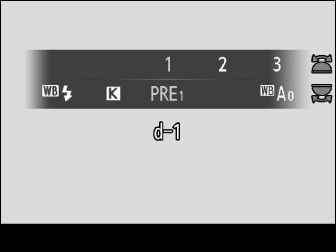
To choose a white balance option, hold the U button and rotate the main command dial. The selected option is displayed in the rear control panel.
|
|
|
|
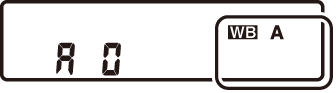
Options for the selected setting, if any, can be selected by holding the U button and rotating the sub-command dial.
[] may not produce the desired results with large studio flash units. Use preset white balance or set white balance to [] and use fine-tuning to adjust white balance.
White balance can also be adjusted from the photo and movie shooting menus.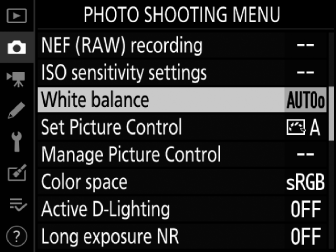
[] may not produce the desired results under artificial light. Choose [] or an option that matches the light source.
The perceived color of a light source varies with the viewer; some may have a red cast while others appear blue. Color temperature is an objective measure of the color of a light source, expressed in Kelvins (K). The lower the color temperature, the redder the cast (q); the higher the temperature, the bluer the cast (w).
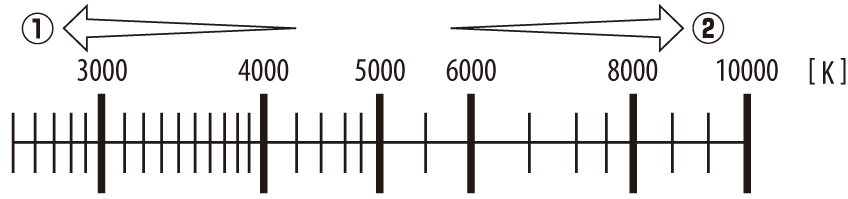
In general, choose lower values if your pictures have a red cast or to intentionally make pictures bluer, higher values if your pictures are tinged blue or to intentionally make pictures redder.
Fine-Tuning White Balance
-
Select [] in the photo shooting menu, highlight the desired option, and press 2 as often as necessary to display fine-tuning options.
For information on fine-tuning [] white balance, see “Fine-Tuning Preset Manual White Balance” (Fine-Tuning Preset White Balance).
-
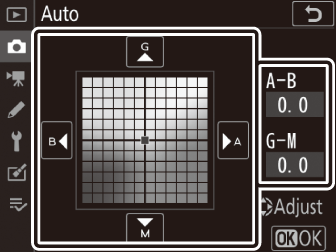
Fine-tune white balance.
-
Use the multi selector to position the cursor on the grid. The cursor can be moved up to six steps from the center along either of the A (amber)–B (blue) and G (green)–M (magenta) axes. The selected value is displayed to the right of the grid.
-
The A (amber)–B (blue) axis corresponds to color temperature and is ruled in increments of 0.5. A change of 1 is equivalent to approximately 5 mired.
-
The G (green)–M (magenta) axis has effects similar to color compensation filters and is ruled in increments of 0.25. A change of 1 is equivalent to approximately 0.05 diffuse density units.
-
-
Save changes.
-
Press J to save changes and exit to the menus.
-
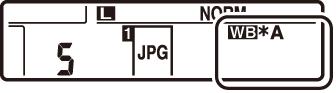
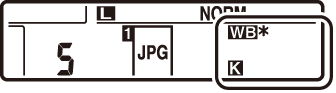
If white balance has been fine-tuned, an asterisk (“U”) will be displayed in the rear control panel.
-
During viewfinder photography, you can press the U button to adjust white balance settings in the information display.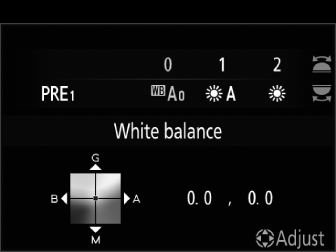
-
Rotate the main command dial to choose the white balance mode. When [] or [] is selected, you can choose an [] or [] sub-option by rotating the sub-command dial.
-
When [] is selected, you can rotate the sub-command dial to choose the color temperature.
-
When [] is selected, you can rotate the sub-command dial to choose a white balance preset.
-
In modes other than [] and [], you can use the multi-selector to fine-tune white balance on the A (amber)– B (blue) and G (green)–M (magenta) axes.
White balance settings can be displayed by pressing the U button during live view.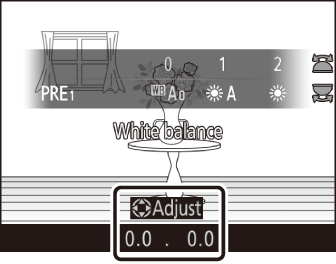
-
The procedures for choosing a white balance mode and fine-tuning white balance are the same as in the information display.
-
The effects can be previewed in the monitor.
The colors on the fine-tuning axes are relative, not absolute. Selecting more of a color on a given axis does not necessarily result in that color appearing in pictures. For example, moving the cursor to B (blue) when a “warm” setting such as [] is selected will make pictures slightly “colder” but will not actually make them blue.
Values in mired are calculated by multiplying the inverse of the color temperature by 10 6. Any given change in color temperature produces a greater difference in color at low color temperatures than it would at higher color temperatures. For example, a change of 1000 K produces a much greater change in color at 3000 K than at 6000 K. Mired is a measure of color temperature that takes such variation into account, and as such is the unit used in color-temperature compensation filters.
E.g.: Change in color temperature (in Kelvin): Value in mired
-
4000 K−3000 K = 1000 K: 83 mired
-
7000 K−6000 K = 1000 K: 24 mired
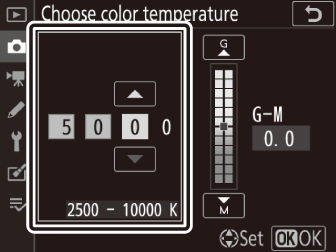
Choosing a Color Temperature
Using the Menus
Choose a color temperature by entering values for the A (amber)–B (blue) and G (green)–M (magenta) axes.
-
Select [] in the photo shooting menu, then highlight [] and press 2.
-
Choose a color temperature.
-
Press 4 or 2 to highlight digits on the amber (A)–blue (B) axis and press 1 or 3 to change.
-
Press 4 or 2 to highlight the value for the green (G)–magenta (M) axis and press 1 or 3 to change.

-
-
Save changes.
-
Press J to save changes and exit to the menus.
-
If a value other than 0 is selected for the green (G)–magenta (M) axis, an asterisk (“U”) will appear in the rear control panel.
-
Using Buttons (Amber–Blue Only)
To adjust color temperature when [] is selected for white balance, hold the U button and use the multi selector or rotate the sub-command dial.
|
|
|
|
-
Hold the U button and rotate the sub-command dial to choose a color temperature in mireds.
-
To highlight a digit, hold the U button and press 4 or 2. Press 1 or 3 to edit the highlighted digit.
-
Changes apply only to the A (amber)–B (blue) axis.
-
The selected setting takes effect when the U button is released.
-
Do not use color-temperature selection with flash lighting or fluorescent light sources; instead, use the [] or [] option, respectively.
-
When using color-temperature selection with other light sources, take a test shot to determine if the selected value is appropriate.
Preset Manual
Preset manual is used to record and recall custom white balance values measured under specific lighting or copied from a photograph. It is recommended under mixed lighting or lighting with a strong color cast or whenever settings such as [], [], and color-temperature selection fail to produce the desired results.
The camera can store up to six values for preset white balance in presets d-1 through d-6. Two methods are available for setting preset white balance:
|
Method |
Description |
|---|---|
|
Direct measurement |
Measure white balance from a white or neutral gray object under the lighting for the final shot (Viewfinder Photography). During live view, white balance can be measured in a selected area of the frame (spot white balance, Live View (Spot White Balance) ). |
|
Copying a value from existing photograph |
Copy white balance from a photo on a memory card (Copying White Balance from a Photograph). |
Changes to white balance presets d-1 through d-6 apply to all photo shooting menu banks (A–D). For example, changes to presets made when photo shooting menu bank A is selected also apply to photo shooting menu banks B through D.
Viewfinder Photography
Before Measuring White Balance:
-
Place a neutral gray or white object under the lighting that will be used in the final photograph. In studio settings, a standard 18% gray panel can be used as a reference object.
-
Note that exposure is automatically increased by 1 EV when white balance is measured using a neutral gray or white reference object. In mode M, adjust exposure so that the exposure indicator shows ±0 ( Exposure Indicators ).
-
Hold the U button and rotate the main command dial to select L.
-
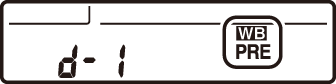
Select a preset.
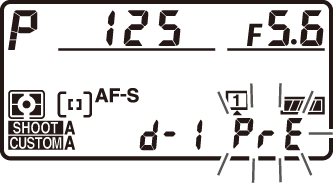
Hold the U button and rotate the sub-command dial until the desired white balance preset (d-1 to d-6) is displayed.


-
Select direct measurement mode.
-
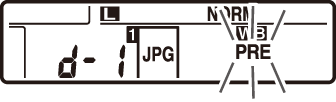
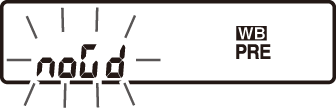
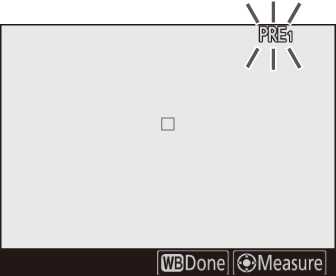
Release the U button briefly and then press the U button until the D indicators in the viewfinder and top control panel and the L icon in the rear control panel start to flash.

-
In direct measurement mode, the focus point changes to a white balance target as shown and stays in the center of the frame.

-
-
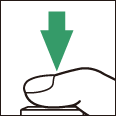
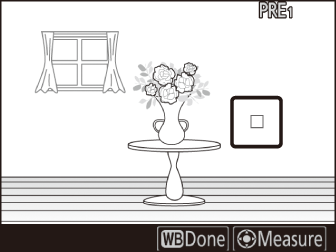
Before the D indicators stop flashing, photograph the reference object.
-
Position the reference object in the white balance target and press the shutter-release button all the way down to measure a value for white balance and store it in the preset selected in Step 2.
-
Even if the camera is not in focus, the shutter will be released and white balance will be measured normally. No photograph will be recorded.
-
-
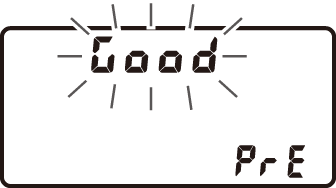
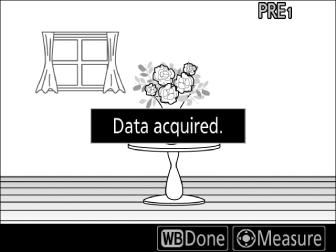
Check the results.
-
If the camera was able to measure a value for white balance, C will flash in the top and rear control panels, while the viewfinder will show a flashing a. Press the shutter-release button halfway to exit to shooting mode.


-
If lighting is too dark or too bright, the camera may be unable to measure white balance. A flashing b a will appear in the viewfinder and in the top and rear control panels. Press the shutter-release button halfway to return to Step 4 and measure white balance again.

-
If no operations are performed during viewfinder photography while the displays are flashing, direct measurement mode will end in the time selected for Custom Setting c2 [].
Preset manual white balance cannot be measured during:
-
multiple exposures,
-
interval-timer photography,
-
time-lapse movie recording, or
-
focus shift.
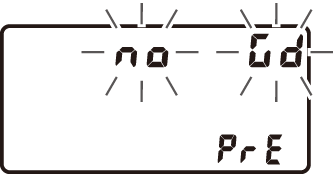
If the current preset is protected, the camera will be unable to measure a value for preset manual white balance; any attempt to measure white balance for a protected preset will be accompanied by a flashing 3 in the viewfinder and top control panel and a flashing g in the rear control panel.
-
At shipment, presets d-1 through d-6 are set to 5200 K, equivalent to the “direct sunlight” white balance option.
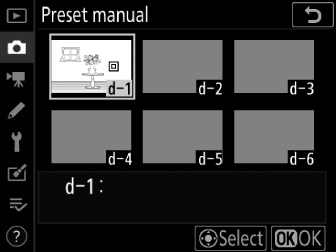
-
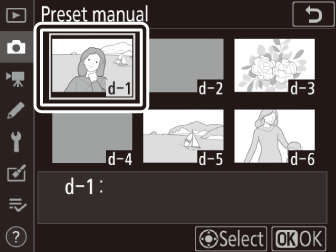
White balance presets can be viewed by selecting [] > [] in the photo shooting menu. To recall a stored value, highlight a preset using the multi selector and press J.
Live View (Spot White Balance)
During live view, white balance can be measured from white or gray objects in a smaller area of the frame than would be possible in viewfinder photography (spot white balance). As long as the subject contain a white or gray area, you will not have to prepare a reference object or change lenses during telephoto photography.
-
When measuring preset manual white balance for flash photography, use the viewfinder as described in “Viewfinder Photography” (Viewfinder Photography).
-
Hold the U button and rotate the main command dial to select L.
-
Select a preset.
Hold the U button and rotate the sub-command dial until the desired white balance preset (d-1 to d-6) is displayed.
-
Select direct measurement mode.
Release the U button briefly and then press the U button until the L icon in the monitor starts to flash.
-
While the L icon is flashing, use the multi selector to position the spot white balance target (r) over a white or gray area of the subject.
To zoom in on the area around the target (r) for more precise positioning, press the X button.
-
Measure a value for preset white balance either by pressing the center of the multi selector or by pressing the shutter-release button all the way down.
-
If the camera is able to measure white balance, the new value will be reflected in the display.
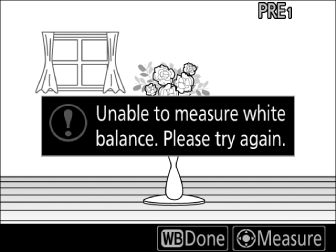
-
If the camera is unable to measure white balance, a message will be displayed and the camera will return to Step 4. Try measuring white balance again, for example with the target (r) positioned over a different area of the subject.
-
-
Press the U button to exit direct measurement mode.
White balance presets can be viewed by selecting [] > [] in the photo or movie shooting menu. White frames show the positions of the targets used to measure preset white balance.
Direct measurement mode will end if no operations are performed in the time selected for Custom Setting c4 [] > [].
Preset manual white balance cannot be measured when [] is active or an option other than [] is selected for [] (Photo Live View Display WB).
In direct measurement mode, you can position the target (U) and measure white balance by tapping the desired area in the display.
Copying White Balance from a Photograph
Follow the steps below to copy a value for white balance from an existing photograph to a selected preset.
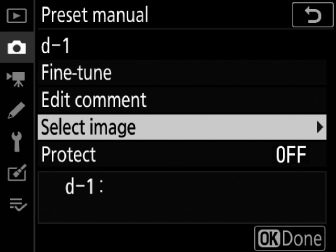
-
Select [] in the photo shooting menu, then highlight [] and press 2.
-
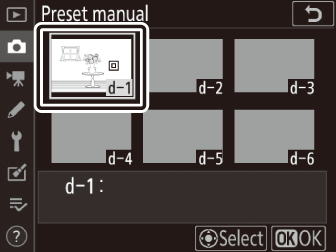
Select a destination.
-
Using the multi selector, highlight the destination preset (d-1 to d-6).
-
Press the center of the multi selector to view the preset manual white balance menu.
-
-
Choose [].
Highlight [] and press 2 to view the pictures on the current memory card.
-
Highlight the source image.
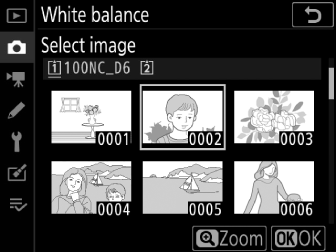
-
Highlight the desired image using the multi selector.
-
To view the highlighted image full frame, press and hold the X button.
-
-
Copy white balance.
-
Press J to copy the white balance value for the highlighted photograph to the selected preset.
-
If the highlighted photograph has a comment, the comment will be copied to the comment for the selected preset.
-
The selected preset can be fine-tuned by selecting [] in the preset manual white balance menu.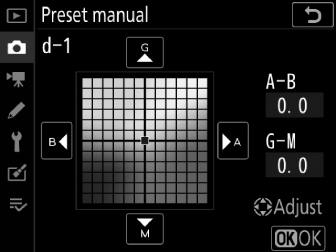
To enter a descriptive comment of up to 36 characters for the current white-balance
preset, select [] in the preset manual white balance menu. Enter a comment as described in “Text Entry”
(Text Entry).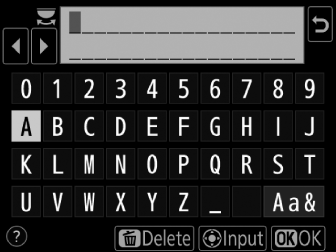
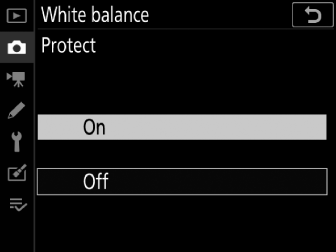
To protect the current white-balance preset, select [] in the preset manual white balance menu. Highlight [] and press J; the current white balance preset is now protected. The preset cannot be modified
as long as [] is selected for [].