Creating a Network Profile (Ethernet)
Before connecting the camera to a computer or ftp server in [], [], [], or [] mode, you will need to create a network profile.
-
Before creating a network profile, select [] for [] > [] in the setup menu.
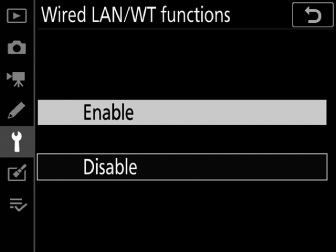
-
Select [] for [] > [] in the setup menu.
-
For information on creating network profiles for use when connecting to wireless LANs using the WT-6, see “Creating Network Profiles (WT-6)” ( Creating Network Profiles (WT-6) ).
Image Transfer and Camera Control Modes
Follow the on-screen instructions to create a network profile.
-
In the setup menu, select [], then highlight [] and press 2.
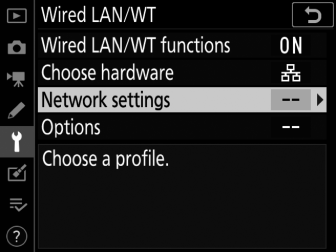
The camera will display a list of network profiles.
-
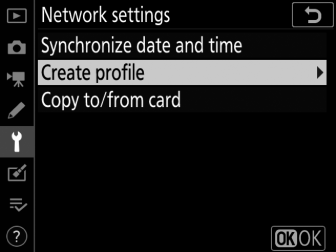
Highlight [] and press 2.
-
You will be prompted to choose between the connection wizard and manual setup.
-
Note that [] will not be available if the profile list already contains nine profiles. Before creating a new profile, you must first delete an existing profile using the O (Q) button.
-
-
Highlight [] and press 2.
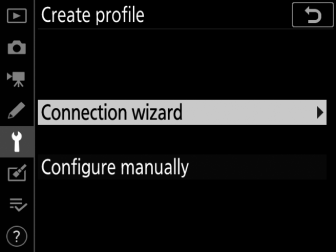
The connection wizard will start.
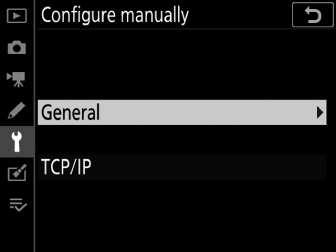
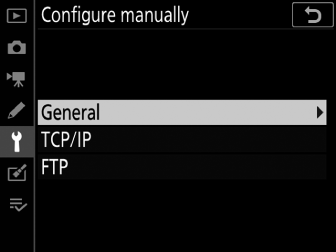
Manual ConfigurationChoose [] to configure [] and [] settings manually. Choose [] to create network profiles for use with [] and [].
-
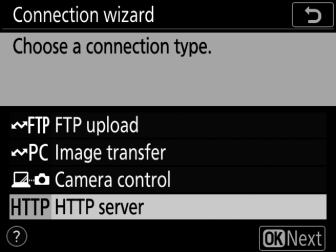
Choose a connection type.
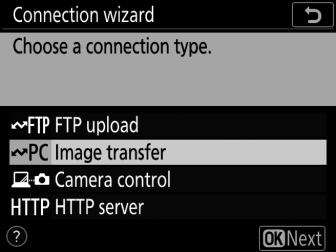
Highlight [] or [] and press J to display the default profile name.
-
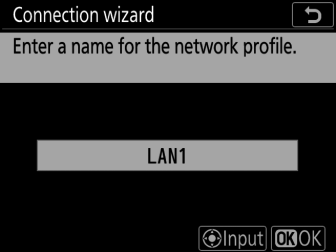
Rename the new network profile.
-
To proceed to IP address selection without renaming the profile, press J.
-
The profile name will appear in the [] > [] list in the camera setup menu.
-
To rename the profile, press the center of the multi selector.
-
-
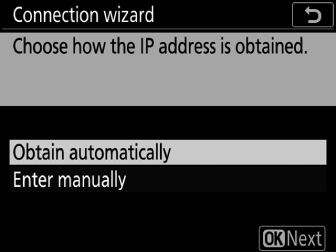
Obtain or select an IP address.
-
Highlight one of the following options and press J.
Option
Description
[]
Select this option if the network is configured to supply the IP address automatically. A “configuration complete” message will be displayed once an IP address has been assigned.
[]
Enter the IP address and sub-net mask manually.
-
Press the center of the multi selector to display a dialog where you can manually enter an IP address.
-
Rotate the main command dial to highlight segments.
-
Press 4 or 2 to change the highlighted segment and press the center of the multi selector to save changes.
-
Next, press J; a “configuration complete” message will be displayed. Press J again to display the sub-net mask.
-
Press 1 or 3 to edit the sub-net mask and press J; a “configuration complete” message will be displayed.
-
-
Press J to proceed when the “configuration complete” message is displayed.
-
-
Start pairing.
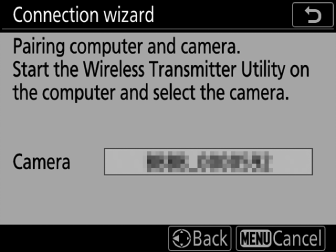
When prompted, launch the Wireless Transmitter Utility on the computer.
-
Select the camera in the Wireless Transmitter Utility.

Select the name displayed by the camera in Step 7 and click [].
-
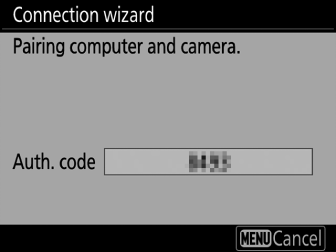
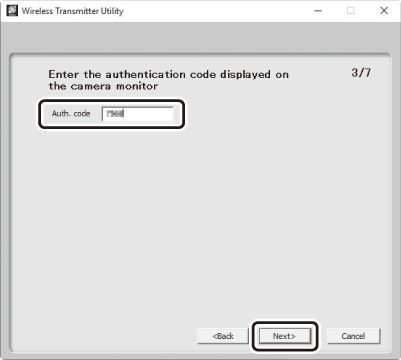
In the Wireless Transmitter Utility, enter the authentication code displayed by the camera.
-
The camera will display an authentication code.
-
Enter the authentication code in the dialog displayed by the Wireless Transmitter Utility and click [].
-
-
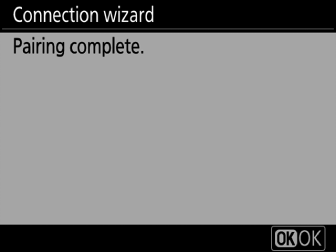
Complete the pairing process.
-
When the camera displays a message stating that pairing is complete, press J.
-
In the Wireless Transmitter Utility, click []; you will be prompted to choose a destination folder. For more information, see online help for the Wireless Transmitter Utility.
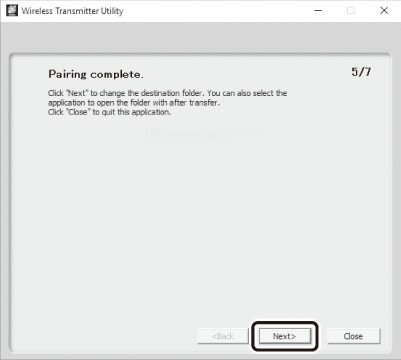
-
-
Exit the wizard.
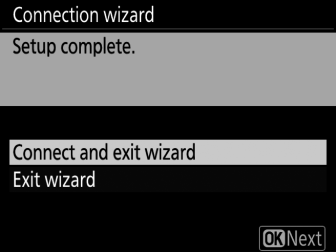
Highlight one of the following options and press J.
Option
Description
[]
Save the new network profile and connect to the server.
[]
Save the new network profile and exit.
Connection settings for the camera and computer are now complete.
Pictures taken with the camera can be uploaded to the computer as described in “Upload to Computers and FTP Servers” ( Upload to Computers and FTP Servers ).
For information on controlling the camera from a computer using Camera Control Pro 2, see “Camera Control” ( Camera Control ).
HTTP Server Mode
Follow the on-screen instructions to create a network profile.
-
In the setup menu, select [], then highlight [] and press 2.
The camera will display a list of network profiles.
-
Highlight [] and press 2.
-
You will be prompted to choose between the connection wizard and manual setup.
-
Note that [] will not be available if the profile list already contains nine profiles. Before creating a new profile, you must first delete an existing profile using the O (Q) button.
-
-
Highlight [] and press 2.
The connection wizard will start.
Manual ConfigurationChoose [] to adjust settings manually.
-
Choose a connection type.
Highlight [] and press J to display the default profile name.
-
Rename the new network profile.
-
To proceed to IP address selection without renaming the profile, press J.
-
The profile name will appear in the [] > [] list in the camera setup menu.
-
To rename the profile, press the center of the multi selector.
-
-
Obtain or select an IP address.
-
Highlight one of the following options and press J.
Option
Description
[]
Select this option if the network is configured to supply the IP address automatically. A “configuration complete” message will be displayed once an IP address has been assigned.
[]
Enter the IP address and sub-net mask manually.
-
Press the center of the multi selector to display a dialog where you can manually enter an IP address.
-
Rotate the main command dial to highlight segments.
-
Press 4 or 2 to change the highlighted segment and press the center of the multi selector to save changes.
-
Next, press J; a “configuration complete” message will be displayed. Press J again to display the sub-net mask.
-
Press 1 or 3 to edit the sub-net mask and press J; a “configuration complete” message will be displayed.
-
-
Press J to proceed when the “configuration complete” message is displayed.
-
-
Exit the wizard.
Highlight one of the following options and press J.
Option
Description
[]
Save the new network profile and connect to the server.
[]
Save the new network profile and exit.
Connection settings for the camera and computer are now complete.
You can now access and control the camera from a computer or smart device as described in “HTTP Server” ( HTTP Server ).
FTP Upload Mode
Follow the on-screen instructions to create a network profile.
-
In the setup menu, select [], then highlight [] and press 2.
The camera will display a list of network profiles.
-
Highlight [] and press 2.
-
You will be prompted to choose between the connection wizard and manual setup.
-
Note that [] will not be available if the profile list already contains nine profiles. Before creating a new profile, you must first delete an existing profile using the O (Q) button.
-
-
Highlight [] and press 2.
The connection wizard will start.
Manual ConfigurationChoose [] to adjust settings manually.
-
Select [].

The default profile name will be displayed when you press J.
-
Rename the new network profile.
-
To proceed to IP address selection without renaming the profile, press J.
-
The profile name will appear in the [] > [] list in the camera setup menu.
-
To rename the profile, press the center of the multi selector.
-
-
Obtain or select an IP address.
-
Highlight one of the following options and press J:
Option
Description
[]
Select this option if the network is configured to supply the IP address automatically. A “configuration complete” message will be displayed once an IP address has been assigned.
[]
Enter the IP address and sub-net mask manually.
-
Press the center of the multi selector to display a dialog where you can manually enter an IP address.
-
Rotate the main command dial to highlight segments.
-
Press 4 or 2 to change the highlighted segment and press the center of the multi selector to save changes.
-
Next, press J; a “configuration complete” message will be displayed. Press J again to display the sub-net mask.
-
Press 1 or 3 to edit the sub-net mask and press J; a “configuration complete” message will be displayed.
-
-
Press J to proceed when the “configuration complete” message is displayed.
-
-
Choose the server type.

Highlight [] or [] (secure ftp) and press J.
-
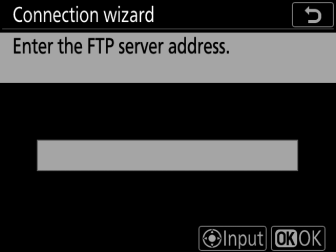
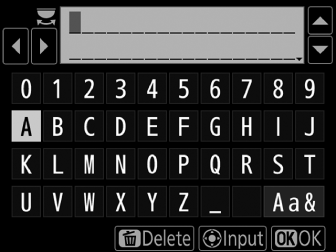
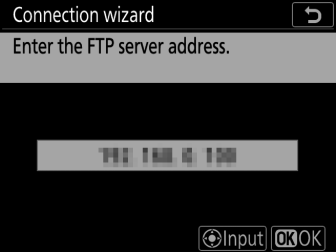
Enter the IP address.
-
Press the center of the multi selector and enter the server URL or IP address.
-
Press J when entry is complete.
-
Press J again to connect to the ftp server. You will be prompted to choose a login method.
-
-
Log in.
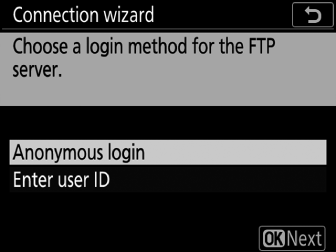
Highlight one of the following options and press J.
Option
Description
[]
Select this option if the server does not require a user ID or password. This option can only be used with servers that are configured for anonymous login. If login is successful, the camera will prompt you to choose a destination.
[]
Enter a user ID and password. Press J to log in when entry is complete. If login is successful, the camera will prompt you to choose a destination.
Firewall SettingsTCP ports 21 and 32768 through 61000 are used for [], TCP ports 22 and 32768 through 61000 for []. File transfer may be blocked if the server firewall is not configured to allow access to these ports.
-
Choose a destination folder.
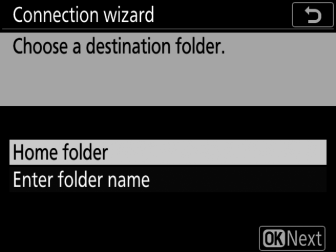
Highlight one of the following options and press J.
Option
Description
[]
Select this option to select the server’s home folder as the destination for pictures uploaded from the camera. A “setup complete” dialog will be displayed if the operation is successful.
[]
Enter the destination folder name manually. The folder must already exist on the server. Enter the folder name and path when prompted and press J to display the “setup complete” dialog.
-
Exit the wizard.
Highlight one of the following options and press J.
Option
Description
[]
Save the new network profile and connect to the server.
[]
Save the new network profile and exit.
Connection settings for the camera and ftp server are now complete.
You can now upload pictures as described in “Upload to Computers and FTP Servers” ( Upload to Computers and FTP Servers ).