Recording Movies
Movies can be recorded in live view.
-
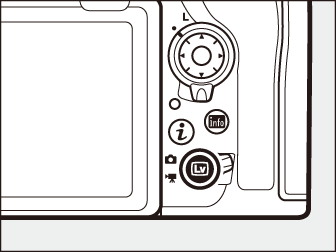
Rotate the live view selector to 1 (movie live view).
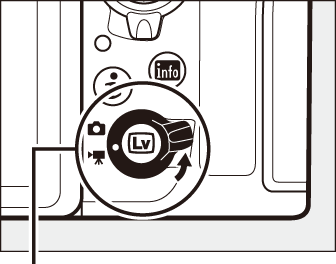
Live view selector
-
Press the a button.
The mirror will be raised and the view through the lens will be displayed in the camera monitor, modified for the effects of exposure. The subject will no longer be visible in the viewfinder.
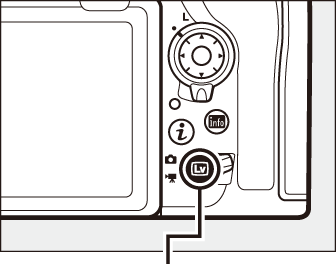
a button
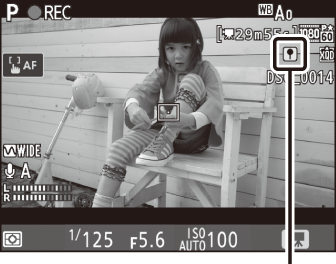
The 0 Icon
A 0 icon (0 The Live View Display) indicates that movies cannot be recorded.
White Balance
White balance can be set at any time by pressing the U button and rotating a command dial (0 White Balance Options).
-
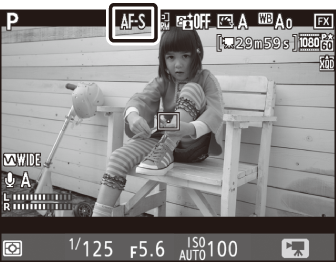
Choose a focus mode (0 Choosing a Focus Mode).
-
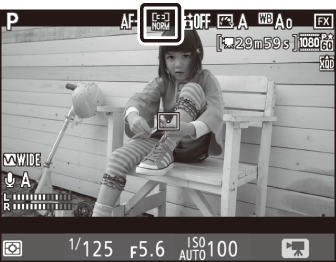
Choose an AF-area mode (0 Choosing an AF-Area Mode).
Pinpoint AF
Pinpoint AF is not available in movie mode.
-
Focus.
Frame the opening shot and press the AF-ON button to focus. Note that the number of subjects that can be detected in face-priority AF drops during movie recording.
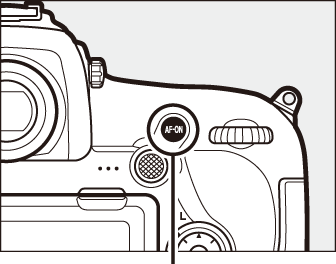
AF-ON button
Focusing
Focus can also be adjusted by pressing the shutter-release button halfway before beginning recording, or you can focus manually as described in “Manual Focus” (0 Manual Focus).
-
Start recording.
Press the movie-record button to start recording. A recording indicator and the time available are displayed in the monitor. Exposure can be locked by pressing the center of the sub-selector (0 Autoexposure (AE) Lock) or altered by up to ±3 EV using exposure compensation (0 Exposure Compensation); spot metering is not available. In autofocus mode, the camera can be refocused by pressing the AF-ON button or by tapping your subject in the monitor.
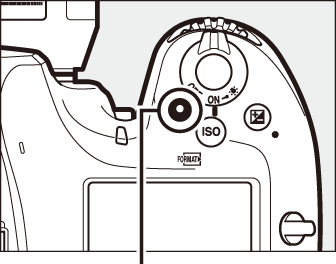
Movie-record button
Recording indicator
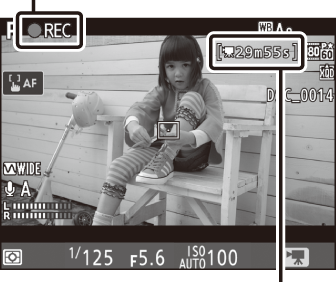
Time remaining
Audio
The camera can record both video and sound; do not cover the microphone on the front of the camera during movie recording. Note that the built-in microphone may record sounds made by the camera or lens during autofocus, vibration reduction, or changes to aperture.
-
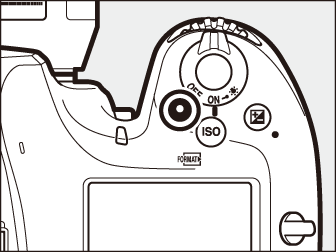
End recording.
Press the movie-record button again to end recording. Recording will end automatically when the maximum length is reached, or the memory card is full (note that depending on memory card write speed, shooting may end before the maximum length is reached).
-
Exit live view.
Press the a button to exit live view.
Exposure Mode
The following exposure settings can be adjusted in movie mode:
| Aperture | Shutter speed | ISO sensitivity | |
|---|---|---|---|
| P, S 1 | ー | ー | ー 2, 3 |
| A | ー | ー 2, 3 | |
| M | 3, 4 |
Exposure for mode S is equivalent to mode P.
The upper limit for ISO sensitivity can be selected using the ISO sensitivity settings > Maximum sensitivity option in the movie shooting menu (0 ISO Sensitivity Settings).
Regardless of the option chosen for ISO sensitivity settings > Maximum sensitivity or for ISO sensitivity (mode M), the upper limit when On is selected for Electronic VR in the movie shooting menu is ISO 25600.
If On is selected for ISO sensitivity settings > Auto ISO control (mode M) in the movie shooting menu, the upper limit for ISO sensitivity can be selected using the Maximum sensitivity option.
In exposure mode M, shutter speed can be set to values between 1/25 s and 1/8000 s (the slowest available shutter speed varies with the frame rate; 0 Frame Size, Frame Rate, and Movie Quality). In other exposure modes, shutter speed is adjusted automatically. If the subject is over- or under-exposed in mode P or S, end live view and start live view again or select exposure A and adjust aperture.
- Indices
- Using the i Button
- Image Area: Choosing a Movie Crop
- Frame Size, Frame Rate, and Movie Quality
- The Live View Display
- The Information Display
- Taking Photos in Movie Mode
Indices
If Index marking is assigned to a control using Custom Setting g1 (Custom control assignment, 0 Custom Control Assignment), you can press the selected control during recording to add indices that can be used to locate frames during editing and playback (0 Viewing Movies). Up to 20 indices can be added to each movie.
Index
See Also
For information on:
- Choosing the role played by the center of the multi selector, see A > Custom Setting f2 (Multi selector center button; 0 Multi Selector Center Button).
- Choosing the roles of the Fn1, Fn2, and Pv buttons and the center of the sub-selector, see A > Custom Setting g1 (Custom control assignment; 0 Custom Control Assignment).
- Choosing whether the shutter-release button can be used to start live view or to start and end movie recording, see A > Custom Setting g1 (Custom control assignment) > Shutter-release button (0 Custom Control Assignment).
- Preventing unintended operation of the a button, see A > Custom Setting f8 (Live view button options; 0 Live View Button Options).
Using the i Button
The options listed below can be accessed by pressing the i button in movie mode. Use the touch screen or navigate the menu using the multi selector and J button, pressing 1 or 3 to highlight items, 2 to view options, and J to select the highlighted option and return to the i-button menu. Press the i button again to exit to the shooting display.
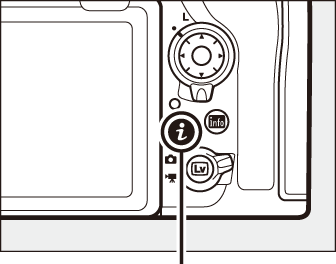
i button
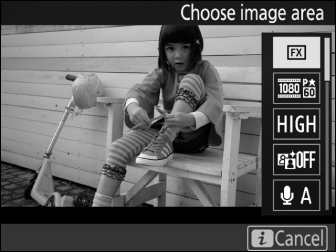
- Choose image area
- Choose image area for movies (0 Image Area: Choosing a Movie Crop).
- Frame size/frame rate
- Select a frame size and rate (0 Frame Size, Frame Rate, and Movie Quality).
- Movie quality
- Choose movie quality (0 Frame Size, Frame Rate, and Movie Quality).
- Active D-Lighting
- Adjust Active D-Lighting (0 Active D-Lighting). Not available when peaking level is displayed or at frame sizes of 1920 × 1080 (slow-mo) and 3840 × 2160 (0 Frame Size, Frame Rate, and Movie Quality).
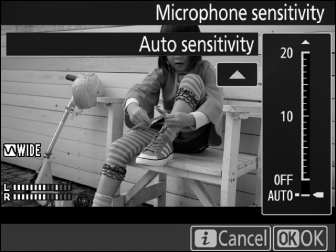
- Microphone sensitivity
-
Press 1 or 3 to adjust microphone sensitivity (0 Microphone sensitivity). Both the built-in and external microphones (0 Other Accessories) are affected.
- Attenuator
- Reduce microphone gain and prevent audio distortion when recording movies in loud environments.
- Frequency response
- Control the frequency response of the built-in or external microphones (0 Frequency Response).
- Wind noise reduction
- Enable or disable wind noise reduction using the built-in microphone’s low-cut filter (0 Wind Noise Reduction).
- Destination
- When two memory cards are inserted, you can choose the card to which movies are recorded (0 Destination).
- Monitor brightness
- Press 1 or 3 to adjust monitor brightness (note that this affects live view only and has no effect on photographs or movies or on the brightness of the monitor for menus or playback; 0 Using the i Button).
- Multi-selector power aperture
- Select Enable to enable power aperture. Press 1 to widen the aperture, 3 to narrow the aperture.
- Multi selector exposure comp.
- Selecting Enable allows exposure compensation to be set by pressing 1 or 3.
- Highlight display
-
If Pattern 1 or Pattern 2 is selected, shading will be used to indicate highlights (bright areas of the frame). The level of brightness needed to trigger the highlight display can be selected using Custom Setting g2 (Highlight brightness, 0 Highlight Brightness). Peaking level is disabled when highlights are displayed.
Highlights
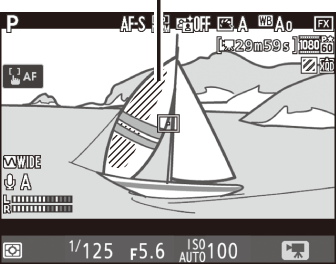
Pattern 1
Highlights
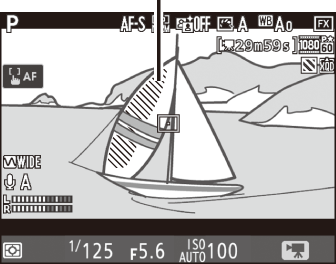
Pattern 2
- Headphone volume
- Press 1 or 3 to adjust headphone volume.
- Electronic VR
- Select On to enable electronic vibration reduction in movie mode. Not available at frame sizes of 1920 × 1080 (slow-mo) and 3840 × 2160 (0 Frame Size, Frame Rate, and Movie Quality). Note that if electronic vibration is on, Peaking level will be disabled, the angle of view will be reduced, and the edges of the frame will be cropped out.
- Peaking level
-
Choose whether objects that are in focus will be indicated by colored outlines while manual focus is in effect.
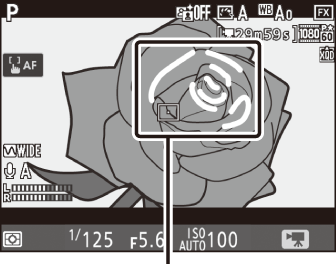
Area in focus
Choose from 3 (high sensitivity), 2 (standard), 1 (low sensitivity), and Off; the higher the setting, the greater the depth shown as being in focus. The peaking color can be changed using Custom Setting d8 (Peaking highlight color, 0 Peaking Highlight Color). Peaking is not available when highlight display is enabled or at frame sizes of 1920 × 1080 (slow-mo) and 3840 × 2160 (0 Frame Size, Frame Rate, and Movie Quality) or when Active D-Lighting (0 Active D-Lighting) or electronic vibration reduction is enabled.

Using an External Microphone
The optional ME-1 stereo microphone or ME-W1 wireless microphone can be used to record sound for movies (0 Other Accessories).
Headphones
Third-party headphones can be used. Note that high sound levels may result in high volume; particular care should be taken when headphones are used.
Image Area: Choosing a Movie Crop
You can choose an image area using the Image area > Choose image area option in the movie shooting menu. Select FX to shoot movies in what is referred to as “FX-based movie format”, DX to shoot in “DX-based movie format”. The differences between the two are illustrated below.
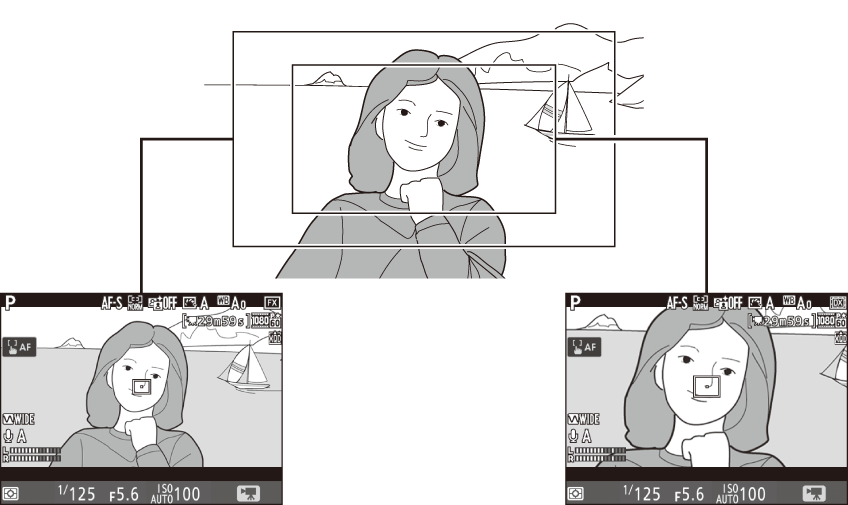
| FX | DX |
The sizes of the areas recorded are approximately 35.9 × 20.2 mm (FX-based movie format) and 23.5 × 13.2 mm (DX-based movie format). Movies shot with a DX-format lens and On selected for Image area > Auto DX crop (0 Automatic Crop Selection) in the movie shooting menu are recorded in DX-based movie format, as are all movies (regardless of the lens used or the option selected for Image area > Choose image area) with a frame size of 1920 × 1080 (slow-mo). Enabling electronic vibration reduction by selecting On for Electronic VR in the i-button menu reduces the size of the crop, slightly increasing the apparent focal length.
Frame Size, Frame Rate, and Movie Quality
The Frame size/frame rate option in the movie shooting menu is used to choose the movie frame size (in pixels) and frame rate. You can also choose from two Movie quality options: high and normal. Together, these options determine the maximum bit rate, as shown in the following table.
| Option 1 | Maximum bit rate (Mbps) ( high quality/Normal) |
Maximum length | |
|---|---|---|---|
| r | 3840 × 2160 (4K UHD); 30p 2 | 144 | 29 min. 59 s 3 |
| s | 3840 × 2160 (4K UHD); 25p 2 | ||
| t | 3840 × 2160 (4K UHD); 24p 2 | ||
| y/y | 1920 × 1080; 60p | 48/24 | |
| z/z | 1920 × 1080; 50p | ||
| 1/1 | 1920 × 1080; 30p | 24/12 | |
| 2/2 | 1920 × 1080; 25p | ||
| 3/3 | 1920 × 1080; 24p | ||
| 4/4 | 1280 × 720; 60p | ||
| 5/5 | 1280 × 720; 50p | ||
| A | 1920 × 1080; 30p ×4 (slow-mo) 4 | 36 |
Recording: 3 min. Playback: 12 min. |
| B | 1920 × 1080; 25p ×4 (slow-mo) 4 | ||
| C | 1920 × 1080; 24p ×5 (slow-mo) 4 | 29 |
Recording: 3 min. Playback: 15 min. |
Actual frame rate is 29.97 fps for values listed as 30p, 23.976 fps for values listed as 24p, and 59.94 fps for values listed as 60p.
When this option is selected, movie quality is fixed at “high”.
Each movie will be recorded across up to 8 files of up to 4 GB each. The number of files and the length of each file vary with the options selected for Frame size/frame rate and Movie quality.
See “Slow Motion Movies” (0 Slow-Motion Movies).
Slow-Motion Movies
To record silent slow-motion movies, select 1920×1080; 30p ×4 (slow-mo), 1920×1080; 25p ×4 (slow-mo), or 1920×1080; 24p ×5 (slow-mo) for Frame size/frame rate in the movie shooting menu. Movies recorded at 4 or 5 times the rated speed are played back at the rated speed for a slow-motion effect; for example, movies shot with 1920×1080; 30p ×4 (slow-mo) selected will be recorded at a frame of roughly 120 fps (120p) and play back at approximately 30 fps (30p).
| Frame size/frame rate | Frame rate * | |
|---|---|---|
| Recorded at | Plays back at | |
| 1920 × 1080; 30p ×4 (slow-mo) | 120p | 30p |
| 1920 × 1080; 25p ×4 (slow-mo) | 100p | 25p |
| 1920 × 1080; 24p ×5 (slow-mo) | 120p | 24p |
Actual frame rate is 119.88 fps for values listed as 120p, 29.97 fps for values listed as 30p, and 23.976 fps for values listed as 24p.
Slow-Motion Movies
When a slow-motion option is selected, quality is fixed at “normal” and the image area is fixed at DX, regardless of the lens used or the option selected for Image area > Choose image area in the movie shooting menu (0 Image Area). Movies shot with face-priority AF, pinpoint AF, or subject-tracking AF selected for AF-area mode (0 Choosing an AF-Area Mode) are recorded using wide-area AF.
The Live View Display
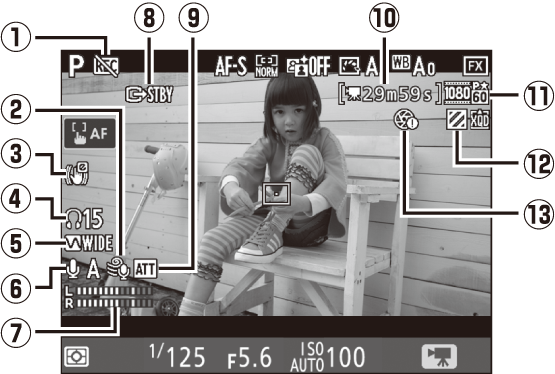
 “No movie” indicator
- Indicates that movies cannot be recorded.
 Wind noise reduction
- Displayed when wind noise reduction is on (0 Wind Noise Reduction).
 Electronic VR indicator
- Displayed when electronic vibration reduction is on (0 Electronic VR).
 Headphone volume
- Volume of audio output to headphones. Displayed when third-party headphones are connected.
 Frequency response
- The current frequency response (0 Frequency Response).
 Microphone sensitivity
- Microphone sensitivity (0 Microphone Sensitivity).
 Sound level
- Sound level for audio recording. Displayed in red if level is too high; adjust microphone sensitivity accordingly.
 HDMI recording indicator
- Displayed if movies are simultaneously being recorded to a device connected via HDMI.
 Attenuator indicator
- Displayed when the attenuator is enabled (0 Attenuator).
 Time remaining
- The recording time available for movies.
 Movie frame size
- The frame size for movie recording (0 Frame Size, Frame Rate, and Movie Quality).
 Highlight display indicator
- Displayed when highlight display is on.
 “No power aperture” indicator
- Indicates that power aperture is unavailable.
The Information Display
To hide or display indicators in the monitor, press the R button.
| Virtual horizon (0 Virtual Horizon) | Information on | Information off |
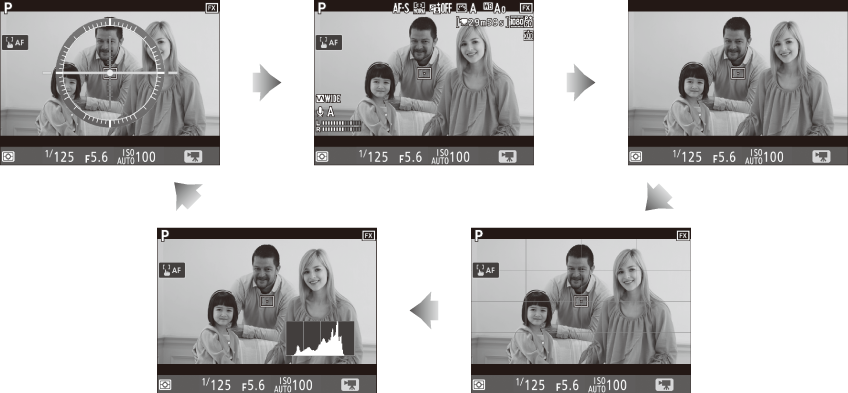
| Histogram | Framing guides |
The Count-Down Display
A count down will be displayed 30 s before live view ends automatically (0 The Live View Display). Depending on shooting conditions, the timer may appear immediately when movie recording begins. Note that regardless of the amount of recording time available, live view will still end automatically when the timer expires.
Adjusting Settings During Movie Recording
Headphone volume cannot be adjusted during recording. If an option other than I (microphone off) is currently selected, microphone sensitivity can be changed to any setting other than I while recording is in progress.
Taking Photos in Movie Mode
To take photos in movie mode (either in live view or during movie recording), select Take photos for Custom Setting g1 (Custom control assignment) > Shutter-release button (0 Custom Control Assignment). Photos with an aspect ratio of 16 : 9 can then be taken at any time by pressing the shutter-release button all the way down. If movie recording is in progress, recording will end and the footage recorded to that point will be saved.
Photographs are recorded in the format selected for Image quality in the photo shooting menu (0 Image Quality). For information on image size, see “Image Size” (0 Image Size). Note that the exposure for photographs cannot be previewed when the live view selector is rotated to 1; mode P, S, or A is recommended but accurate results can be achieved in mode M by previewing exposure with the live view selector rotated to C.
Image Size
The size of photos taken in movie mode varies with the image area (0 Image Area) and the option selected for Image size in the photo shooting menu (0 Image Size).
| Image area | Image size | Size (pixels) |
|---|---|---|
| FX | Large | 8256 × 4640 |
| Medium | 6192 × 3480 | |
| Small | 4128 × 2320 | |
| DX | Large | 5408 × 3040 |
| Medium | 4048 × 2272 | |
| Small | 2704 × 1520 |
Recording Movies
Movies are recorded in the sRGB color space. Flicker, banding, or distortion may be visible in the monitor and in the final movie under fluorescent, mercury vapor, or sodium lamps or with subjects that are in motion, particularly if the camera is panned horizontally or an object moves horizontally at high speed through frame (for information on reducing flicker and banding, see the section on the movie shooting menu Flicker reduction option, 0 Flicker Reduction). Flicker may also appear while power aperture is in use. Jagged edges, color fringing, moiré, and bright spots may also appear. Bright regions or bands may appear in some areas of the frame with flashing signs and other intermittent light sources or if the subject is briefly illuminated by a strobe or other bright, momentary light source. When recording movies, avoid pointing the camera at the sun or other strong light sources. Failure to observe this precaution could result in damage to the camera’s internal circuitry. Note that noise (randomly-spaced bright pixels, fog, or lines) and unexpected colors may appear if you zoom in on the view through the lens (0 Live View Zoom Preview) in movie mode.
Flash lighting cannot be used.
Recording ends automatically if the lens is removed or the live view selector is rotated to a new setting.
Wireless Remote Controllers and Remote Cords
If Record movies is selected for Custom Setting g1 (Custom control assignment) > Shutter-release button (0 Custom Control Assignment), the shutter-release buttons on optional wireless remote controllers and remote cords (0 Other Accessories) can be pressed halfway to start live view or pressed all the way down to start and end movie recording.