Picture Controls
Selecting a Picture Control
Choose a Picture Control according to the subject or type of scene.
-
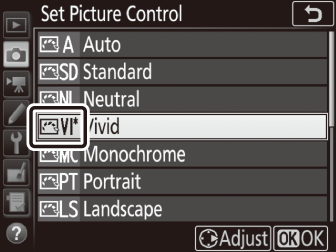
Press L (Z/Q).
A list of Picture Controls will be displayed.

L (Z/Q) button
-
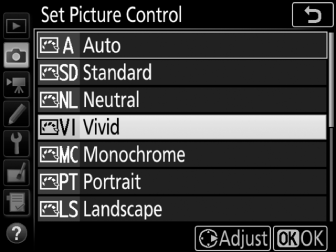
Select a Picture Control.
Highlight the desired Picture Control and press J.
Custom Picture Controls
Custom Picture Controls are created through modifications to existing Picture Controls using the Manage Picture Control option in the photo or movie shooting menu (0 Manage Picture Control, Manage Picture Control). Custom Picture Controls can be saved to a memory card for sharing among other cameras of the same model and compatible software.
The Picture Control Indicator
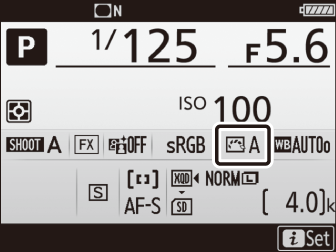
The current Picture Control is shown in the information display when the R button is pressed.
The Shooting Menus
Picture Controls can also be selected using the Set Picture Control option in the photo or movie shooting menu (0 Set Picture Control, Set Picture Control).
Modifying Picture Controls
Existing preset or custom Picture Controls (0 Custom Picture Controls) can be modified to suit the scene or the user’s creative intent. Choose a balanced combination of settings using Quick adjust, or make manual adjustments to individual settings.
-
Select a Picture Control.
Highlight the desired Picture Control in the Picture Control list (0 Selecting a Picture Control) and press 2.
-
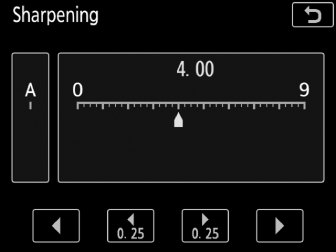
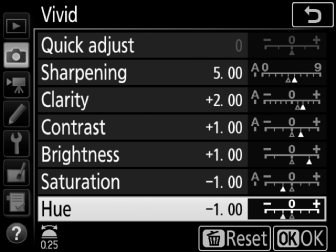
Adjust settings.
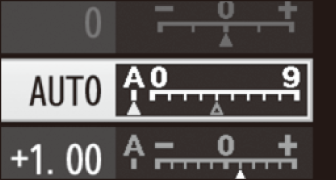
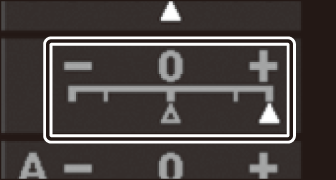
Press 1 or 3 to highlight the desired setting and press 4 or 2 to choose a value in increments of 1, or rotate the sub-command dial to choose a value in increments of 0.25 (0 Picture Control Settings; the options available vary with the Picture Control selected). Repeat this step until all settings have been adjusted, or select a preset combination of settings by highlighting Quick adjust and pressing 4 or 2. Default settings can be restored by pressing the O (Q) button.
-
Press J.
Modifications to Original Picture Controls
Picture Controls that have been modified from default settings are indicated by an asterisk (“U”) in the Set Picture Control menu.
Picture Control Settings
Quick adjust
Mute or heighten the effect of the selected Picture Control (note that this resets all manual adjustments). Not available with custom Picture Controls (0 Custom Picture Controls).
Manual adjustments
The “n Auto” Picture Control
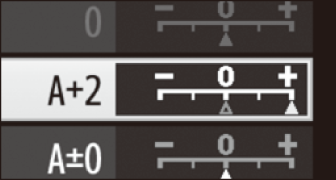
If n Auto is selected for Set Picture Control, settings can be adjusted in the range A-2 to A+2. Rotating the sub-command dial has no effect.
“A” (Auto)
Results for auto sharpening, clarity, contrast, and saturation vary with exposure and the position of the subject in the frame. Use a type G, E, or D lens for best results.
Switching Between Manual and Auto
Press the X button to switch back and forth between manual and auto (A) settings for sharpening, clarity, contrast, and saturation.
Previous Settings
The j indicator under the value display in the Picture Control setting menu indicates the previous value for the setting. Use this as a reference when adjusting settings.
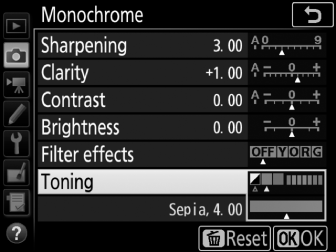
Filter Effects (Monochrome Only)
The options in this menu simulate the effect of color filters on monochrome photographs. The following filter effects are available:
| Option | Description | |
|---|---|---|
| Y | Yellow | Enhances contrast. Can be used to tone down the brightness of the sky in landscape photographs. Orange produces more contrast than yellow, red more contrast than orange. |
| O | Orange | |
| R | Red | |
| G | Green | Softens skin tones. Can be used for portraits. |
Toning (Monochrome Only)
Pressing 3 when Toning is selected displays saturation options. Press 4 or 2 to adjust saturation. Saturation control is not available when B&W (black-and-white) is selected.
Touch Controls
Tapping the indicator displays touch controls that can be used to adjust Picture Control settings.