Using the i Button
The options listed below can be accessed by pressing the i button during live view photography. Use the touch screen or navigate the menu using the multi selector and J button, pressing 1 or 3 to highlight items, 2 to view options, and J to select the highlighted option and return to the i-button menu. Press the i button again to exit to the shooting display.
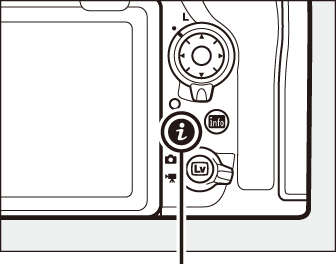
i button
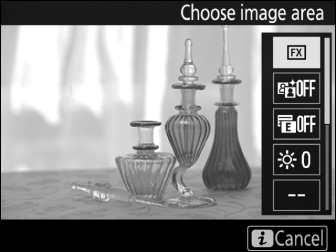
- Choose image area
- Choose an image area for live view photography (0 Image Area).
- Active D-Lighting
- Adjust Active D-Lighting (0 Active D-Lighting).
- Electronic front-curtain shutter
- Enable or disable the electronic front-curtain shutter for mirror-up photography (0 Electronic Front-Curtain Shutter).
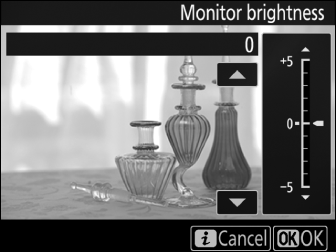
- Monitor brightness
-
Press 1 or 3 to adjust monitor brightness for live view (note that this affects live view only and has no effect on photographs or movies or on the brightness of the monitor for menus or playback; to adjust the brightness of the monitor for menus and playback, use the Monitor brightness option in the setup menu; 0 Monitor Brightness).
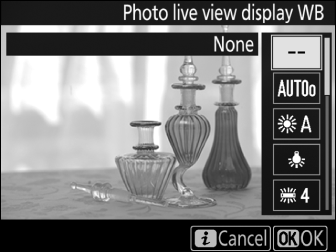
- Photo live view display WB
-
During live view photography, the white balance (hue) of the monitor can be set to a value different from that used for photographs (0 White Balance Options). This can be effective if the lighting under which shots are framed is different from that used when the photographs are taken, as is sometimes the case when a flash or preset manual white balance is used. Adjusting the photo live view display white balance to produce a similar effect to that used for the actual photographs makes it easier to picture the results. To use the same white balance for both the view in the monitor and the photograph, select None. Monitor white balance is reset when the camera is turned off, but the last value used can be selected by pressing the a button while pressing and holding the U button.
- Split-screen display zoom
-
View two separate areas of the frame side-by-side (0 Split-Screen Display Zoom). This option can be used, for example, to align buildings with the horizon.
- Silent live view photography
- Eliminate the sound made by the shutter when photos are taken (0 Silent Live View Photography).
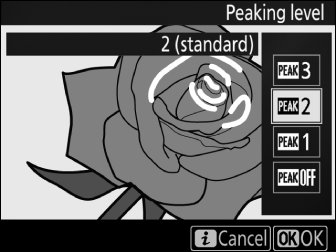
- Peaking level
-
Objects that are in focus are indicated by colored outlines, including during focus zoom (0 Live View Zoom Preview). Choose from 3 (high sensitivity), 2 (standard), 1 (low sensitivity), and Off; the higher the setting, the greater the depth shown as being in focus. The peaking color can be changed using Custom Setting d8 (Peaking highlight color, 0 Peaking Highlight Color).
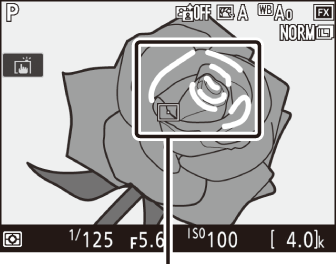
Area in focus
- Negative digitizer
- Create positives from color or black-and-white film negatives (0 Negative Digitizer).
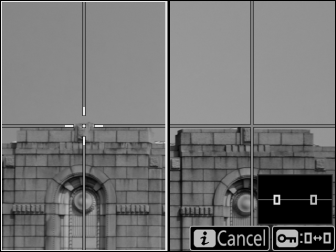
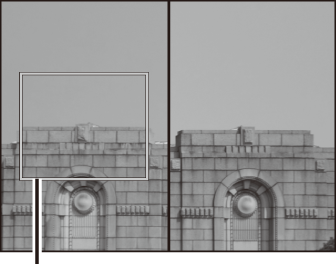
Split-Screen Display Zoom
Selecting Split-screen display zoom in the live view photography i button menu splits the display into two boxes showing separate areas of the frame side-by-side at a high zoom ratio. The positions of the magnified areas are shown in the navigation window.
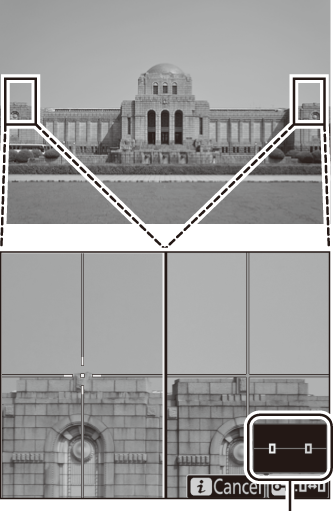
Navigation window
Use the X and W (M) buttons to zoom in and out, or use the L (Z/Q) button to select a box and press 4 or 2 to scroll the selected area left or right. Pressing 1 or 3 scrolls both areas up or down simultaneously. To focus on the subject at the center of the selected area, press the shutter-release button halfway. To exit the split-screen display, press the i button.
Area in focus
Silent Live View Photography
To eliminate shutter sounds during live view photography, press the i button and select On (Mode 1) or On (Mode 2) for Silent live view photography.
Silent Live View Photography
Multiple exposure photography (0 Multiple Exposure) and long-exposure noise reduction are disabled (0 Long Exposure NR) and the flash cannot be used. In continuous release modes, focus and exposure are fixed at the values for the first shot in each series. Flicker or banding may be visible in the monitor and in photographs under fluorescent, mercury vapor, or sodium lamps (for information on reducing flicker and banding, see the section on the movie shooting menu Flicker reduction option, 0 Flicker Reduction), while subjects in motion may appear distorted, particularly if the camera is panned horizontally or an object moves horizontally at high speed through the frame. Jagged edges, color fringing, moiré, and bright spots may also appear. Bright regions or bands may appear in scenes lit by flashing signs and other intermittent light sources or if the subject is briefly illuminated by a strobe or other bright, momentary light source.
The amount of time you can continue shooting is shown in place of the number of exposures remaining.
Silent live view photography can also be enabled or disabled using the Silent live view photography option in the photo shooting menu (0 Silent Live View Photography).
Camera Sounds
The sound of the camera focusing may be audible, as may the sound of the aperture mechanism when you adjust aperture in mode A or M or take pictures in mode P or S.
Custom Setting d11
If On is selected for Custom Setting d11 (Live view in continuous mode, 0 Live View in Continuous Mode) when On (Mode 1) is chosen for Silent live view photography, the monitor will briefly go dark when the shutter is released and then turn back on to display the picture. When On (Mode 2) is selected, pictures will not be displayed as they are taken; instead, a C icon will appear in the monitor when a picture is taken (during burst photography, the icon will flash).
“On (Mode 2)”
The following exposure settings can be adjusted when On (Mode 2) is selected:
| Aperture | Shutter speed | ISO sensitivity 3 | |
|---|---|---|---|
| P, S 1 | ー | ー | ー |
| A | ー | ー | |
| M | 2 |
Exposure for mode S is equivalent to mode P.
Choose from speeds of from 1/30 s to 1/8000 s.
In mode M, ISO sensitivity can be set manually to values of from Lo 1 to 25600 or adjusted automatically by the camera. In other exposure modes, ISO sensitivity is adjusted automatically by the camera.
Exposure compensation can be used to alter exposure by up to ±3 EV. Exposure can be previewed in the monitor. Pressing J will display an exposure indicator (0 Exposure Indicators) showing the difference between the selected and metered exposure values; to hide the indicator, press J again.
On (Mode 2) cannot be combined with some camera features, including flexible program (0 Flexible Program), bracketing (0 Bracketing), Active D-Lighting (0 Active D-Lighting), HDR (high dynamic range; 0 High Dynamic Range (HDR)), vignette control (0 Vignette Control), auto distortion control (0 Auto Distortion Control), exposure delay mode (0 Exposure Delay Mode), and the Clarity Picture Control parameter (0 Picture Control Settings). If RAW primary - JPEG secondary is selected for Secondary slot function in the photo shooting menu, JPEG images will be recorded to the cards in both slots.
“On (Mode 2)” and Photo Info
The photo info for pictures taken with On (Mode 2) selected for Silent live view photography and white balance set to v (auto) does not include color temperature (0 Shooting Data).
Negative Digitizer
To record positives of copies of film negatives, press the i button and select Color negatives or Monochrome negatives for Negative digitizer.
-
Position the negatives in front of a featureless white or gray background.
We recommend using an AF-S Micro NIKKOR 60mm f/2.8G ED or other micro lens and either natural light or an artificial light source with a high Ra (color rendering index), such as a light box or a high-CRI fluorescent lamp.
-
In live view, press the i button, highlight Negative digitizer, and press 2.
The colors in the display will be reversed. The flash mode is automatically set to s; to use a flash, choose a different flash mode.
-
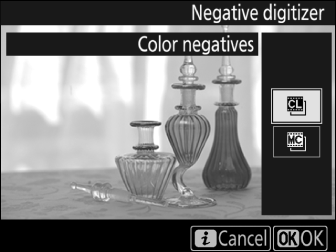
Choose the film type.
Highlight Color negatives or Monochrome negatives and press J.
-
Compose the shot to capture a frame of the film negative.
-
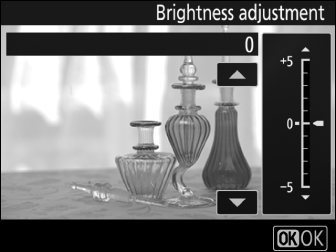
Adjust exposure.
Press J to display brightness adjustment options and press 1 or 3 to adjust exposure. To view your subject at a higher magnification, press X (0 Live View Zoom Preview). Press J to proceed.
-
Take the photograph.
Press the shutter-release button all the way down to take the photograph and save it in JPEG format.
Negative Digitizer
No options are available for correcting dust, scratches, or uneven colors due to faded film. Photos are saved in JPEG format regardless of the option selected for image quality; photos taken with a JPEG option selected will be saved at the chosen setting, while photos taken with NEF (RAW) or TIFF (RGB) selected will be saved in JPEG fine format. Some menu items and features, including bracketing and focus shift, are unavailable. Exposure mode is set to A and cannot be changed.