Connections
- Installing NX Studio
- Copying Pictures to a Computer Using NX Studio
- Ethernet and Wireless Networks
- Printing Photographs
- Viewing Photographs on TV
Installing NX Studio
You will need an Internet connection when installing NX Studio. Visit the Nikon website for the latest information, including system requirements.
- Download the latest NX Studio installer from the website below and follow the on-screen instructions to complete installation.
https://downloadcenter.nikonimglib.com/ - Note that you may be unable to download pictures from the camera using earlier versions of NX Studio.
Copying Pictures to a Computer Using NX Studio
See online help for detailed instructions.
-
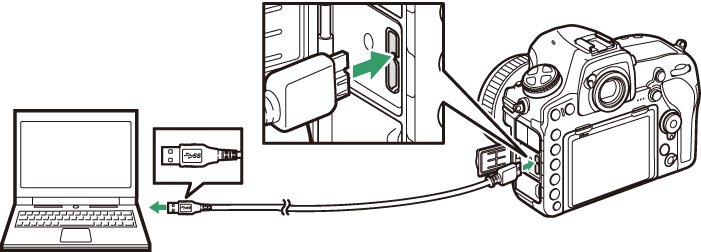
Connect the camera to the computer.
After turning the camera off and ensuring that a memory card is inserted, connect the supplied USB cable as shown.
Using a Card Reader
Pictures can also be copied from a memory card inserted in a third-party card reader. You should however check that the card is compatible with the card reader.
-
Turn the camera on.
- The Nikon Transfer 2 component of NX Studio will start. Nikon Transfer 2 image transfer software is installed as part of NX Studio.
- If a message is displayed prompting you to choose a program, select Nikon Transfer 2.
- If Nikon Transfer 2 does not start automatically, launch NX Studio and click the “Import” icon.
-
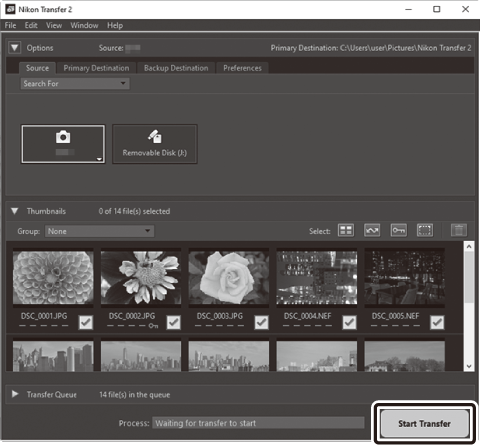
Click Start Transfer.
Pictures on the memory card will be copied to the computer.
-
Turn the camera off.
Disconnect the USB cable when transfer is complete.
Windows 10 and Windows 8.1
Windows 10 and Windows 8.1 may display an AutoPlay prompt when the camera is connected.
![]()
Click the dialog and then click Nikon Transfer 2 to select Nikon Transfer 2.
![]()
macOS
If Nikon Transfer 2 does not start automatically, confirm that the camera is connected and then launch Image Capture (an application that comes with macOS) and select Nikon Transfer 2 as the application that opens when the camera is detected.
Caution: Transferring Videos
Do not attempt to transfer videos from the memory card while it is inserted in a camera of a different make or model. Doing so could result in the videos being deleted without being transferred.
Cautions: Connecting to Computers
- Do not turn the camera off or disconnect the USB cable while transfer is in progress.
- Do not use force or attempt to insert the connectors at an angle. Be sure also to keep the connectors straight when disconnecting the cable.
- Always turn the camera off before connecting or disconnecting a cable.
- To ensure that data transfer is not interrupted, be sure the camera battery is fully charged.
USB Hubs
Connect the camera directly to the computer; do not connect the cable via a USB hub or keyboard. Connect the camera to a pre-installed USB port.
Ethernet and Wireless Networks
When connected to the camera via the supplied USB cable, the optional WT-7 wireless transmitter (0 Other Accessories) can be used for connection to computers or ftp servers over wireless or Ethernet networks.
Mode Selection
The following modes are available when the camera is connected to a network using an optional WT-7 wireless transmitter:
For information on using optional wireless transmitters, refer to the manuals provided with the device. Be sure to update all related software to the latest versions.
During Transfer
Features unavailable during transfer (either while images are being transferred via Ethernet or wireless networks or while images remain to be sent) include:
- Movie recording and playback
- Silent live view photography > On (Mode 2) in the photo shooting menu (0 Silent Live View Photography)
Movies
Movies can be uploaded in transfer mode if the camera is connected to an Ethernet or a wireless network and Auto send or Send folder is not selected for Network > Options.
HTTP Server Mode
Features unavailable in http server mode include:
- On-camera movie recording and playback
- Silent live view photography > On (Mode 2) in the photo shooting menu (0 Silent Live View Photography)
Send Folder
If the folder selected for Network > Options > Send folder in the setup menu contains more than 1000 files, only the first 1000 (starting from the lowest file number) will be uploaded to the destination.
Wireless Transmitters
The principal differences between the WT-7 and WT-7A/B/C are in the number of channels supported; unless otherwise stated, all references to the WT-7 also apply to the WT-7A/B/C.
Printing Photographs
Selected JPEG images can be printed on a PictBridge printer connected directly to the camera.
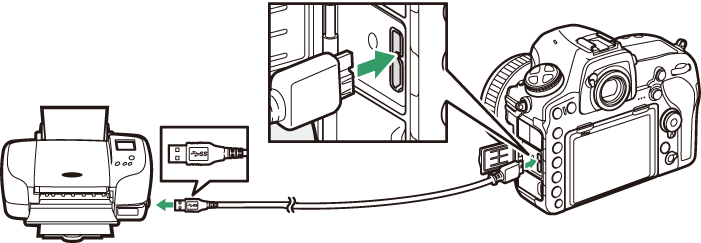
Connecting the Printer
Connect the camera using the supplied USB cable. Do not use force or attempt to insert the connectors at an angle.
When the camera and printer are turned on, a welcome screen will be displayed in the monitor, followed by a PictBridge playback display.
Selecting Photographs for Printing
Images created at image quality settings of NEF (RAW) or TIFF (RGB) (0 Image Quality) cannot be selected for printing. JPEG copies of NEF (RAW) images can be created using the NEF (RAW) processing option in the retouch menu (0 NEF (RAW) Processing).
Printing Via Direct USB Connection
Be sure the battery is fully charged or use an optional AC adapter and power connector. When taking photographs to be printed via direct USB connection, set Color space to sRGB (0 Color Space).
Printing Pictures One at a Time
-
Display the desired picture.
Press 4 or 2 to view additional pictures. Press the X button to zoom in on the current frame (press K to exit zoom). To view six pictures at a time, press the W (M) button. Use the multi selector to highlight pictures, or press the X button to display the highlighted picture full frame. To view images in other locations, press W (M) when thumbnails are displayed and select the desired card and folder.
-
Adjust printing options.
Press J to display the following items, then press 1 or 3 to highlight an item and press 2 to view options (only options supported by the current printer are listed; to use the default option, select Printer default). After selecting an option, press J to return to the printer settings menu.
-
Start printing.
Select Start printing and press J to start printing. To cancel before all copies have been printed, press J.
Printing Multiple Pictures
-
Display the PictBridge menu.
Press the G button in the PictBridge playback display.
-
Choose an option.
Highlight one of the following options and press 2.
- Print select: Select pictures for printing. Use the multi selector to highlight pictures (to view images in other locations, press W (M) and select the desired card and folder; to display the current picture full screen, press and hold the X button) and, keeping the L (Z/Q) button pressed, press 1 or 3 to choose the number of prints (maximum 99). To deselect a picture, set the number of prints to zero.
- Index print: To create an index print of all JPEG pictures on the memory card, proceed to Step 3. Note that if the memory card contains more than 256 pictures, only the first 256 images will be printed. A warning will be displayed if the page size selected in Step 3 is too small for an index print.
-
Adjust printing options.
Adjust printer settings as described in Step 2 of “Printing Pictures One at a Time” (0 Printing Pictures One at a Time).
-
Start printing.
Select Start printing and press J to start printing. To cancel before all copies have been printed, press J.
Viewing Photographs on TV
The optional High-Definition Multimedia Interface (HDMI) cable (0 Other Accessories) or a type C HDMI cable (available separately from third-party suppliers) can be used to connect the camera to high-definition video devices. Always turn the camera off before connecting or disconnecting an HDMI cable.
Connect to camera
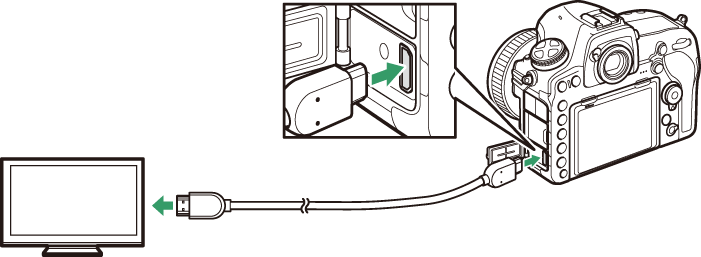
Connect to high-definition device
(choose cable with connector for HDMI device)
Tune the device to the HDMI channel, then turn the camera on and press the K button. During playback, images will be displayed on the television screen. Volume can be adjusted using television controls; the camera controls cannot be used.
HDMI Options
The HDMI option in the setup menu (0 HDMI) controls output resolution and other advanced HDMI options.
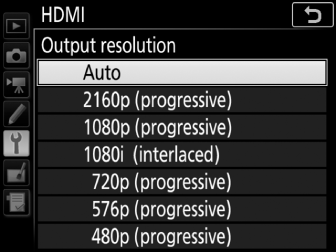
Output Resolution
Choose the format for images output to the HDMI device. If Auto is selected, the camera will automatically select the appropriate format.
External Recording Control
Enabling external recording control allows camera controls to be used to start and stop recording when the camera is connected via HDMI to a third-party recorder that supports the Atomos Open Protocol (Atomos SHOGUN, NINJA, or SUMO-series Monitor recorders). An icon will be displayed in the camera monitor: A is displayed in movie live view, while B is displayed during movie recording (note camera controls cannot be used for movie recording when 3840 × 2160 or 1920 × 1080 slow-mo is selected for frame size; use the controls on the recorder). During recording, check the recorder and recorder display to ensure that footage is being saved to the device. Note that depending on the recorder, you may need to adjust recorder settings; for more information, see the manual provided with the recorder.
Advanced
Television Playback
Use of an AC adapter and power connector (available separately) is recommended for extended playback. If the edges of photographs are not visible in the television display, select 95% for HDMI > Advanced > Output display size (0 Advanced).
Slide Shows
The Slide show option in the playback menu can be used for automated playback (0 Slide Show).
Dual Monitor
Regardless of the option chosen for Dual monitor, images will not be displayed in the camera monitor if On (Mode 2) is selected for Silent live view photography in the photo shooting menu (0 Silent Live View Photography).
Using Third-Party Recording Devices
The following settings are recommended when using third-party recorders:
- HDMI > Advanced > Output display size: 100%
- HDMI > Advanced > Live view on-screen display: Off