Choose the items listed in the i menu displayed when the i button is pressed during live view. For information on customizing the i menu, see “Customizing the i Menu: Customize i Menu” ( Customizing the i Menus: Customize i Menu ).
|
Item |
0 |
|
|---|---|---|
|
J |
[] |
|
|
8 |
[] |
|
|
o |
[] |
|
|
E |
[] |
|
|
9 |
[] |
Adjusting the Camera’s Sensitivity to Light (ISO Sensitivity) |
|
m |
[] |
Achieving Natural Colors with Different Light Sources (White Balance) |
|
h |
[] |
|
|
p |
[] |
|
|
y |
[] |
|
|
$ |
[] |
|
|
% |
[] |
|
|
w |
[] |
|
|
N |
[] |
|
|
Y |
[] |
|
|
m |
[] |
|
|
D |
[] |
|
|
t |
[] |
|
|
t |
[] |
Varying Exposure or White Balance over a Series of Photographs (Bracketing) |
|
$ |
[] |
Combining Multiple Exposures in a Single Photo (Multiple Exposure) |
|
2 |
[] |
|
|
7 |
[] |
|
|
8 |
[] |
|
|
9 |
[] |
Varying Focus over a Series of Photos (Focus Shift Shooting) |
|
L |
[] |
|
|
w |
[] |
|
|
z |
[] |
|
|
x |
[] |
|
|
W |
[] |
|
|
3 |
[] |
|
|
k |
[] |
|
|
Z |
[] |
|
|
U |
[] |
|
|
j |
[] |
|
|
z |
[] |
|
Photo Live View Display WB
In live view, white balance for the monitor (monitor hue) can be set separately from the white balance for photography (photographic white balance). Hues in the monitor may differ from those in pictures taken with an option such as [] or [] selected for photographic white balance. Matching monitor hue to photographic white balance gives you a more accurate preview of how pictures will turn out.
|
Option |
Description |
|---|---|
|
[] |
Monitor hue matches photographic white balance. |
|
[] |
The monitor uses [] white balance. |
|
[] |
Choose a color temperature for the monitor display. |
Monitor white balance is reset when the camera is turned off.
Split-Screen Display Zoom
Display two areas, aligned horizontally but in different parts of the frame, side-by-side
at a high zoom ratio. This makes it easier to level photographs of buildings or other
wide objects. Selecting this option splits the display into two boxes arranged side-by-side
showing the two areas at a high zoom ratio (split-screen display zoom). The boxes
display magnified views of the areas indicated by the frames (r) in the navigation window.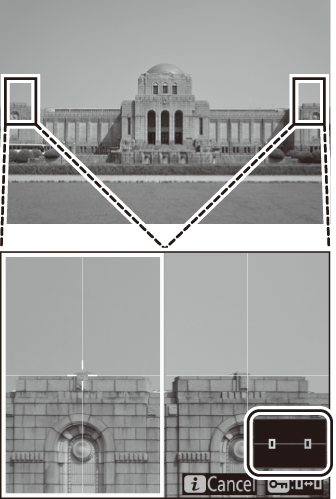
-
Use the X and W (M) buttons to zoom in and out.
-
Press 4 or 2 to scroll the selected area left or right. Use the g (h/Q) button to select a box.
-
Press 1 or 3 to scroll both areas up or down simultaneously.
-
To focus on the subject at the center of the selected area, press the shutter-release button halfway.
-
To exit split-screen display zoom, press the i button.